A Comprehensive Guide to Implementing Cucumber BDD Framework in IntelliJ IDE
- Meenaa Kannan
- May 5, 2025
- 14 min read
Updated: May 9, 2025
This blog explains how to implement a Cucumber BDD framework from scratch in IntelliJ IDEA, with integrated reporting using Extent Reports and Allure Reports.
Before we dive into the framework setup, let’s take a moment to understand what Cucumber is and why it's used in behavior-driven development (BDD).
Cucumber: Cucumber is a behavioral testing tool used to implement BDD (Behavior-Driven Development). It allows teams to write tests in plain language using Gherkin syntax, making it easier for both technical and non-technical stakeholders to understand and collaborate on test scenarios. Please refer to this link for more detailed information about Cucumber BDD.
Now, let's start creating the project in IntelliJ IDEA. Please refer to this link for instructions on how to download and install IntelliJ IDEA on your local system.
Before proceeding, make sure that Java and Maven are installed on your system, and verify that the environment variables are properly set. Press the Windows + R shortcut keys to open the Run dialog, then type ‘sysdm.cpl’ and press Enter to open the System Properties window

In the System Properties window, click the Advanced tab, then click the Environment variables. Check you have the JAVA_HOME, Maven_Home paths added under the System variables. If it's not added please add that here and set path accordingly.

Steps to Implement the project in IntelliJ :
Step 1:
Launch IntelliJ IDEA on your system. First, install the "Cucumber for Java" plugin from the settings, which you can access from the top-right corner of the interface. After installing the Cucumber for Java plugin, let’s create a new Maven project to start building our automation framework.
Then Click the File —> New —> Project from the Main menu.

When you click this, a new window will pop up where you need to enter the project name and project location. By default, it will create a folder named ~IdeaProjects, and inside that, it will create a folder for your project, but you can choose a different location if you prefer. Select "Create Git repository" to connect the project to GitHub. Choose Maven as the build system. The JDK version will be selected automatically. Unselect 'Add sample code. Then, click 'Create'. Your Maven project will be created with Git initialized.

IntelliJ will generate a project structure and open the pom.xml file initially

In the pom.xml add the following dependencies and plugins. (This is what I have used for this project, You can use whatever dependencies you want as per your requirement)
cucumber-java
cucumber-testng
selenium-java
commons-io
extentreports-cucumber7-adapter
extentreports
webdrivermanager
poi
poi-ooxml
testng
allure-cucumber-jvm
maven-surefire-plugin
After adding the dependencies in the pom.xml press Ctrl+Shift+O.
It will download all the required External libraries. The Initial project structure will look like this.

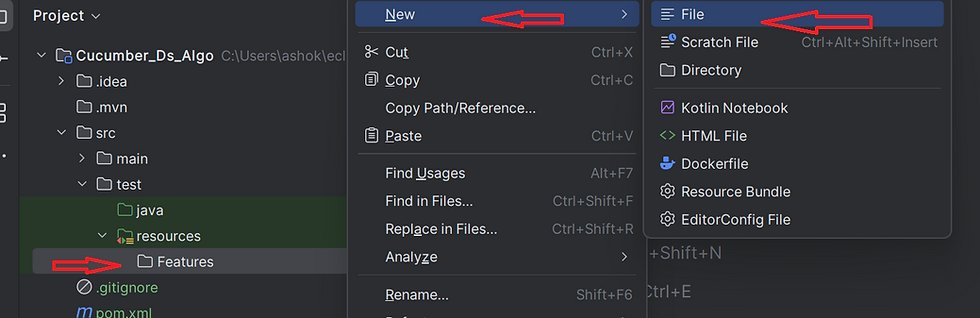
Step 2: Create Feature file and write feature.
We need to create feature files in the src/test/resources folder. For that we need to create a directory under the project and name it as src/test/resources and click finish. Please refer screenshot below,


After clicking enter, the project structure will look like below

Under src/test/resources, create a folder named features. For this example, I’m using the Graph feature from our DS Algo project for testing. Inside the features folder, create a new file named Graph.feature. This file will be used to test user navigation to the Graph Data Structure page.
Refer below screenshot.


Next,

Refer this link for more details about the feature file in cucumber.
Example of Feature file.
@Regression
Feature: Graph Datastructure
Background: The user sign in to dsAlgo Portal
@Graph1
Scenario: Verify that user is able to navigate to Graph data structure page
Given The user is in the Home page after Sign in with valid credentials.
When The user clicks the Getting Started button in Graph Panel
Then The user should be directed to Graph Data Structure Page
@Graph2
Scenario: Verify that user is able to navigate to Graph Data Structures page
Given The user is in the Home page after Signed in.
When The user selects Graph item from the drop down menu.
Then The user should land in Graph Data Structure Page
@Graph3
Scenario: Verify that user is able to navigate to Graph page of Graph-Data structures page
Given The user is in the Graph data structure page after Sign in
When The user clicks Graph link
Then The user should be redirected to Graph page of Graph-Data structures
@Graph4
Scenario: Verify that user is able to navigate to Try Editor page of Graph
Given The user is on the Graph page
When The user clicks Try Here button in Graph page
Then The user should be redirected to a page having a Try Editor with a Run button to test
@Graph5
Scenario: Verify that user receives an error when clicking on Run button without entering code in Graph Try Editor page
Given The user is in the Try Editor page
When The user clicks the Run button without entering the code in the Editor
Then The user should see an error message in an alert window
@Graph6
Scenario Outline: Verify that user receives an error for invalid Python code read from "<SheetName>" and <RowNumber> in Graph Page
Given The user is in the Try Editor page
When The user reads the invalid python code from excel "<SheetName>" and <RowNumber> and enters in the Editor and clicks on Run button
Then The user should see an error message in an alert window
Examples:
| SheetName | RowNumber |
| pythonCode | 1 |
@Graph7
Scenario Outline: Verify that user is able to see output for valid Python code from "<SheetName>" and <RowNumber> in Graph Page
Given The user is in the Try Editor page
When The user reads the valid python code from excel "<SheetName>" and <RowNumber> and enters in the Editor and clicks on Run button
Then The user should see output in the Output console
Examples:
| SheetName | RowNumber |
| pythonCode | 0 |
@Graph8
Scenario: Verify that user is able to navigate to Practice Questions in the Graph Data Structure page
Given The user is in the Graph page after Sign in
When The user clicks Practice Questions link
Then The user should be redirected to Practice page
...... Continues.......
@Graph14
Scenario:: Verify that user able to logout from the Graph data structure
Given The user is in the Graph data structure page
When The User clicks signout button
Then The user should signout successfully
Step 3: Create DriverFactory class
In a Cucumber project, a DriverFactory is typically used to initialize and manage the browser driver (e.g., Chrome, Firefox) that will be used for running the tests. This class ensures that the setup of the WebDriver is centralized and reusable across your Cucumber step definitions.
The idea behind a DriverFactory is to create a single place where the WebDriver is configured, instantiated, and injected into the step definitions. This is particularly helpful for handling browser lifecycle management like opening, closing, and quitting the browser.
First, click on the src folder. Then, under src/test/java, create a new package named Driverfactory (or any name of your choice). Afterward, right-click the Driverfactory package and select New > Java Class. In the dialog that appears, name the class driverFactory (or any name you prefer). (Note: that the package name and Java class name can be chosen as per your preference).

Step 4: Create Page Objects/ Page Factory
Page Objects Model: also known as POM, is a design pattern in selenium that creates an object repository for storing all web elements. It helps reduce code duplication and improves test case maintenance.
In Page Object Model, consider each web page of an application as a class file. Each class file will contain only corresponding web page elements. Using these elements, testers can perform operations on the website under test.
Page Factory: Page Factory is a class provided by Selenium WebDriver to support Page Object Design patterns. In Page Factory, testers use @FindBy annotation. The initElements method is used to initialize web elements. Under src/test/java, create a package called ‘PageFactory’ and create a class called GraphPage.java. Please refer to the screenshot below. In GraphPage.java, define WebElements as variables using annotation @FindBy , and create methods for actions performed on WebElements.
Example of PageFactory
package PageFactory;import java.time.Duration;

import org.openqa.selenium.JavascriptExecutor;
import org.openqa.selenium.WebDriver;
import org.openqa.selenium.WebElement;
import org.openqa.selenium.interactions.Actions;
import org.openqa.selenium.support.CacheLookup;
import org.openqa.selenium.support.FindBy;
import org.openqa.selenium.support.PageFactory;
import org.openqa.selenium.support.ui.ExpectedConditions;
import org.openqa.selenium.support.ui.WebDriverWait;
import DriverFactory.driverFactory;

public class GraphPage {
	WebDriver driver;
	WebDriverWait wait;

public GraphPage() {
	driver = driverFactory.getDriver();
	PageFactory.initElements(driver, this);
}

@FindBy(className = "btn")
@CacheLookup
WebElement GetStarted;

@FindBy(xpath = "//a[@href='graph']")
@CacheLookup
WebElement GraphGetStarted;

@FindBy(xpath = "//pre[@id='output']")
@CacheLookup
WebElement OutPutmsg;

@FindBy(linkText = "Practice Questions")
@CacheLookup
WebElement Practice_QuestionsLink;

@FindBy(linkText = "Graph Representations")
@CacheLookup
WebElement GraphRepresentationsLink;

@FindBy(xpath = "//a[text()='Sign out']")
@CacheLookup
WebElement SignOut;

public void GraphGetStarted() {
GraphGetStarted.click();
}

public void dropdownMenuClick() {
dropdownMenu.click();
}

public void ClickGraphFromDropdown() {
selectGraph_DropdownMenu.click();
}

public void Graphlink() {
GraphLink.click();
}

public void TryHereButton() {
TryhereBtn.click();
}

public String RunBtnText() {
return RunBtn.getText();
}

public void Run() {
RunBtn.click();
}

public void EmptytryInput() {
Actions actions = new Actions(driver);
actions.moveToElement(tryEditorTxt).click().sendKeys("").build().perform();
}

public String alertMessage() {
return driver.switchTo().alert().getText();
}

public String Outputmsg() {
return OutPutmsg.getText();
}

public void GraphRepresentationlink() {
GraphRepresentationsLink.click();
}

public void signOut() {
SignOut.click();
}

}
Step 5: Writing Step Definitions
Now, under src/test/java, create a package named StepDefinitions. Inside this package, create a Java class called GraphSteps. Additionally, create another class named Hooks.java within the same package. Hooks in Cucumber are special blocks of code that run before or after each scenario, step, or even the entire test suite. They allow you to perform setup and teardown tasks, making your test automation more efficient and modular.

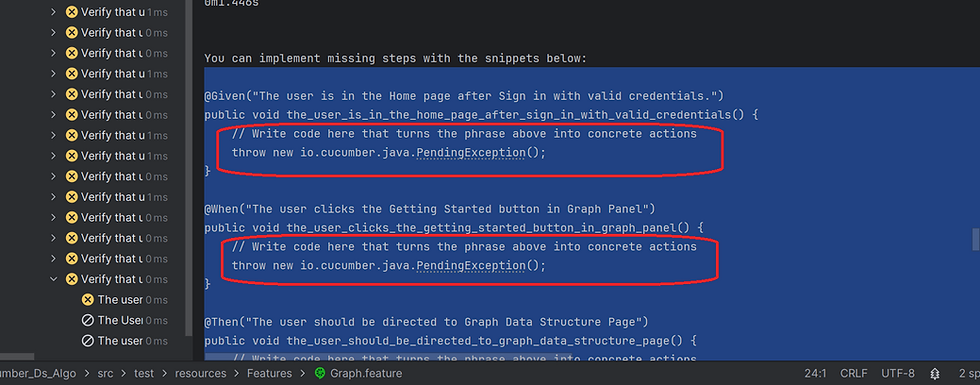
Once the feature files are created, the next step is to define and link the steps using StepDefinitions. Step definitions serve as the bridge between the Gherkin syntax in feature files and the underlying test code. When Cucumber executes a scenario, it searches for matching step definitions to run the corresponding steps. In the Graph.feature file, any steps highlighted in yellow indicate that those steps haven't been implemented yet. The easiest way to generate step definition stubs is by running the feature file—Cucumber will suggest the necessary code in the console. Refer to the snapshot below for reference.

Now, the console will display suggested step definitions for all test steps in your feature file that don't yet have corresponding implementations. Copy the entire suggested code and paste it into your GraphSteps class. Then, remove the red rounded rectangular placeholder code from GraphSteps, as it is no longer needed.
Now go to StepDefinitions > GraphSteps and implement all the required test steps and import all the required classes as shown below:
package StepDefinitions;

import PageFactory.GraphPage;
import Utilities.ConfigReader;
import Utilities.LoggerReader;
import io.cucumber.java.en.Given;
import io.cucumber.java.en.Then;
import io.cucumber.java.en.When;
import org.apache.poi.EncryptedDocumentException;
import org.testng.Assert;
import java.io.IOException;

public class GraphSteps {
    GraphPage graphPage;
    String username = ConfigReader.getProperty("username");
    String password = ConfigReader.getProperty("password");

    public GraphSteps() {
        graphPage = new GraphPage();
    }

    @Given("The user is in the Home page after Sign in with valid credentials.")
    public void the_user_is_in_the_home_page_after_sign_in_with_valid_credentials() {
        graphPage.Gethomeurl();
        graphPage.clickLogin(username, password);
        LoggerReader.info("User is in Home Page");
    }
//continues....
    @When("The user clicks the Getting Started button in Graph Panel")
    public void the_user_clicks_the_getting_started_button_in_graph_panel() {
        graphPage.Gethomeurl();
	   graphPage.GraphGetStarted();
    }

    @Then("The user should be directed to Graph Data Structure Page")

    public void the_user_should_be_directed_to_graph_data_structure_page() {
        Assert.assertEquals(GraphPage.getTitle(), "Graph");
        LoggerReader.info("User is in the Graph Page");
    }

    @Given("The user is in the Home page after Signed in.")
    public void the_user_is_in_the_home_page_after_signed_in() {
        graphPage.Gethomeurl();
    }

    @When("The user selects Graph item from the drop down menu.")
    public void the_user_selects_graph_item_from_the_drop_down_menu() {
        graphPage.dropdownMenuClick();
        graphPage.ClickGraphFromDropdown();
    }

    @Then("The user should land in Graph Data Structure Page")
    public void the_user_should_land_in_graph_data_structure_page() {
        Assert.assertEquals(GraphPage.getTitle(), "Graph");
        LoggerReader.info("User is in the Graph Page");
    }
	@Given("The user is in the Graph data structure page")
    public void the_user_is_in_the_graph_data_structure_page() {
        GraphPage.navigate();
    }

    @When("The User clicks signout button")
    public void the_user_clicks_signout_button() {
        graphPage.signOut();
        LoggerReader.info("User is Leaving Graph data Structure!");
    }
    @Then("The user should signout successfully")
    public void the_user_should_signout_successfully() {
        Assert.assertEquals(GraphPage.getTitle(), "NumpyNinja");
        LoggerReader.info("User Signed out Successfully!");
    }

}
Step 6: Writing Hooks
Hooks are blocks of code that run before or after each scenario in a Cucumber test. It help with setup and teardown logic, such as opening a browser before a scenario or taking a screenshot after a failure.
In this case, using the @BeforeClass and @AfterClass annotations from TestNG, along with an afterStep method for post-step failure handling.
package StepDefinitions;

import org.openqa.selenium.OutputType;
import org.openqa.selenium.TakesScreenshot;
import org.openqa.selenium.WebDriver;
import org.openqa.selenium.chrome.ChromeDriver;
import org.testng.annotations.AfterClass;
import org.testng.annotations.BeforeClass;

import DriverFactory.driverFactory;
import io.cucumber.java.AfterStep;
import io.cucumber.java.Scenario;
import io.qameta.allure.Allure;

public class Hooks {
	private static WebDriver driver;

	@BeforeClass
	public static void setUp() {
// //Initialize WebDriver only once before all tests
		if (driver == null) {
			driver = new ChromeDriver();
		}
	}

	@AfterClass
	public static void tearDown() {
// Quit WebDriver after all tests are finished
		driverFactory.quitDriver();
	}
	@AfterStep
	  public void afterStep(Scenario scenario) {
	        WebDriver driver = driverFactory.getDriver(); // Get WebDriver for current thread

	        if (scenario.isFailed()) {
	            // Capture screenshot if scenario fails
	            TakesScreenshot screenshotTaker = (TakesScreenshot) driver;
	            final byte[] screenshot = screenshotTaker.getScreenshotAs(OutputType.BYTES);
	            scenario.attach(screenshot, "image/png", "My screenshot");
	            Allure.addAttachment("Myscreenshot", new String(screenshot));
	        }
	    }
	}
Step 8: Create Utilities In my test case, I need a login username and password to access the application and proceed with navigating through the Data Structures section. Currently, I'm retrieving the username and password from the Config.properties file. However, it's also possible to fetch the username and password from an Excel file. Additionally, I'm retrieving some of the data (Python code snippets for the "Try Here" section of the Data Structures module) from a .xlsx file.
To manage this data, we need to create a folder named TestData under src/test/resources and place our Excel file there. To read the Excel file, we should create a Java class. First, we need to create a package named Utilities under src/test/java. I'm attaching a screenshot of the Utilities package structure for reference.

Creating property files:
I planned to retrieve username password from Config.properties file. What is Configuration file?
The main purpose of using a configuration file when testing a Java application is to separate variable values from the source code. This allows us to modify these values as needed without changing the actual code.
Using different configuration files makes it easier to manage environment-specific settings.
These files are also useful for storing sensitive data such as usernames and passwords, helping ensure that such information is not exposed directly in the source code. In a configuration file, data is stored as key-value pairs, with both the keys and values represented as strings. In a Java project, configuration files are typically stored under the resources folder. There are several types of config files such as Properties files(.properties), XML files(.xml), JSON Files(.json), YAML Files(.yaml)
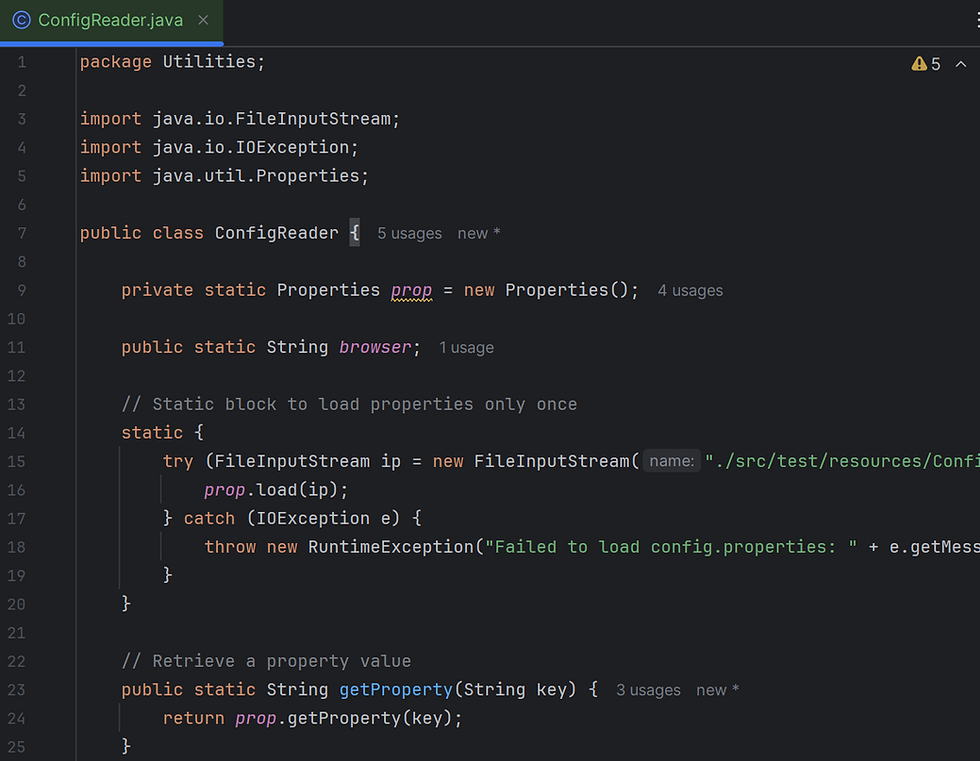
In this test case I'm using .properties file. Under the resources folder create a new folder and open a new file in the folder and save with the extension .properties. Then add all the necessary key-value pairs and save it. Please refer the above screenshot for the Config.proprties file location.


How to read the Config file in java? To read the Config.properties file we are creating java class in Utilities Package under src/test/java. Below is the screenshot of the Config Reader I have used.
Similar to that Config.properties file I'm adding Log4j2.properties file under src/test/resources and to read that property file adding LoggerReader.java class under Utilities package. Logging is important aspect of Testing Automation. During the running of test case, user wants some information to be logged in the console as well as in the file. Information could be any detail depends upon the purpose. There are multiple reasons why we may need to capture logs during the execution of testing activities. Log4j2 helps us to achieve the above objectives in Selenium Webdriver.
We need to follow 3 steps before enabling Logger into Selenium Test Cases.
Step1 : Adding Dependencies in pom.xml file
Log4j-api and Log4j-core dependencies need to be added on pom.xml . We can get the latest version from MVN Repository@Log4j
Once you update Maven project , we can see corresponding .jar files in Maven Dependencies folder.
Step 2 : Adding Log4j2 properties file
Once we add the necessary dependencies in the pom.xml file, we need to include a log4j2.properties file. As a best practice, we typically place this file in the resources folder. Like any other Java properties file, log4j2.properties consists of key-value pairs used to configure various components of Log4j 2, such as loggers, appenders, and layouts.
The configuration code for the appenders is shown below:
#Declare loggers
status = info
name= PropertiesConfig
appenders=console, file
rootLogger.level= info
rootLogger.appenderRefs = file
rootLogger.appenderRef.file.ref = LOGFILE
# Direct log messages to Console
appender.console.type = Console
appender.console.name = STDOUT
appender.console.layout.type = PatternLayout
appender.console.layout.pattern=[%5-level]%d{yyyy-MM-ddHH:mm:ss.SSS}[%t]%c{1]-%msg%n
# Direct log messages to a log file
appender.file.type = File
appender.file.name = LOGFILE
appender.file.fileName=logs/Mylog4j.log
appender.file.layout.type=PatternLayout
appender.file.layout.pattern=[%5-level]%d{yyyy-MM-ddHH:mm:ss.SSS}[%t]%c{1)-%msg%n
Step 3: Creating Logger Class
In the utilities Package we need to create LoggerReader java class as mentioned below
package Utilities;

import org.apache.logging.log4j.LogManager;
import org.apache.logging.log4j.Logger;

public class LoggerReader {
	private static Logger logger = LogManager.getLogger();
	public static void info(String message) {
		logger.info(message);
	}
	public static void warn(String message) {
		logger.warn(message);
	}
	public static void error(String message) {
		logger.error(message);
	}
	public static void fatal(String message) {
		logger.fatal(message);
	}
	public static void debug(String message) {
		logger.debug(message);
	}
}
Once we completed above mentioned 3 important steps , then Logger is ready to use in the selenium Test cases. Based on logger severity we can place the loggers outputs in Test cases. When you run the Test cases , then Logger will generate the output as defined in test cases. We can see the Log in mentioned format at Console during run time also same log will be stored in file.
Step 9: Executing the test using Test Runner / testng.xml In a Cucumber-TestNG based automation framework, the Test Runner class plays a key role in bridging Cucumber feature files with their step definitions and enabling smooth test execution. To execute tests using TestNG in a Cucumber framework, we need to create a Test Runner class. This runner integrates Cucumber with TestNG by extending AbstractTestNGCucumberTests, which comes from the io.cucumber.testng dependency added in your pom.xml.
We also use the @CucumberOptions annotation to define:
The location of feature files
The glue code (Step Definitions)
Reporting plugins
Filters such as tags
Let’s see how to create the Test Runner: Go to src/test/java>create package called Runner. Under Runner> create a java class called TestRunner as shown below

package Runner;

import org.testng.annotations.BeforeClass;
import org.testng.annotations.DataProvider;
import org.testng.annotations.Optional;
import org.testng.annotations.Parameters;
import DriverFactory.driverFactory;
import io.cucumber.testng.AbstractTestNGCucumberTests;
import io.cucumber.testng.CucumberOptions;

@CucumberOptions(features = { "src/test/resources/Features" }, glue = { "StepDefinitions" },
		monochrome = false,
		tags = "@Regression",
		plugin = { "pretty", "html:target/cucumber.html", "io.qameta.allure.cucumber7jvm.AllureCucumber7Jvm",
		"com.aventstack.extentreports.cucumber.adapter.ExtentCucumberAdapter:",

		})

public class TestRunner extends AbstractTestNGCucumberTests {
	@BeforeClass
	@Parameters("browser")
	public static void setup(@Optional("chrome") String browser) {
		System.out.println("Setting up driver for browser: " + browser);
		driverFactory.setBrowser(browser);
	}

	@Override
	@DataProvider(parallel = false) // Enable parallel execution
	public Object[][] scenarios() {
		return super.scenarios();
	}

}
Adding testng.xml:
In a Cucumber-TestNG based automation framework, the testng.xml file acts as a centralized test configuration file that helps define how and what tests to run. This file is particularly powerful when used to support cross-browser execution, parallel testing, and parameterization.
I have used the below testng.xml for my test case. You can modify it as per your project requirements—for example, by changing the browser type, updating the test class name, or enabling parallel execution. You can create the testng.xml file by right-clicking the project. If you scroll down, you’ll see the option to create a testng.xml file at the last. By clicking that option, the testng.xml file will be created, and you can add any parameters you need in that file.
<?xml version="1.0" encoding="UTF-8"?>
<!DOCTYPE suite SYSTEM "https://testng.org/testng-1.0.dtd">
<suite name="Suite" parallel="tests" thread-count="3">
	<test name="Chrome Test">
		<parameter name="browser" value="Chrome" />
		<classes>
			<class name="Runner.TestRunner" />
		</classes>
	</test>
	<test name="FirefoxTest">
		<parameter name="browser" value="firefox" />
		<parameter name="reportFile"
			value="target/cucumber-reports/ChromeReport.html" />
		<classes>
			<class name="Runner.TestRunner" />
		</classes>
	</test>
	<test name="EdgeTest">
		<parameter name="browser" value="edge" />
		<parameter name="reportFile"
			value="target/cucumber-reports/EdgeReport.html" />
		<classes>
			<class name="Runner.TestRunner" />
		</classes>
	</test>
</suite>
testng. xml
Step 10: Create a property file for extent report
Here, we are going to use Extent Reports—an open-source and powerful reporting library used to generate visually appealing and detailed test reports. Extent Reports provide comprehensive insights into test execution, including step-by-step analysis, screenshots, execution status, and more with enhanced visual presentation.
Let’s see how to integrate Extent Reports into our Cucumber TestNG project.
Similar to that Config.properties,Log4j2.properties file I'm adding extent.properties file under src/test/resources.
#Spark Report
extent.reporter.spark.start=true
extent.reporter.spark.out=Reports/Spark.html
#PDF Report
extent.reporter.pdf.start=true
extent.reporter.pdf.out=PDFReport/ExtentPDF.pdf
extent.reporter.pdf.font=arial.ttf

#Screenshot
screenshot.dir=/Screenshots/
screenshot.rel.path=../Screenshots/
#Base Folder Name
extent.reporter.spark.vieworder=dashboard,test,category,exception,author,device,log
basefolder.name=ExtentReports/SparkReport
basefolder.datetimepattern=d_MMM_YY HH_mm_ss
#System.info
systeminfo.os=windows
systeminfo.Engineer= Meenaa
systeminfo.Project= Innovation_Inspectors
systeminfo.Browser= Google ChromeAnother important point to mention is that we can also generate Allure Reports. We've already added the required dependency in the pom.xml file and included the corresponding plugin in our Test Runner. After executing the tests, refresh the project, and you will see an allure-results folder and ExtentReports folder generated in the project directory, as shown below.

Final Step :
Now the project is ready for testing. Right Click on the TestRunner.java and click Run 'TestRunner'. Or you can Run it from testng.xml also for parallel and Cross browser testing. For parallel testing set parallel="tests" or "true". The Output of Test Execution looks like below.

Once the execution finished the project will be automatically refreshed and we can see the auto generated ExtentReports folder and allure-results folder in the project structure. Click on the folder to see all reports.

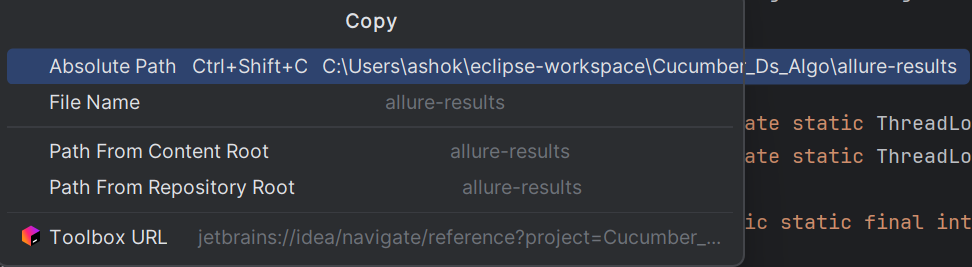
In order to view the Allure reports, Right click on the allure-results folder > properties> copy the location path as shown below.

Go to Command Prompt and type “allure serve” and give space and paste the path and press enter. And the report will open in browser
In addition to that, Cucumber report is also generated in the target folder. If you open the target folder, you will find a file named cucumber.html. Right-click on that file, and you will see an option to open it in a browser.

A Cucumber report is a detailed document or output file that provides a summary of the results from running Cucumber tests. These reports show which scenarios passed or failed, along with any relevant details, such as error messages or logs. Cucumber reports are typically generated in HTML, JSON, or JUnit formats, and they can help stakeholders understand the status of the system from the perspective of the behavior-driven development (BDD) tests.
That wraps up this part of the automation framework setup!
In the my another blog, I have explained how to push your code to GitHub and configure Jenkins to run your tests automatically.
Thanks for reading!
Happy testing — and may your builds always be green! 🚀