How to Install IntelliJ IDEA on Windows – A Complete Beginner’s Guide
- rajeeramyab
- May 5, 2025
- 4 min read
Introduction
IntelliJ IDEA is developed by JetBrains. It is one of the most powerful and user-friendly Integrated Development Environment (IDEs) for Java development. Whether you're just starting out with Java programming or building enterprise applications, IntelliJ offers robust features like smart code completion, version control integration, and powerful debugging tools.
🛠️ System Requirements
Before we begin, make sure your system meets the following:
Windows 10 or later
At least 2 GB RAM (8 GB recommended)
Minimum 2.5 GB disk space
64-bit JDK (Java Development Kit) — you can install this later if you don’t have it
Steps To Install IntelliJ on Windows:
In this blog, you'll learn how to install IntelliJ IDEA on your Windows machine step-by-step.
Step 1: Download IntelliJ IDEA
Open your browser and go to the official JetBrains download page:
👉 https://www.jetbrains.com/idea/download
You’ll see two editions:
Community Edition – Free and open-source; great for pure Java development.
Ultimate Edition – Paid; includes support for web frameworks, databases, and more.
Click the Download button under Community Edition unless you specifically need the extra features of the Ultimate Edition.

Let's learn few things about community edition and ultimate edition.
🆓 IntelliJ IDEA Community Edition (Free & Open Source)
Best for:
Java, Kotlin, Groovy, Scala developers focused on pure JVM development.
Key Features:
Support for Java SE, Kotlin, Groovy, Scala
Maven, Gradle, and Ant build tools
Git, SVN, Mercurial version control
JUnit and TestNG testing frameworks
Code completion, syntax highlighting, and smart refactoring
Basic support for Android development
Limitations:
No built-in support for web development (HTML/CSS/JS features are limited)
Lacks advanced database tools
No support for enterprise frameworks like Spring, Jakarta EE, or Java EE
💼 IntelliJ IDEA Ultimate Edition (Paid)
Best for:
Professional developers working on enterprise, full-stack, or commercial applications.
Includes everything in Community Edition, plus:
Web & Enterprise Features:
Full support for Java EE / Jakarta EE (e.g., Servlets, JSPs, JPA, CDI)
Spring, Spring Boot, and related frameworks
Advanced support for JavaScript, TypeScript, React, Angular, etc.
Built-in tools for working with databases and SQL
RESTful Web Services, OpenAPI/Swagger support
HTTP client, Kubernetes/Docker integrations
Profiler and performance tools
Pricing:
Requires a license (monthly/annual subscription)
Summary Table
Feature | Community Edition | Ultimate Edition |
Java/Kotlin/Scala/Groovy | ✅ | ✅ |
Android Support | ✅ | ✅ |
Spring/Spring Boot | ❌ | ✅ |
Java EE/Jakarta EE | ❌ | ✅ |
JavaScript/TypeScript | ⚠️ (basic plugin) | ✅ |
Web Frameworks (React, etc.) | ❌ | ✅ |
SQL & Database Tools | ❌ | ✅ |
HTTP Client / Web services | ❌ | ✅ |
Docker/Kubernetes | ❌ | ✅ |
Step 2: After clicking the download button under the community edition then it will open the IntelliJ Idea community setup window. Now click Next button.

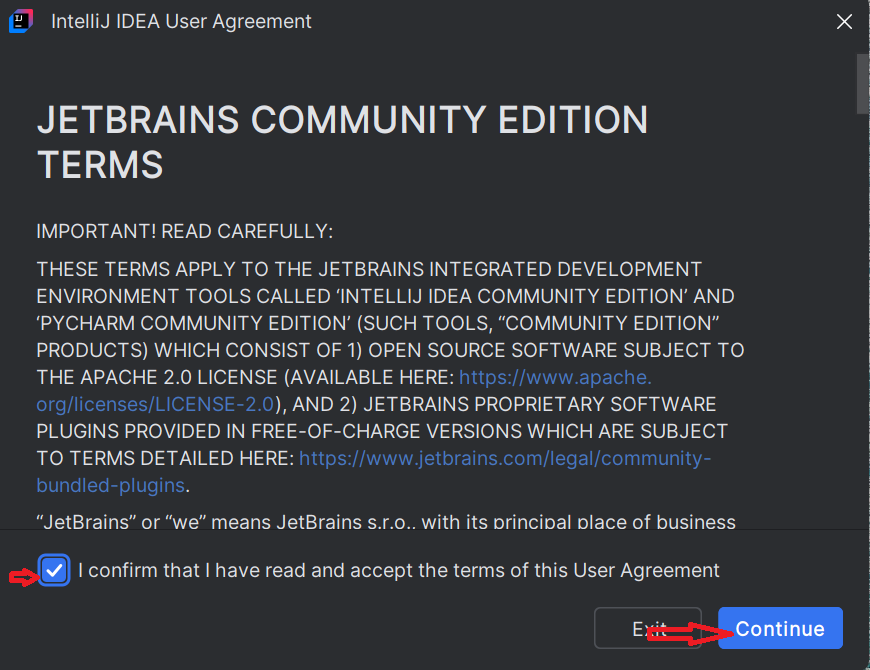
Step 3:

Step 4: From the following options, check those we have checked and leave the rest as it is. Then click Next.

Step 5: Now click the Install button.

Step 6: You may see the progress bar. The installation speed depends on your machine configuration. After installation is done then click the Next button.

Step 7: click on Finish button.

Step 8: Now, the IntelliJ Idea IDE has been installed on your local machine.
Step 9: After that First Launch & Initial Setup
Step 10: After that it will ask permission whether you want to share your data or not. So you can select option as per your convinence. After that it will open welcome to IntelliJ IDEA page so from you can be able to create New Project, add Plugins and you can even customize or clone repository. you can also make use of Kotlin Notebooks.

🎉 Congratulations! IntelliJ IDEA is now successfully installed and ready to use.
Benefits of using IntelliJ on Windows:
Powerful Editor: IntelliJ IDEA comes with one of the most powerful code editors in the industry. It understands user-written code and allows it to detect errors on the fly, suggest code completion options with precise context awareness and perform safe refactoring.
Language Support: Despite being primarily built for java developers, IntelliJ IDEA comes equipped with plugins that allow it to be used with a diverse set of other languages. This includes JavaScript, TypeScript (with Angular, React and Vue support), Ruby, Python, Golang and many more languages.
Clean and Stylish UI: IntelliJ IDEA has a clean and stylish user interface that is customizable with a wide variety of themes.
Built-in Tools and Integrations: IntelliJ IDEA comes with the mission-critical built-in tools and integrations that help you with your development needs.
Limitations of IntelliJ on Windows:
RAM Consumption: IntelliJ IDEA is known to be heavy on RAM consumption and often hangs up on low RAM machines.
Stability Issues: Some users have reported that IntelliJ IDEA can be unstable and slow with regular freezes and crashes.
Poor Communication with the user community: There have been complaints about poor communication with the user community and requests for highly demanded features are often ignored for years. Except for these limitations many developers find IntelliJ IDEA to be a valuable tool for their programming needs due to its powerful features and extensive language support.
In this blog, we have listed out all the steps of installing IntelliJ Idea on your computer system. For your convenience, we have attached snapshots of each step. IntelliJ IDEA developed by JetBrains. It stands as a robust and versatile IDE for java Kotlin. You will surely enjoy developing applications using its rich features.
Thank You so much for reading my blog and i hope it helped you to learn about IntelliJ IDEA installation.