Automating Cucumber Test Projects with GitHub and Jenkins via IntelliJ
- Meenaa Kannan
- May 5, 2025
- 4 min read
In the previous part, we saw how to create a Cucumber project from scratch. In this post, we’ll see how to integrate that existing project with GitHub.
Before starting the integration, make sure Jenkins, Maven, and Git are already installed on your local system. You should also have a GitHub account.
Step 1:
If you selected "Create Git Repository" when creating the project in IntelliJ, you can share the project directly to GitHub by following these steps:
Go to the top menu bar in IntelliJ where you see options like File, Edit, View, etc.
Look for the Git tab in this menu.
Click on Git → then go to GitHub → and select Share Project on GitHub.
Please refer the following screenshots.

Step 2:
Once we click on "Share Project on GitHub" in the screen above, another window will appear, as shown in the following screenshot. In this step, we need to provide a repository name (by default, it will be the same as the project name). The description field is optional. The remote name will be set to origin by default. Then click "Add Account" and log in via GitHub.

Step 3:
After clicking that, your default browser will open, as shown in the screenshot below. There, click on "Authorize in GitHub". You will then need to enter your GitHub credentials to continue. Once authenticated, you will see a success message on the JetBrains website. Please refer the following screenshots.


Step 4:
After closing the browser, you will get the following window (your Github account added). Then click share button.

Step 5:
Then you will see a pop-up window where you can select the files you want to share in the GitHub repository. Write a commit message, then click Add. You have now successfully created a repository on GitHub from IntelliJ and pushed your project code to the repository’s master branch.

Step 6:
Now you can go to your GitHub and verify in the GitHub in the repository that our project is successfully pushed into repository.

Step 7:
After committing the initial commit, if you add or modify files, you’ll need to commit and push the changes to the master branch again. To do this, follow the steps below:
Go to the master branch from the top panel, then click Commit.
You will see the changed files listed. Select all the files, write a commit message, and click Commit and Push.
If there are any warnings in your files, a confirmation dialog will appear asking if you want to Commit and Push Anyway — click that, then click Push.
Your changes will be pushed to your GitHub repository.
Now Its' time to Build our project from GitHub to Jenkins
Step 8: Follow this link to install Jenkins
Launch your browser and open your Jenkins (http://localhost:8080/login?from=%2F)
Login with your credentials
Install Plugins
For installing plugins, we can directly download from the Available section of the Manage Plugin.
Navigate to the left side menu > choose Manage Jenkins > click Manage Plugins.
Now under the Available plugins section, enter the name of the plugin in the search bar and click on ‘Install without Restart’. Here I have installed all Maven, Git, Cucumber, Allure related plugins.

Then we have to set up our Global Tool Configuration. For that go to Manage Jenkins > Under the System Configuration, click Tools

Then scroll down a bit Click the JDK installations dropdown. Give name for JDK and and JDK path.

Go to Maven> Add Maven > provide Name and path and click Save.

Go to Allure Command line check install automatically and click save.

Now Dashboard--> Manage Jenkins , If you scroll down a bit you can see Security Section, from there click Credentials.

Under credentials click global link (Domain)

Click "+ Add Credentials".

Select Kind as Username with password, scope leave that as it is. For the username--> Give your Github Username. For the password, We need to Generate the Personal Access Token from GitHub and have to give the PAT here as a Password. Then Click Create. After then your GitHub will connect with the Jenkins.
Now we are going to see how to run test cases using Jenkins.
Go to Dashboard > click New item
Enter the name of the item and select maven project and click ok. Here I have mentioned as “Cucumber_Ds_Algo_”

Then we will directed to configure page in General type the description or you can skip. Then Go to Source Code management or Scroll down little.

In the Source Code Management, Select Git and give your Git Repository URL and select the credentials which we created earlier.

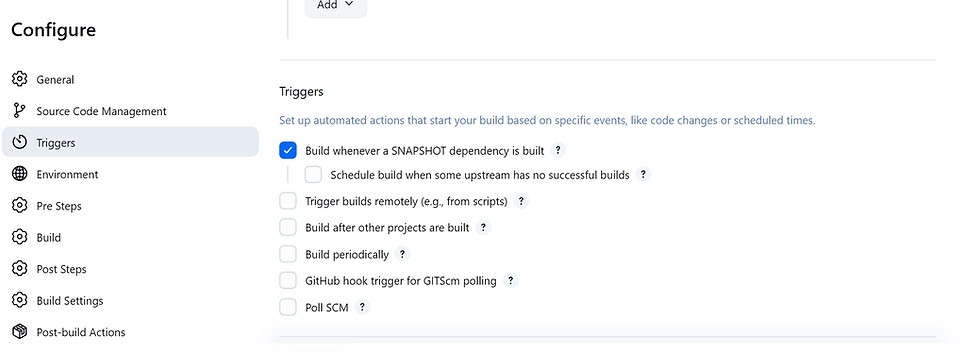
In Triggers, check the first one, In Environment check the First one, In post steps click "Run regardless of build result"


In post Build Actions section, Click Add post-build action and select Allure report.

Check the allure-results path in the IntelliJ Project folder and give according to that, For me its under the project so I gave allure-results alone. and click save.

Now to go to Dashboard click on the project and select Build now. or Click the project, There will be a Build Now in the Left column. Click that. Once we click on the Build Now the build will start and we can able to see the Console Output.

In the status window we can see the Allure history trend and Allure report link.

Click on the Allure report to see complete report.

That's all !!!
We have successfully Build the test cases through Jenkins and generated Allure report.
I hope this guide gave you a clear path to automate your Cucumber test projects seamlessly with GitHub and Jenkins right from IntelliJ.
Thanks for reading!
Happy testing — and may your builds always be green! 🚀