Visual Tutorial on Creating Calculated Field

Creating calculated fields can seem complicated for most of us, you are not alone if you feel the same. But with the right guidance, it becomes a simple and powerful tool. In this blog, we will work together and create calculated fields with easy-to-follow steps with the help of screenshots to show you exactly where to click and what each field means. Whether you're a beginner or just need a refresher, this guide will help you get started with calculated fields in no time!
This is one of the crucial yet interesting topic in Tableau. Calculation Field plays a big role in Manipulation and Transformation of data. This is one of the most powerful features in Tableau.
In this blog we will learn.
1. What is calculated field and why do we need it?
2. Click -By-Click methods to create calculated field.
3. Quick table calculation through screenshot.
4. Calculated field dialogue box field info.
Let’s start with Definition of CALCULATED FIELD and Why do we need it?
DEFINITION: A calculated field in Tableau is a new field created by applying a calculation to existing data in your data source. This allows you to derive new insights and create more robust visualizations without altering the original data. Calculated fields can be used for various purposes such as segmenting data, converting data types, aggregating data, filtering results, and calculating ratios.
This Definition you can easily find in Google. This helps you understand theoretically.
Now let's visualize the Calculated Field Dialogue Box.
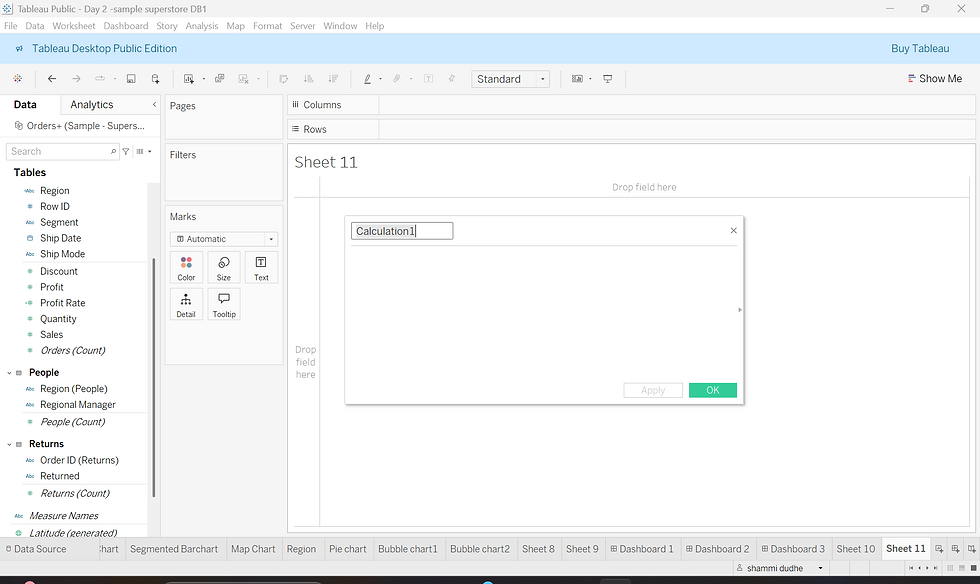
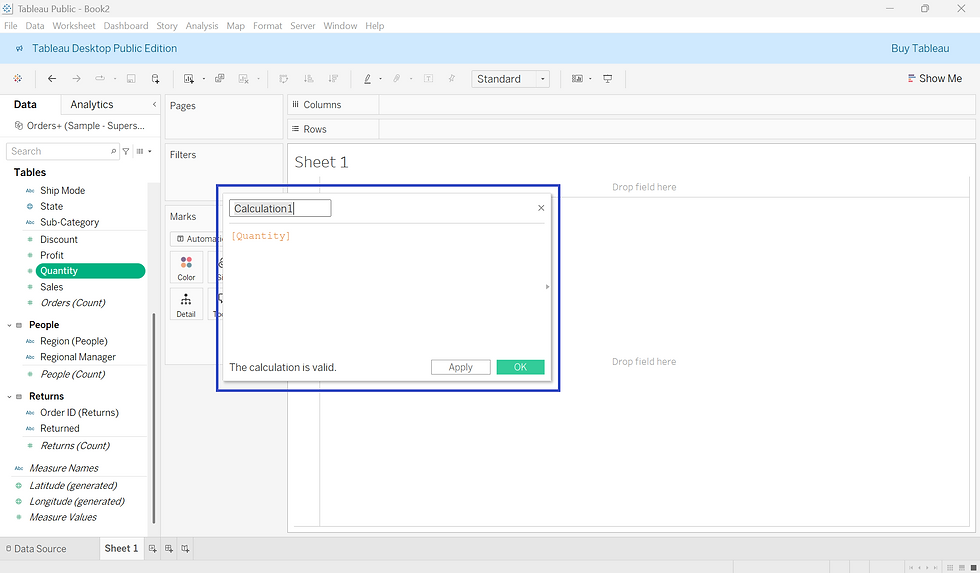
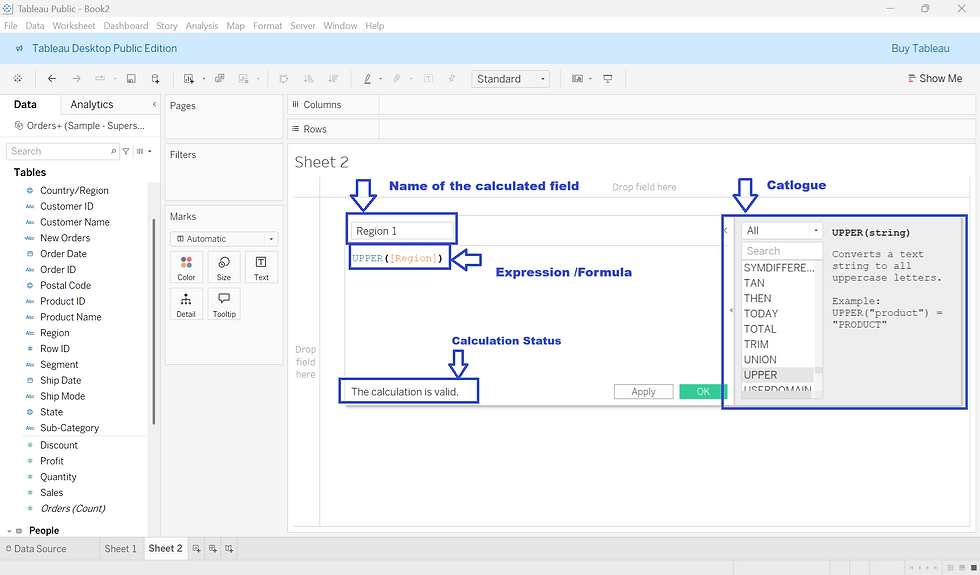
This is how your Calculated field Dialogue box looks like.
How to create CALCULATIVE FIELD in Tableau?
There are few ways to create calculated fields in your worksheet let’s check it out one by one.
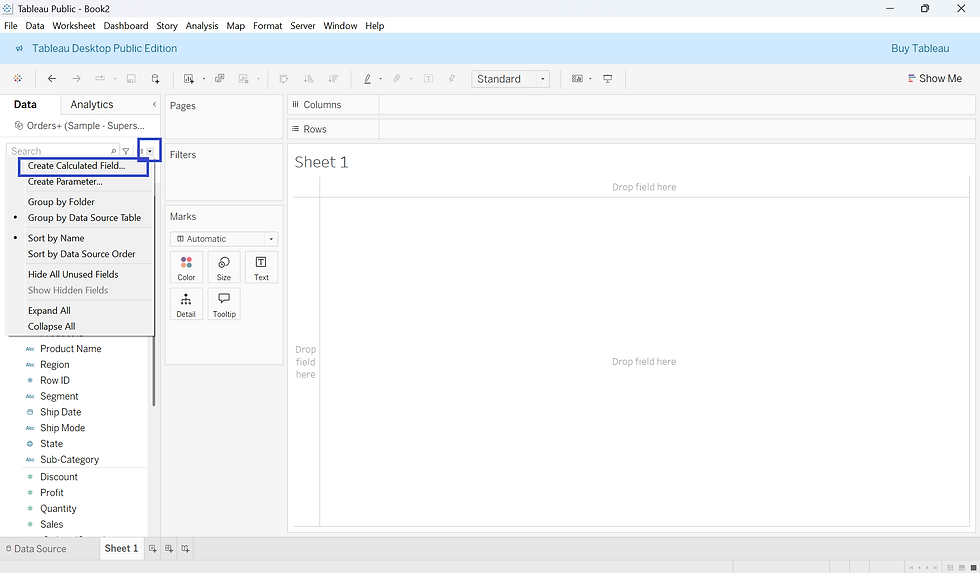
1. By clicking a small dropdown arrow box next to search window. You can get “Create Calculated Field” option.
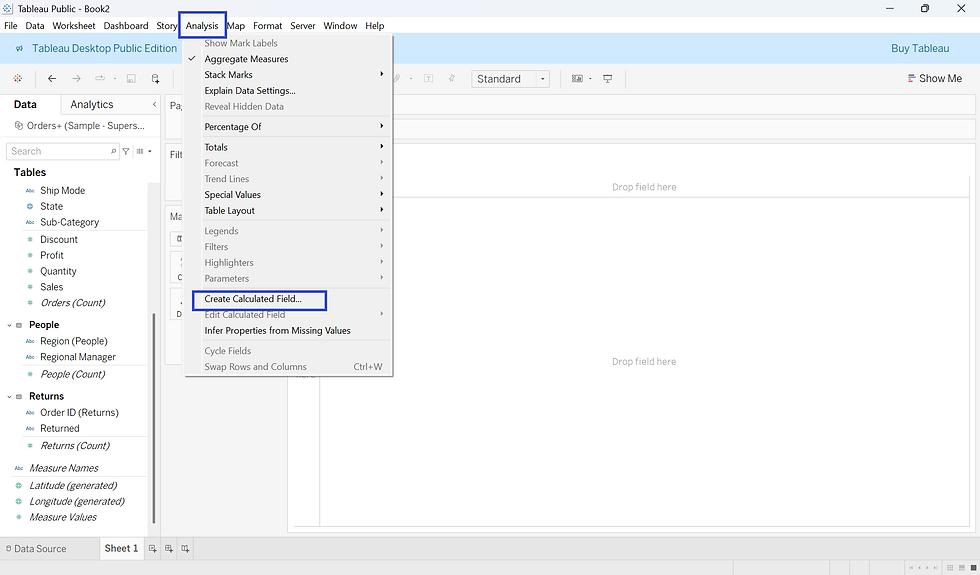
2. In below image, click on the Analysis in the Menu bar and in dropdown you can get calculation field option.
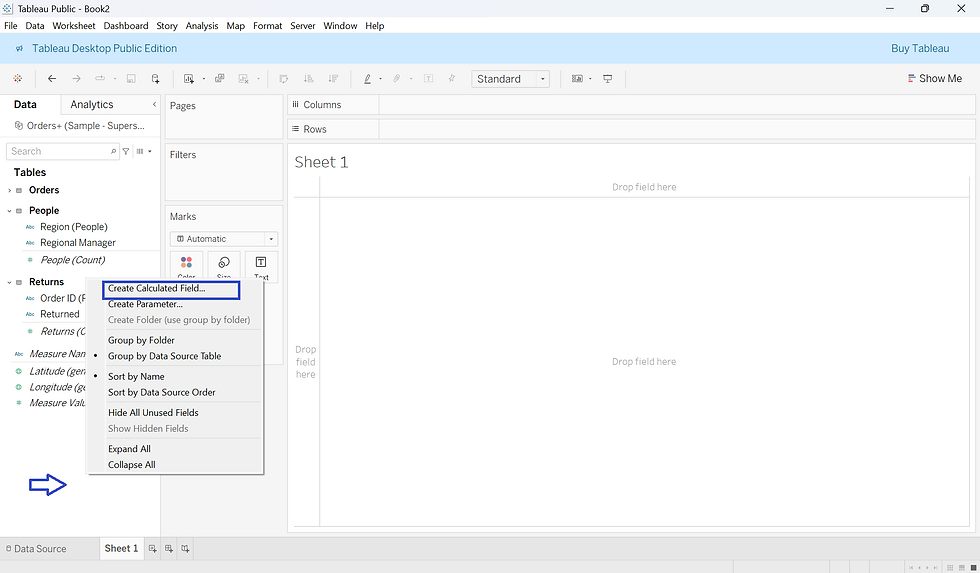
3. Click on the blank space down shown in the image and you can see a pop up for creating Calculated Field.
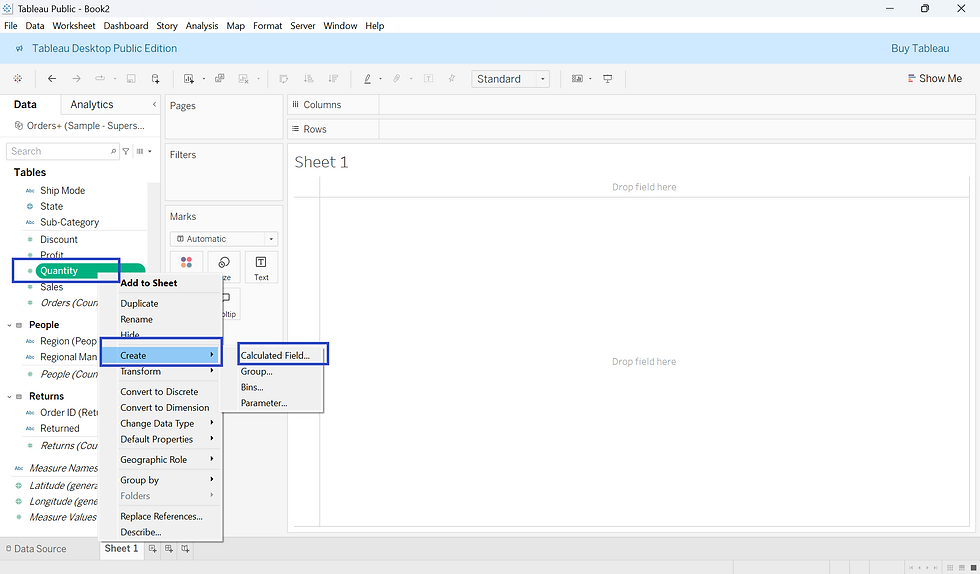
4. You can get Calculated Field by clicking any data from dataset as well. As shown below. The calculated field box comes up with a field name [Quantity]. This happen only because we clicked on data field “Quantity”. By simply erasing the field and you will get and empty calculated field window to write your own expression. Please check the images for better understanding.
QUICK TABLE CALCULATION
1. There is one more type of calculated Field called “Quick Calculation field”. In this you are doing calculation for that particular view locally. In the below image let’s see step by step Quick calculation field.
Drag and drop Region to the row .
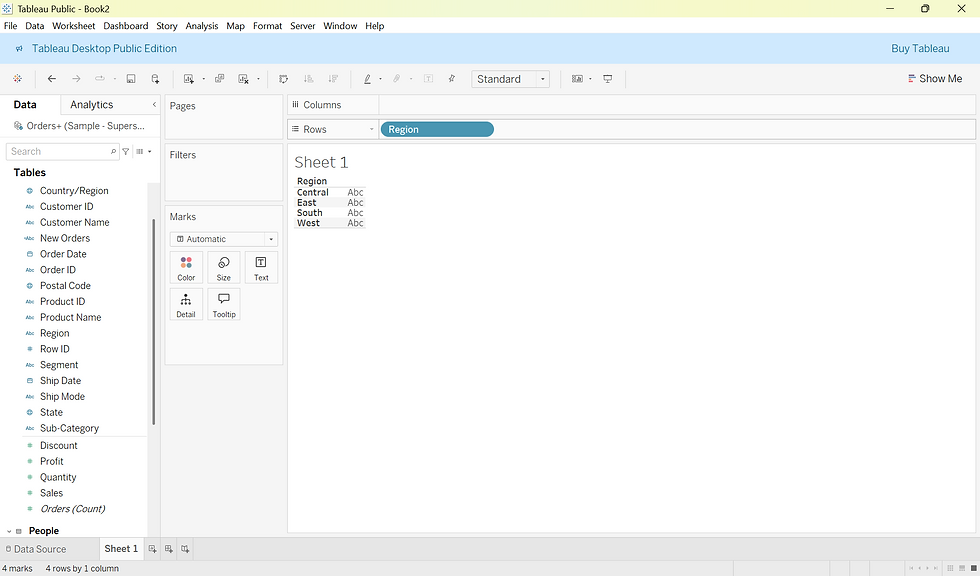
2. As you double click the Region field in row, it will appear as an editable under [] brackets. As shown in the image below.
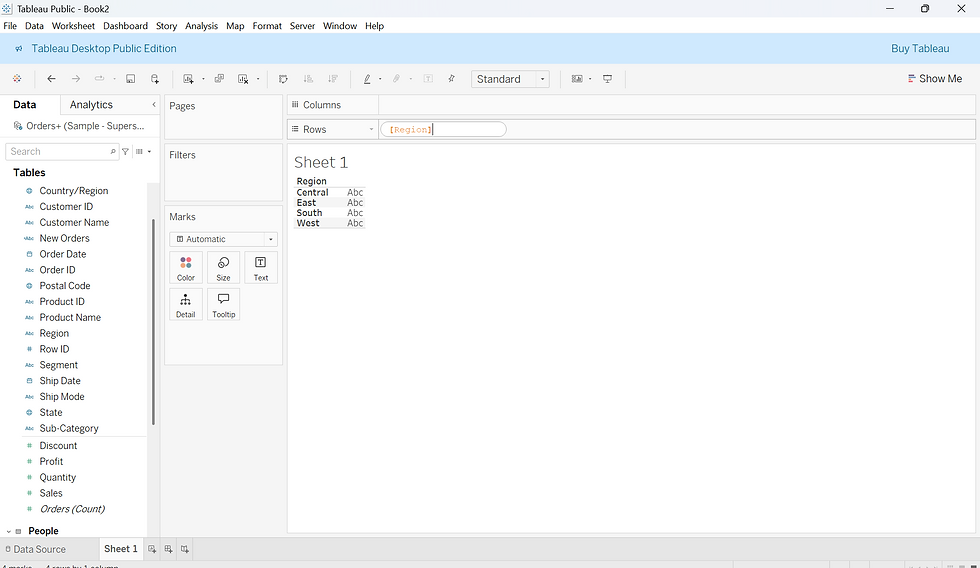
3. It appears as an editable field; you can write Syntax as per your requirement. As shown in the image below, I have written the command “UPPER([Region]). As you can see the REGION name appears in UPPER CASE.
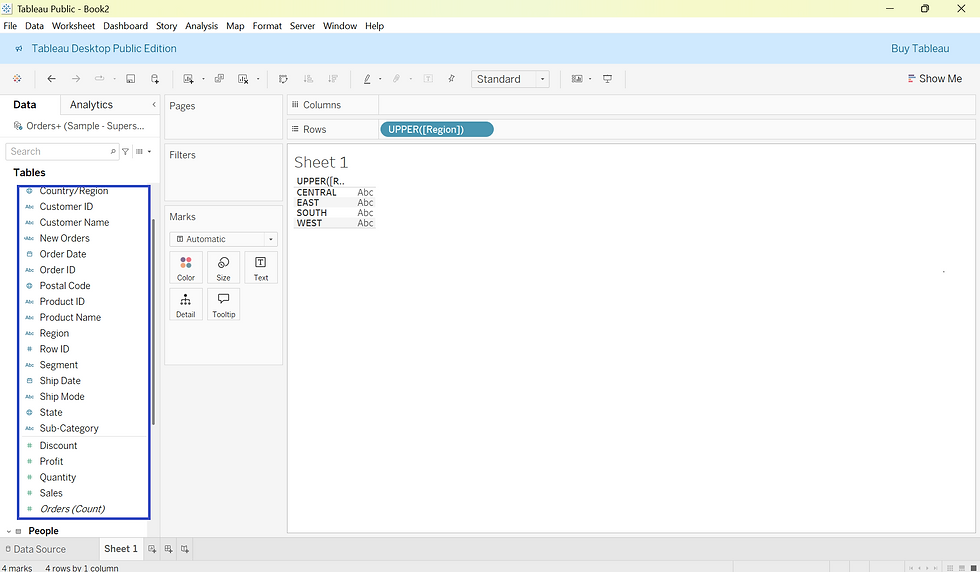
I hope you got an idea what Quick Calculation Table does. It helps you to calculate on the spot i.e. locally. One thing to observe here is by doing that no new data appears on data field like it does after CALCULATED FIELD.
Calculation table window brief.
1. Choose any of the above method to create a calculation table. Once it is done this small box appears this Dialogue Box (shown in first image) is nothing but the calculated field window. Let's explore this Dialogue box in detail. As you can see the highlighted fields
Name of the Calculated Field: The name you choose in this area will be your calculated field name.
Expression/Formula Empty space is for writing the code using syntax from catalogue.
Catalogue is nothing but a small book of syntax given to you for information about all the syntax used in Tableau.
Calculation Status let you know whether your code is correct (valid) or incorrect (contains error).
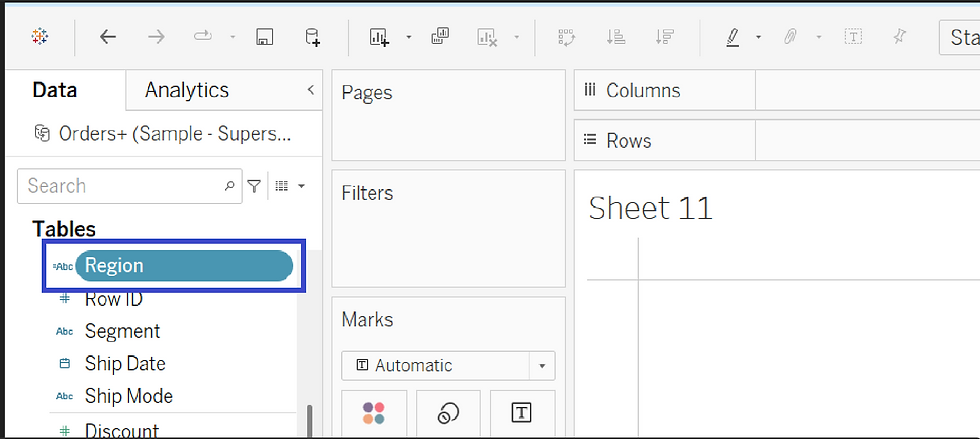
Once you create calculated field it will appear in your dataset with small equal-to (=) sign in front. As shown below
In Calculated field you can perform various calculation where you can manipulate, transform and Analyse data, some of the very commonly used calculations are:
Basic Arithmetic Operations: Addition, Subtraction, Multiplication, Division.
Conditional Calculation: IF statements.
Date Calculations: DateDiff, DateAdd.
String Manipulation: Uppercase /Lowercase, Sub string.
Mathematical Function: Min/Max, Round.
Aggregation Function: Sum, Count, Average.
Null Function: IFNULL,
Finacial Calculation: Profit, Discount, Percentage.
These are Many more calculation we can perform. Above were the few most commonly used.
I hope you got an idea how Calculated field is used in Tableau, how to create it? and what are the fields called?
Now you will be able to create your Own Calculated field through the guidance of this blog. This is an easy follow along blog which you can revisit if you feel any challenges. This blog is very simple, easy to follow step by step guide to create calculated field, whether you a newcomer or need a brush-up. Just have to keep practicing.


