Understanding the Basic Concepts of Selenium - A Beginner guide along with Cucumber BDD Framework.
- Sivaranjani Subbarayan
- Jun 3
- 4 min read
Manually testing every feature repeatedly can be time consuming, This is where Selenium WebDriver comes in. Selenium WebDriver automates the web application, helping testers to save time and improve software quality.
What is Selenium?
It is used for web application automation, automate browser interactions, making testing faster, more reliable, and repeatable. below are the selenium components.
Selenium Components
Selenium IDE: Record and playback tool suitable for beginners and quick test creation.
Selenium WebDriver: A powerful browser automation framework that interacts directly with web browsers.
Selenium Grid: A tool that allows tests to run on multiple machines and browsers simultaneously.
Using WebDriver, you can automate tasks such as:
Opening websites
Clicking buttons
Entering text
Selecting dropdown values
Uploading files
Validating UI elements
Handling alerts and popups
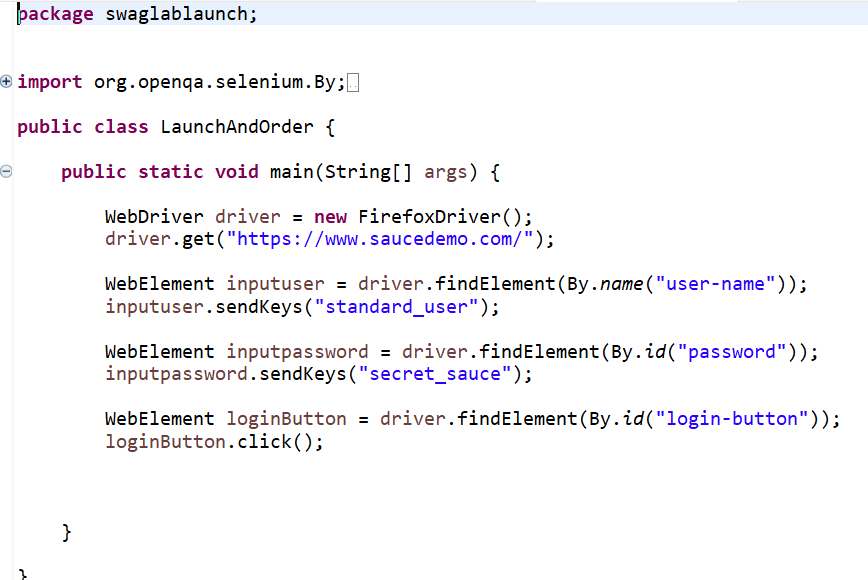
Sample code for opening website:
WebDriver driver = new ChromeDriver();
driver.get("https://www.dietician.com");
in the above example, selenium web driver communicates with the chrome driver, then chrome driver communicates with the browser. Browser performs the requested actions.
Prerequisites to start with Selenium framework:
before starting the framework, make sure Java and Maven are installed to the correct version.
to verify the installation,
java -version
mvn -version
Selenium Framework:
Add dependency

write your java code under src > test > java
Few sample code using different locators

Locators help Selenium identify web elements.
Types of Locators
ID - e.g, driver.findElement(By.id("username"));
Name - e.g, driver.findElement(By.name("email"));
ClassName - e.g, driver.findElement(By.className("btn"));
Tag Name - e.g, driver.findElement(By.tagName("input"));
Link Text - e.g, driver.findElement(By.linkText("Login"));
CSS Selector - e.g, driver.findElement(By.cssSelector("#username"));
XPath - e.g, driver.findElement(By.xpath("//input[@id='username']"));
Common WebDriver Actions
Enter Text - e.g, driver.findElement(By.id("username")) .sendKeys("Admin");
Click a Button - e.g, driver.findElement(By.id("loginBtn"))click();
Clear Text- e.g, driver.findElement(By.id("username")).clear();
Get Text - e.g, String message = driver.findElement(By.id("message")).getText();
Get Attribute Value - e.g, String value = driver.findElement(By.id("username")).getAttribute("value");
Handling Waits:
web applications load content dynamically. Sometimes Selenium executes faster than the application loads.
To avoid failures, Selenium provides waits.
Implicit waits
Explicit waits
Syntax for the waits:
implicit Wait
driver.manage().timeouts().implicitlyWait(Duration.ofSeconds(10));
Explicit Wait
WebDriverWait wait = new WebDriverWait(driver,Duration.ofSeconds(10));
wait.until(ExpectedConditions.visibilityOfElementLocated(By.id("loginBtn")));
Browser commands:
Browser controls are commands used to manage and interact with the browser window during automation.
some of them are
Open Browser : WebDriver driver = new ChromeDriver();
Launch URL : driver.get("https://example.com");
Get Current URL: String url = driver.getCurrentUrl();
Get Page Title: String title = driver.getTitle();
Web Elements:
Web Elements are the HTML elements on a web page, such as text boxes, buttons, links, checkboxes, radio buttons, and dropdowns. Selenium interacts with these elements using the WebElement interface. ie, locating elements on a web page and interacting with them through the WebElement actions.
Common Web Elements
Text Box
Button
Link
Checkbox
Radio Button
Dropdown
Text Area
alert
simple selenium project structure:

Selenium WebDriver is the most widely used browser automation tool. Beginners should first start with setup, and get comfortable with locators, waits, and common actions. Once you have understand the basics, you can build test automation frameworks and execute hundreds of tests with them.
Selenium with Cucumber:
So far, we have learned how to automate web applications using Selenium WebDriver, as automation projects expands maintaining locators directly inside test scripts becomes difficult.
This is where POM helps. POM is a Selenium design pattern used to organize web elements and page actions in a structured manner. Instead of placing all locators inside test scripts, we create dedicated page classes.
Benefits of POM
Cleaner code
Better maintainability
Reusable page objects
Easier updates when UI changes
Improved readability
While this approach works well, test cases are still written in Java and may not be easily understood by non-technical stakeholders such as Business Analysts, Product Owners, or Clients. This is where Cucumber BDD (Behavior Driven Development) works.
Cucumber allows us to write test scenarios in simple language that everyone can understand. Instead of writing requirements separately and automation scripts separately, Cucumber helps bridge the gap between them.
Cucumber Architecture
Below are the test flow that occurs while executing the feature file
Feature Files contain business scenarios.
Step Definitions contain automation logic.
Page Objects contain page-related methods.
PageFactory manages web elements.
Selenium interacts with the browser.
Sample cucumber project structure:


The DriverFactory class is responsible for browser initialization and WebDriver management.
Each class in the Page package represents a specific pages in the application. This helps reduce code duplication and keeps UI interactions centralized.
The Step Definition package contains the actual automation logic behind the test scenarios. Whenever a scenario is written in a feature file using Gherkin keywords such as Given, When, and Then, the corresponding implementation is written inside the step definition classes. These classes act as a bridge between the business-readable scenarios and the Selenium automation code.
In feature folder, scenarios are written in a simple and readable format, they can be easily understood.
The Runner package contains the test runner class, which is responsible for executing the features.
it acts as the entry point for the automation framework. It integrates with TestNG and controls how tests are triggered.
The Utils package contains reusable utility and helper classes that support the automation framework.
pom.xml file is used for dependency management.
Happy Learning!

