Step-by-Step Instructions for Running a Playwright JavaScript BDD Gen Project in Docker on Windows OS.

Introduction to Docker for QA Engineers and SDETs
As QA Engineers and SDETs, we often face challenges in setting up test environments, managing dependency issues, and executing tests across various systems. Docker simplifies this process by packaging everything required for our tests into a portable container.
In addition to simplifying test environments, Docker allows QA Engineers and SDETs to run tests in isolated containers, scale easily, and integrate seamlessly into CI/CD pipelines
By running your automation scripts in Docker:
You get a consistent environment that works the same on any system.
Setting up and running tests becomes faster and simpler.
It's easy to scale and run tests in parallel.
This blog will show you how to run your Playwright BDD Gen tests in Docker, making your testing process more reliable and efficient.
Step 1: Installing the Docker Plugin
We have to install the Docker plugin in our VS Code.
Go to Extensions, search for Docker, and install Docker.

Step 2: Installing the Docker Desktop
Install Docker Desktop on your system. If you are using Windows, select Download for Windows - AMD64 and download the
Docker Desktop Installer.
Click this link to download Docker Desktop: https://www.docker.com/get-started/
Step 3: Run the installer and verify installation
After downloading, we must run the installer and follow the instructions that are shown on-screen to complete the installation. Once the installation is complete, we can launch our Docker Desktop from the Start Menu. Now we will see the Docker icon in the system tray when it's running.
To make sure or verify if Docker is installed and running on our system, open a command prompt and run the following command.
docker --versionIf you run the above command, you should be able to see the version of Docker you have installed if everything is done properly.
Step 4: Set the Environment Variables Path
Search for “Edit the System Variables” on your laptop and click on Environmental Variables, then select the path under System Variables and click on edit to set the path.


Now, click on New and add the Docker Path if it is not added.
By default, the path looks like this:
C:\Program Files\Docker\Docker\resources\bin
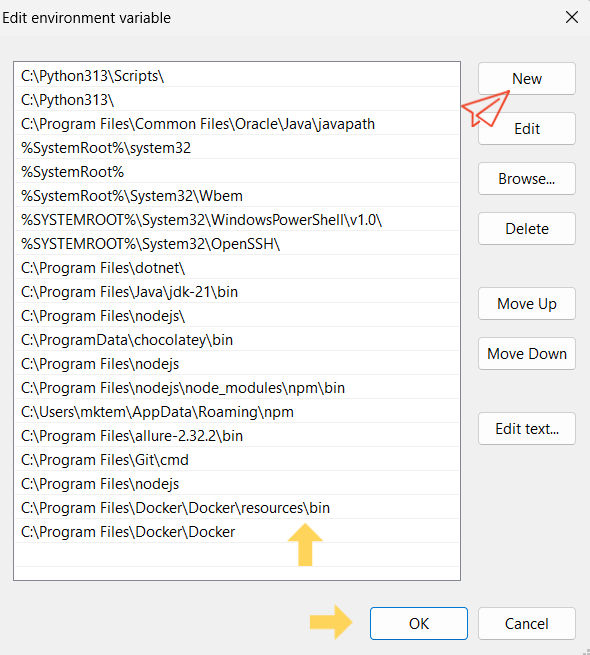
Click on the “OK” button to save the changes and close the windows.
If you give a different path when you are installing, please give the Docker\resources\bin path.
Now, restart the terminal or VSCode to ensure the changes take effect.
This setup will help us to run the tests in a Linux-based environment inside a Docker container, regardless of our host operating system (Windows, macOS, or Linux). This ensures consistency and avoids compatibility issues, making the testing process smoother.
The next steps are to add the required Docker files to your project and execute your project in Docker.
Add a Docker File:
The Dockerfile defines the environment and steps for building your Docker image.
Open your project folder in your VSCode and create a file called Dockerfile in the root of your project.
Add the following content to your playwright BDD Gen project:
FROM mcr.microsoft.com/playwright:v1.51.1-noble
WORKDIR /app

# Copy package.json and package-lock.json first for efficient caching

COPY package*.json ./

# Install dependencies

RUN npm install

# Copy the rest of your project files

COPY . .

# Set the default command to run the bddgen script

CMD ["npm", "run", "bddgen"]
Add Scripts:
Define useful scripts for running and testing your project. Add the lines of code in the package.json file
 "scripts": {

    "bddgen": "npx bddgen && npx playwright test",

    "playwright-test": "npx playwright test"
},
Add a .dockerignore File:
The “.dockerignore” file helps to exclude unnecessary files from the Docker build context. This will improve build speed and avoid transferring large and unnecessary files.
Now, create a new file named “.dockerignore” in your project root directory and add the following content to exclude common unwanted files:
node_modules
.git
.vscode
Dockerfile
.dockerignore
Add other files/folders as needed based on your project structure.
Build the Docker Image:
To build the Docker image, open the terminal in VS Code (Ctrl+Shift+) and run the following command
docker build -t playwright-bdd-tests .This will create an image with the name “playwright-bdd-tests”.
Run the Docker Container:
To run the Docker container, use the following command:
docker run --rm playwright-bdd-testsThe `--rm` flag in the command ensures that the container is removed automatically after it has finished executing.
After running this command, you can see your test cases running with logs and test outputs in your VSCode terminal.
Execute using the Docker plugin in VSCode
You can run your project in Docker directly by right-clicking the run option.
If you've installed the Docker plugin in VS Code:
Go to the Docker view by clicking the Docker icon in the Activity Bar.
Locate your Docker image (playwright-bdd-tests) in the Images section.(which might show “latest” under playwright-bdd-tests )
Right-click on the image and select "Run" to start the container.
The logs and test output will be visible in the VS Code terminal.
Verify Output :
Check the logs for test results or errors.
"If you encounter errors during execution, check Docker logs with docker logs<container_id> or ensure your Docker image is up-to-date by rebuilding it with
docker build --no-cache -t playwright-bdd-tests ..Additionally, confirm your environment variables are correctly configured
If there are issues, double-check your Dockerfile and .dockerignore, and package.json file configuration.
### Bonus: Integrating with CI/CD, Dockerized tests can be easily incorporated into CI/CD pipelines. For example, in GitHub Actions, you can define a workflow that builds and runs your Docker container:
jobs:

  test:

    runs-on: ubuntu-latest

    steps:

      - uses: actions/checkout@v2

      - name: Set up Docker

        uses: docker/setup-buildx-action@v2

      - name: Build and run tests

        run: |

          docker build -t playwright-bdd-tests .

          docker run --rm playwright-bdd-tests
Running Playwright BDD Gen projects in Docker provides a reliable and scalable way to execute automation tests. With the steps outlined in this blog, you'll be equipped to handle test environments efficiently and integrate them into robust pipelines.
Happy testing!!!


