Step-by-Step Instructions for Building an AI Agent Using MCP Servers in VSCode to Automate the Creation of a Playwright Framework, Add Tests, and Push to a GitHub Repository.

In this blog, we will learn how to
1. Create a Playwright framework,
2. Add test cases, and
3. Commit and push the code to a GitHub repository
using prompts within VSCode. This process will require no coding or command-line usage, as we will provide prompts in plain English to guide the AI agent built with the MCP Server.
Before we begin, let's take a moment to understand the MCP Server.
MCP Server: MCP stands for Model Context Protocol, which is designed to facilitate communication between large language models (LLMs) and external tools or data sources. The MCP Server acts as a bridge, enabling LLMs to interact with these external tools and data sources.
Using the MCP Server in Testing: We will utilize the Playwright MCP Server, which allows LLMs to interact with web pages through browser automation capabilities provided by Playwright. In VSCode, MCP supports enhancing the agent mode in GitHub Copilot, allowing us to connect to any MCP-compatible server within our agent-based coding workflow.
Key features of Playwright MCP Server: It is fast, lightweight, LLM-friendly, and offers Deterministic tool applications.
Use Cases of Playwright MCP Server include web navigation, form filling, data extraction from structured content, LLM-driven automated testing, and general-purpose browser interaction for agents.
How to add Playwright MCP Server to VSCode:
As I write this blog, the MCP Server is not integrated with VSCode. Currently, it is only integrated with VSCode Insider. If we want to use the MCP Server in VSCode, we have to use the VSCode Insider. VSCode Insider is a pre-release version of VSCode that allows users to test the new features and improvements before they are officially released.
First, we need to install VSCode Insider on our computer. I am using Windows OS, so I will install the VSCode Installer for Windows. If you are using MAC OS, please install the version for MAC OS. Click on the link below to install it on your computer

Hit the download button and install the VSCode Installer on the computer.

Double-click on the installer

To proceed with the installation, accept the agreement and click the "Next" button. Choose your preferred installation location and click "Next" again. Follow the on-screen instructions and click "Next" to complete the installation. If you want to create a desktop icon, select the corresponding option before clicking the "Next" button. Click "Install" and then "Finish" after the installation is done.

You will see the VSCode Insider open after you hit the "Finish" Button.
Create a New Folder in your preferred location(workspace) to create a project. Open that folder from the VSCode Insider. I named it "MCPAIAgent". You can give any name to the folder depending on the project you are working on.


Now, we need GitHub Copilot plugins in our VSCOde Insider. To add the plugin, click " Extensions " on the screen's left side. In the search bar, type "GitHub Copilot." You will see two options: "GitHub Copilot" and "GitHub Copilot Chat." Install both of these extensions in the VSCode Insider IDE. After the installation is complete, restart VSCode Insider to apply the changes.

You will see "Ask Copilot" on the right side of your screen in VSCode Insider after you install the extensions.
Here, you give prompts and get things done for you. Change the mode to "Agent" mode by clicking on the dropdown "Ask"

Right now, our project folder is empty. Our goal is to create a framework for our project. To achieve this, we need to rely on MCP Servers, specifically the Playwright MCP Server.

This Playwright MCP server will create the framework, create tests inside the framework, and automate the browser as well.
Let us add this MCP server to our VSCode. Click the link below to add the MCP Server.
Scroll down and you will see the "install Server" buttons for Playwright MCP Server in VSCode and VSCode Insider. Right now, it is available only for VSCode Insiders. So, click on the button for VSCode Insider.

After you click on the install server button, it will give a pop-up asking to open VSCode Insider.

Once you click on "open VSCode Insiders," It will give options as shown in the screen below for VSCode Insiders.
Select the "Install Server" option from the options. It will automatically add the configurations to the "settings.json" file.

There is one extra argument "- y" added; delete it if you get any error. And click on "Restart"

Now click on the "tools" button, which is at the bottom right on Copilot, and scroll down, you will see the MCP server Playwright is added to the tools.

Now our agent has the intelligence of Playwright. Our goal is to
Build a framework
Add the testcases and
Push the code to GitHub
We will ask everything in plain English and let the agent do it for us without writing any code or commands.
1. Build A Framework:
To build a framework, we need to install Playwright dependencies and packages, as well as execute certain commands. However, we will not be performing any of these tasks ourselves; instead, we will have the agent handle all the work for us.
I will give the instructions/prompts to the copilot in English to create a playwright framework.
I gave the following prompt. "MCPAIAgent" is the folder name that I created at the beginning.
create a playwright project under MCPAIAgent folder

Here, it has asked me to sign in to the copilot. I logged in using my GitHub account as it gave me that option. It will ask you to continue to run the command in the terminal to initialise the new playwright project in the MCPAIAgent folder.
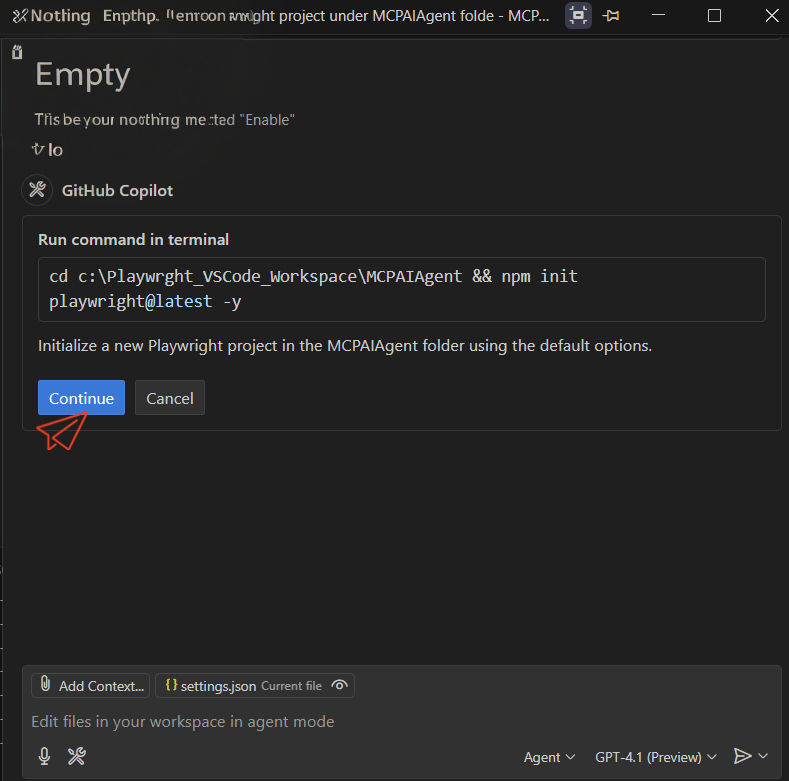
Click on the "continue" button.
After hitting the continue button, I encountered an error that was displayed in the terminal. It mentioned that the command was invalid because the token '&&' is not recognized as a valid statement separator. However, later on, the Copilot itself corrected the command and prompted me to hit the continue button again. This is fantastic; the agent (MCP Server) can self-correct the error without requiring any input from us!

This time, I hit the continue button, and it asked me to select the language on the terminal
Typescript
Javascript.
I chose JavaScript, and I hit enter for the remaining options too.

All the packages were installed, and the necessary browsers were downloaded, creating the framework for me. You can see the new files and folders that have been added under the MCPAGENTAI project on the left side. Additionally, the terminal at the bottom displays all the installed packages and browser downloads, while the command used by the copilot is shown on the right side.

ADD the Testcases:
Now let's integrate the tests into our framework; however, our agent will add them for us. We will only provide the prompts.
I gave the following prompt
In tests folder, create a test which navigates to the link https://ecommerce-playground.lambdatest.io/index.php . Select HTC Touch HD product into cart
You can see in the screenshot below that the agent has successfully created a new test file named "add-htc-touch-to-cart.spec.js" under the tests folder. The generated code includes all the necessary elements located correctly for the test, ensuring that the correct product is added to the cart. Additionally, an assert statement has been included to verify the success message, confirming that the product was added successfully. This demonstrates the effectiveness of using the Playwright MCP Server for automated testing with ease.

I further asked it to view the cart and check out the product. Then it gave me the following option.

It has added the necessary code to access the view cart and proceed to checkout. Additionally, it is asking "if you want to automate the entire checkout process, including filling in the address, payment information, and confirming the order. Let me know if you'd like to proceed with that! That's great! Let's go ahead and ask it to automate the full checkout process as well." I instructed the agent to automate the checkout process. It successfully identified all the elements and filled in the required details in a matter of seconds. Now, it's asking if I need any further adjustments or if I would like to run this test. I want to run the test to see how the code performs.

I provided a prompt requesting to see the results. Then, I received confirmation to continue executing the commands. I clicked the continue button.

After I clicked the "Continue" button, the commands to execute the test cases were run. However, the test cases failed because the selector for the "Add to Cart" button matched multiple elements. The system also provided a suggested fix for the failed test cases, recommending that I update the test with the correct selector.

You can see the error and the fix that the agent is giving us in the screenshot.
I will ask the agent to fix and execute the testcases. It gave me the option to hit the "continue" button to fix the error and run the command to execute the testcases.
The process failed due to issues with the locators. However, it automatically fixed a few locators and made assumptions about others, which led to errors. The system ran in debug mode to locate the elements and address these issues. After several attempts, all the test cases passed, and a report was generated.
It successfully executed an end-to-end flow that included adding a product to the cart, proceeding to checkout, and validating the success message—all done in headless mode with cross-browser testing. This means the entire process was automated and tested across different browsers without a visible interface, ensuring that everything functions correctly across various environments.

This is the report it generated for all three browsers, covering all the testcases. You can see the detailed report for each worker by clicking on it. Here, worker means browser type.

You can optimize this code by implementing a well-structured framework, such as using the Page Object Model, driving data from an external source, or utilizing the Cucumber framework if you have the necessary knowledge. Alternatively, you can seek assistance from GitHub Copilot without the MCP Server. I will not cover those topics here. This blog focuses on the power of MCP Servers in automating browsers and extracting locators from the DOM by interacting with the browser.
I conclude that Playwright MCP Server gives a great transformation in Testing by automating the framework creation, adding test cases, but it is still doing wrong with locating the elements correctly.
3. Commit and push the code to a GitHub repository :
Let's explore how to commit and push code to a GitHub repository using simple English instructions. We will directly instruct our agent to handle the commit and push process. We are not going to give any commands to commit and push the code.
First, we have to add the GitHub MCP server to our VSCode. Click on the link below to add
Scroll down and click on the Install Server.

After clicking, you will get a pop-up to open Visual Studio Code Insider. Click the button to open. It opens VSCode Insider, and from the options, click on the "install server".

After that, it will automatically add the configurations to your settings.json file.

Here, it internally hits Docker and then starts the GitHub MCP Server. So, you must have Docker Desktop in your system to achieve all these. Download the Docker Desktop from the link below based on the OS you use. Scroll down a bit to see the Download button
We also need to specify the GitHub repository where we will push our code. This information must be provided in the form of a Token in a GitHub personal Access token. To obtain the access token, create a repository in your GitHub account with the same name as the project you named in VSCode Insider. For example, I am naming my repository "MCPAIAgent" because my folder name in VSCode is the same. This is simply a blank repository; all code will be pushed by our AI agent.

For this repository, we have to permit our agent by using a token. To generate the token, go to
settings->Developer Settings->Personal Access Tokens ->Fine Grianed Tokens ->Generate new token
Here it will ask you password or passkey for GitHub. Provide the details, it will take you to the page where you can generate the new token. Give a name to your token. scroll down and from the Repository access, choose the "Only select repositories" option and select your repository name from the dropdown.
Here, it will ask you for your GitHub password or passkey. Enter your credentials, and it will redirect you to a page where you can generate a new token.
1. Name Your Token: Provide a meaningful name for your token that reflects its purpose.
2. Set Repository Access: Scroll down to the section labeled "Repository access." Choose the option labeled "Only select repositories" to grant access specifically to the repository you want to work with.
3. Select Your Repository: From the dropdown menu, select the repository name that you have created now.
Grant Repository Permissions: Provide read and write permissions for administration and content management. Noting to select from the Account permissions.
Now, click on the Generate Token Button. It will generate a token
Once you’ve completed these steps, make sure to copy your new token somewhere secure, as you’ll need it for your setup in VSCode Insider.
Now, paste that token in the settings.json file.

Keep your Docker up and running and hit the start button on the settings.json file. It will start the MCP GitHub Server and add the tools to your VSCode Insiders.

Now I will ask my agent to commit and push the code to my remote repository
I gave my repository link and asked to commit and push the code to GitHub in plain English.
It asked me to hit the continue button to run the commands.

After setting up the GitHub MCP Server and configuring everything in VSCode Insider, the process became incredibly straightforward. Every time a command was required, I just clicked the continue button. This allowed the agent to execute all the necessary commands without any need for me to manually input anything. All I had to do was provide prompts in plain English, and the agent took care of the rest.
In the end, it successfully pushed my code to the GitHub repository we had created, all automated through this seamless interaction with the agent. It’s impressive how efficiently the combination of the MCP Server, Playwright, and GitHub Copilot handled everything!

In the terminal, you can view the commands executed by the agent, which are displayed on the right side of the screen.

I hope this blog provides you with a basic understanding of MCP servers and their potential impact on the future of testing applications.
Happy Testing!! Happy Prompting!!


