SQL Made Simple: A Beginner’s Journey from Basics to Keys

Updated: Feb 13
If you’re just starting out with SQL, it might seem like a lot—tables, queries, keys, and strange-looking commands. But once you get the hang of it, SQL becomes one of the most useful and surprisingly simple tools for working with data. Whether you’re building a student database, organizing course enrollments, or just learning how to ask questions with code, SQL gives you a clear way to manage and explore information.
Think of SQL as a language for talking to databases. You use it to create tables, add data, update records, and connect different pieces of information—all using short, readable statements. It’s like giving instructions to a very smart spreadsheet that listens and responds.
In this blog, we’ll walk through the essential SQL building blocks using clear examples and smooth explanations. You’ll learn how to set up your database, insert and filter data, and build relationships between tables—all in a way that’s easy to follow, even if you’ve never written a query before.
Let’s make SQL feel logical, approachable, and even fun.

Image Created by AI
Creating a Database
Every SQL journey begins with a database. Think of a database as a big folder where all your tables live. In PostgreSQL, creating a database is very simple:
Query:
CREATE DATABASE college;
Once the database is created, you connect to it and start building your tables. This step is like opening a new notebook before writing anything inside it.
Create your first table
Inside a database, information is stored in tables. A table works just like a spreadsheet — rows represent individual records and columns represent the type of information you want to store. Example of a simple table for storing student information
Query:
CREATE TABLE students (
  student_id SERIAL PRIMARY KEY,
  name VARCHAR(100) NOT NULL,
  age INT,
  email VARCHAR(100) UNIQUE,
  enrollment_date DATE DEFAULT CURRENT_DATE
);
Each part of this table definition has a purpose
SERIAL PRIMARY KEY automatically assigns a unique ID to each student.
VARCHAR(100) stores text up to 100 characters.
NOT NULL ensures the name cannot be left empty.
UNIQUE prevents duplicate emails.
DEFAULT CURRENT_DATE fills in today’s date automatically.
This is how you design the structure of your data before adding anything to it.

Adding and Managing data
Once your table exists, you can start putting information into it and you can start adding, updating, and deleting data. This is called Data Manipulation Language (DML). SQL makes this very straightforward.
Note: The WHERE clause is important to ensures you only update / delete the correct row.
Insert data
The INSERT INTO statement is used to insert new records in a table.
Add a new students information. You can insert multiple rows at once too.
Query:
INSERT INTO students (name, age, email)
VALUES ('Asha R', 22, 'asha@example.com');
( ‘Rohan S’,  19,  ‘rohan.s@example.com’ ),
( ‘Meera K’, 17, ‘meera.k@example.com’),
( ‘Vikram P’,  21,  ‘vikram.p@exampl.com’),
( ‘Latha M’ , 20, ‘latha.m@example.com’);
You succesfully inserted the meaningful data into 'students' table then run the select to query to view the inserted data from the table.

Now we are going to insert 3 college course with meaningful data
Query:
INSERT INTO course(course_id,course_name,credits)
VALUES(200,'Computer Science Basics',4),
(201,'Mathematics I',3),
(202,'English Communication',2);
You succesfully inserted the meaningful data into 'course' table then run the select to query to view the inserted data from the table.

Update Data
The UPDATE statement is used to modify the existing records in a table.
Upadate the email of one student from students table
Before update:

Query:
update students
set email='asha.ram@example.com'
where student_id=1;
After updating the email id now run the select query to view the updated email id of the student.
After update:

Delete Data
The DELETE statement is used to remove existing rows from a table.
Delete one student who is younger than 18 from students table
Before run the delete query

Query:
DELETE FROM students
WHERE age < 18;
After run the delete query

Rollback
Rollback in SQL, for easy understanding think Rollback as an UNDO Button for your database. When you make changes inside a transaction, you can choose to save them or undo them. ROLLBACK is what you use when you want to undo. The Rollback command in SQL is Transaction Control Language (TCL).
Let's jump into the simple illustration. Start a transaction by inserting 2 rows and rollback the transaction
Record set before run the query

Query:
BEGAIN;
INSERT INTO students (name, age, email)
VALUES ('kiran M' 20, 'kiran@example.com');

INSERT INTO students (name, age, email)
VALUES ('Divya S', 21, 'divya@example.com');
Next use the select query to view the updated values in the table

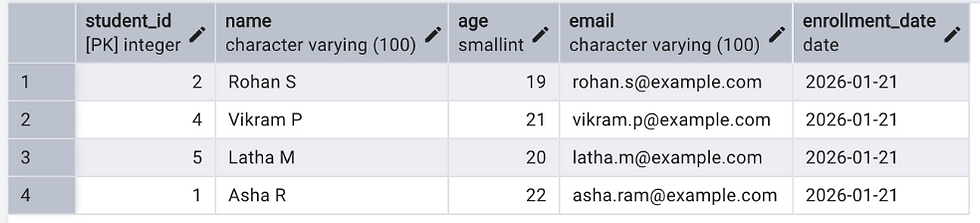
What Rollback really dose it cancels the changes you made in the current transaction and Restores the table to the state it was in before the transaction started. Works only if you used BEGIN / START TRANSACTION
Query:
ROLLBACK;
Final output, after run the rollback query
Savepoint
A SAVEPOINT is like a pause button inside a transaction.It lets you say: If something goes wrong, I’ll undo only part of the work — not everything.It’s like saving your game before a tough level — if you mess up, you go back to the save not the beginning.
Use of Savepoint
You’re doing multiple steps in one transaction.
You want to undo just one part, not everything.
It gives you more control than ROLLBACK alone
Rollback to Savepoint
The Rollback to Savepoint command allows us to rollback the transaction to a specific savepoint, effectively undoing changes made after that point.
Feature | SAVEPOINT | ROLLBACK TO SAVEPOINT |
What it does | Creates a checkpoint inside a transaction | Goes back to that checkpoint |
Does it undo anything? | No — it only marks a spot | Yes — it undoes changes made after the savepoint |
When to use | Before doing risky steps | When a risky step fails or needs to be undone |
Effect on earlier work | Keeps everything before it | Keeps everything before the savepoint safe |
Effect on later work | No effect | Removes only the work done after the savepoint |
Analogy | Saving your game before a boss fight | Loading that saved game if you lose |
Example command | SAVEPOINT step1; | ROLLBACK TO step1; |
Record set before run the query

Query:
BEGIN;
INSERT INTO students (name, age, email)
VALUES ('Arun P',23 , 'arun@example.com');

SAVEPOINT spl;

INSERT INTO students (name, age, email)
VALUES ('Sneha L', 19, 'sneha@example.com)
Record set with Savepoint

Query:
ROLLBACK TO spl;Record set after Rollback with Savepoint - [Undo Only 1 Row]

Rollback with DROP & Delete
In this section, We’re going to explore how ROLLBACK work with DROP and DELETE commands. How transactional control behaves when you use DELETE (which removes rows) and DROP (which removes entire tables).
Understanding how ROLLBACK interact with these commands is essential for preventing accidental data loss and managing changes safely during database operations.
Rollback with Delete
Record set before delete & rollback

Query:
BEGIN;
DELETE FROM students
WHERE age < 20;
Record set after delete query

Query:
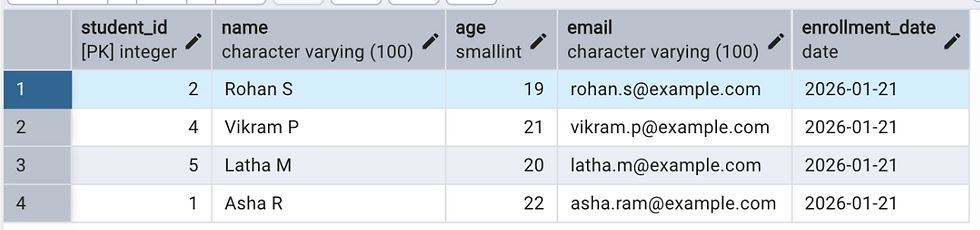
ROLLBACK;Record set after rollback query
Rollback with Drop
Record set before drop & rollback

Query:
BEGIN;
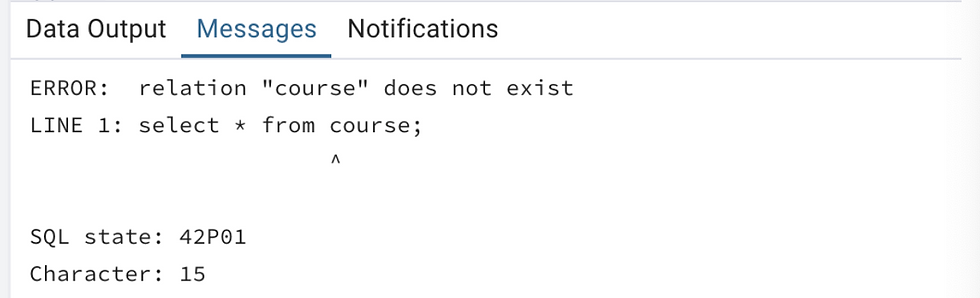
DROP TABLE course;
Error message when running the select query to display the record set
Query:
ROLLBACK;Record set after rollback

Commit with Delete
Understanding how COMMIT interact with DELETE command. It is essential for preventing accidental data loss and managing changes safely during database operations.
Record set before running the query

Query:
BEGIN;
DELETE FROM students
WHERE age < 22;
Record set after delete query

Query:
COMMIT;Record set after commit query
Querying & Filtering
We will step into querying and filtering. We’ll begin exploring how to retrieve specific information from a database using SQL queries. You’ll learn how to select the data you need, apply filters to narrow down results, and start building the foundation for more advanced analysis.
This is where SQL becomes truly powerful — turning raw tables into meaningful insights. This is the part most beginners enjoy — asking questions to the database.
Qury to retrieve all students older than 20
SELECT *
FROM students
WHERE age > 20;
Output

Query to show only name and emails of students
SELECT name, email
FROM students;
Output

Query to list all courses where credits are greater than 3
SELECT *
FROM course
WHERE credits > 3;
Output

Qurey to find students whose name starts with "A"
SELECT *
FROM students
WHERE name LIKE 'A%';
Output

Qury to display all students sorted by age in descending order
SELECT *
FROM students
ORDER BY age DESC;
Output

Primary Key & Foreign Key
Here is the SQL becomes truly powerful. Databases are not just random tables, they are connected. This connections are made using keys. It creates a relationship between tables.
Primary Key (PK) - A column that uniquely identifies each row.
Foreign Key (FK) - A column that points to a primary key in another table.
Let’s create an enrollments table with below columns that links students to courses tables
enrollment_id (SERIAL, PK) – a unique ID for each enrollment (automatically generated)
student_id (FK → students) – the ID of the student enrolling
course_id (FK →courses) – the ID of the course they’re joining
enrollment_date (DATE DEFAULT CURRENT_DATE) – the date of enrollment, which fills in automatically with today’s date.
Query:
CREATE TABLE enrollments(
enrollment_id SERIAL PRIMARY KEY,
students_id INT REFERENCES course (course_id)
enrollment_date DATE DEFAULT CURRENT_DATE
);
This table acts as a bridge between the students and courses tables. It tracks which student has enrolled in which course.
To demonstrate how the INSERT command works, We’ll add a minimum of three sample records into the table. This helps beginners clearly see how data is stored and how multiple rows can be inserted efficiently.
Query:
INSERT INTO enrollments(students_id, course_id) VALUES
(1, 200),
(16,201),
(19,202);
Record set after inserting query

Display record set
To view the complete dataset across all three tables, We can write a simple SELECT query for each table. This allows beginners to clearly see the raw records before performing joins or applying filters.
Query to display records from all the 3 table
Query:
SELECT
e.enrollment_id,
s.name AS student_name,
c.course_name,
e.enrollment_date
FROM enrollment e
JOIN students s ON e.student_id = s.student_id
Join course c ON e.course_id = c.course_id;
Display the record set after select query

This query retrieves every record from all three tables, giving a full view of the data structure and the relationships between them.
Attempt to insert an invalid record
In this section, We’ll try inserting a record into the enrollments table using a course_id that does not exist in the courses table.
This helps beginners understand how foreign key constraints work and how the database prevents invalid or inconsistent data.
Query:
INSERT INTO enrollments (student_id, course_id)
VALUES (1, 999);
Error message while inserting data

It display the error message because the course_id violates the foreign key constraint, demonstrating how the database enforces data integrity.
Bringing It All Together
SQL can seem a little technical when you first look at it, but once you understand the basic flow—creating a database, setting up tables, adding information, filtering what you need, and linking related data—it starts to feel surprisingly logical. Every new concept builds gently on the previous one, and before you know it, you’re not just writing commands… you’re designing a real relational database that actually makes sense.
For beginners, the most important thing to remember is that SQL isn’t about memorizing complicated code. It’s about understanding how data is organized and how to ask clear questions. When you learn how to store information in tables, update it when things change, and connect different tables together, you gain the ability to manage data in a clean, structured, and meaningful way.
Whether you’re a student learning SQL for the first time, someone exploring data out of curiosity, or a beginner preparing for a career in analytics, SQL gives you a powerful foundation. It teaches you how to think logically, how to structure information, and how to retrieve exactly what you need with simple, readable commands.
The more you practice, the more natural it becomes. Try small examples, experiment with your own tables, and don’t be afraid to make mistakes—SQL is very forgiving, and every query teaches you something new. With consistent practice, SQL will shift from feeling unfamiliar to feeling like a comfortable language you can rely on every day.
Happy Reading ! :)


