Spring AI - Part 2: Dynamic Prompts, System Messages, and Streaming

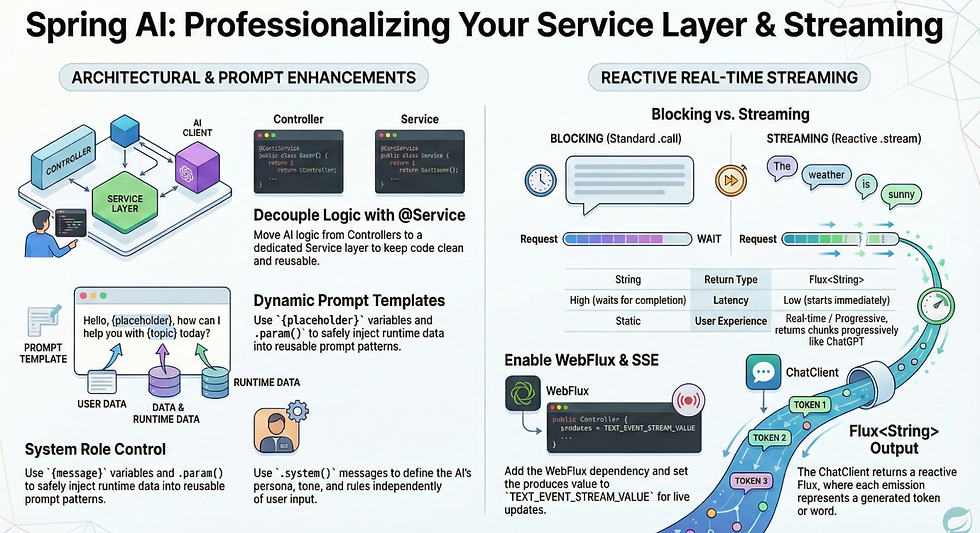
Welcome back! In Part 1, we built a simple HTTP endpoint that sends a user message to an AI model and returns plain text. In Part 2, we go further by writing cleaner code, building reusable prompts, controlling the AI's behaviour, and streaming responses in real time.
What you'll build
By the end of this post, you will have:
A clean service layer (AiService) to keep AI logic separate from the controller.
A new endpoint that uses template variables (e.g., {topic} ) so you can reuse the prompt patterns easily.
A new endpoint that uses a system message to control how the model behaves (tone, style, rules).
A streaming endpoint using ChatClient.stream() that returns the answer progressively.
Prerequisites
Your Part 1 project runs successfully with OpenAI or Ollama.
No new dependencies are needed for templates or system messages.
One new dependency is required for streaming (WebFlux, added in Section 6).
Refactor: Move AI Logic into a Service
In Part 1, the AI call lived directly inside the controller. As we add more endpoints, it is better to move the logic into a @Service class. This keeps controllers focused on HTTP only.
Create src/main/java/com/spring/ai/springaidemo/AiService.java:
package com.spring.ai.spring_ai_demo;

import org.springframework.ai.chat.client.ChatClient;
import org.springframework.stereotype.Service;

@Service
public class AiService {

    private final ChatClient chatClient;

    public AiService(ChatClient.Builder builder) {
        // Spring Boot autoconfigures ChatClient.Builder for your chosen provider.
        // Calling builder.build() gives a ready-to-use ChatClient.
        this.chatClient = builder.build();
    }

    public String simpleAnswer(String message) {
        return chatClient
                .prompt()
                .user(message)
                .call()
                .content();
    }
}
Update AiController.java to use the service:
package com.spring.ai.spring_ai_demo;

import org.springframework.web.bind.annotation.GetMapping;
import org.springframework.web.bind.annotation.RequestParam;
import org.springframework.web.bind.annotation.RestController;

@RestController
public class AiController {

    private final AiService aiService;

    // Spring injects AiService automatically
    public AiController(AiService aiService) {
        this.aiService = aiService;
    }

    @GetMapping("/ai/hello")
    public String hello(@RequestParam(defaultValue = "Hello World!") String message) {
        return aiService.simpleAnswer(message);
    }
}
Test (same as Part 1):
Understanding the Service Layer
4.1 @Service
@Service
public class AiService{
Marks the class as a Spring-managed service bean.
Spring creates one instance and injects it wherever needed (e.g., into AiController).
Keeps AI logic in one place - easy to update or test.
4.2 Constructor Injection
public AiService(ChatClient.Builder builder) {
	this.chatClient = builder.build();
}
ChatClient.Builder is auto-providedby Spring Boot based on your application.properties.
No manual HTTP configuration needed - Spring AI handles base URLs, API keys, and model selection
Prompt Templates (Dynamic Prompts)
In Part 1, you passed raw user text straight to the model. Prompt templates let you write a reusable structure with {placeholder} variables filled at runtime.
5.1 Add the Method to AiService
Add this method to AiService.java:
public String explainInStyle(String topic, String audience) {
        return chatClient
                .prompt()
                .user(u -> u
                        .text("Explain \"{topic}\" to a {audience}. Keep it short and clear.")
                        .param("topic", topic)      // Replaces {topic} in the template
                        .param("audience", audience)) // Replaces {audience} in the template
                .call()
                .content();
}
5.2 Add the Endpoint to AiController
Add this method to AiController.java:
@GetMapping("/ai/explain")
public String explain(
		@RequestParam String topic,
		@RequestParam(defaultValue = "beginner") String audience) {
	return aiService.explainInStyle(topic, audience);
}
5.3 How it works
.user(u -> u
	.text("Explain \"{topic}\" to a {audience}.")
	.param("topic", topic)
	.param("audience", audience))
.text(...) defines the prompt pattern.
.param("key", value) safely substitutes {key}in the text.
No manual String.format() or concatenation needed - cleaner and safer.
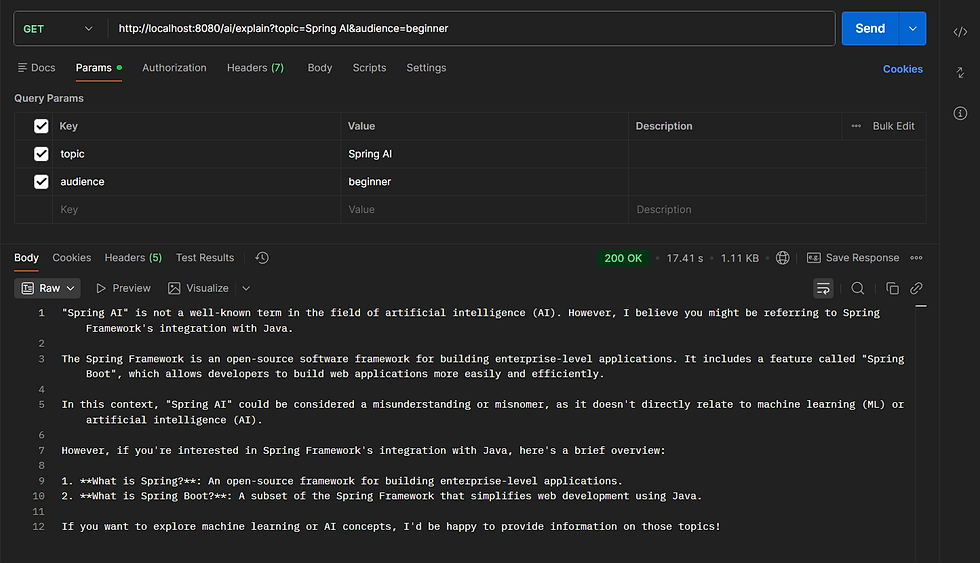
Test URLs:
http://localhost:8080/ai/explain?topic=Spring AI&audience=beginner
http://localhost:8080/ai/explain?topic=Spring&audience=senior) developer
System Messages (Control AI Tone and Rules)
AI prompts have roles: system, user, and assistant. The system role sets the behavior and tone of the model. The user role is what the end user asks.
6.1 Add Tutor Mode to AiService.java
Add this method to AiService.java:
public String tutorAnswer(String question){
	return chatClient
          	.prompt()
             	.system("""
              	You are a friendly Java tutor.
                 	- Use simple and clear language.
                 	- Use short paragraphs.
                 	- If you mention code, keep it minimal.
                	- Always encourage the learner.
                	""")
          	.user(question)// The learner's actual question
             	.call()
             	.content();
}
6.2 Add Endpoint to AiController
@GetMapping("/ai/tutor")
public String tutor(@RequestParam String question){
	return aiService.tutorAnswer(question);
}
6.3 How it works
.system("You are a friendly Java tutor...")
.user(question)
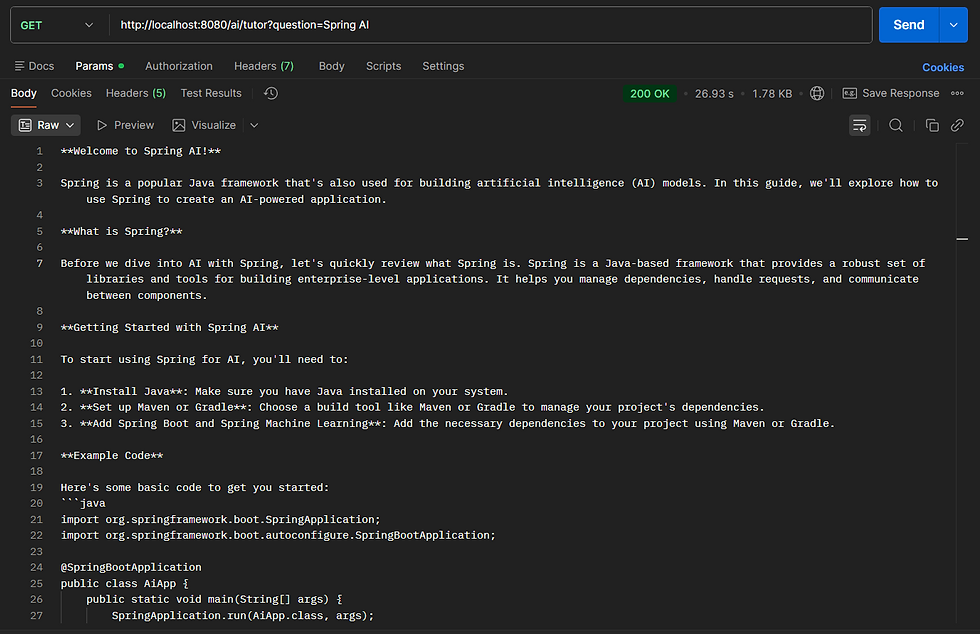
system(...) runs before the user message and sets consistent rules for every call.
The model now always replies in a friendly, simple way - no need to repeat it in every request.
Test URLs:
Streaming Responses (Real-Time Output)
So far, every endpoint waits for the complete response before returning it. Streaming changes this: it returns text chunk by chunk as the model generates it - exactly like you see in ChatGPT.
Spring AI supports streaming using stream() on the ChatClient, which returns a reactive Flux<String>.
7.1 Add WebFlux Dependency
Open pom.xml -> Add inside <dependencies>:
<dependency>
	<groupId>org.springframework.boot</groupId>
	<artifactId>spring-boot-starter-webflux</artifactId>
</dependency>
Run: ./mvnw dependency:resolve
7.2 Add Streaming Method to AiService
Add these imports + method to AiService.java:
public Flux<String> streamAnswer(String message){
	return chatClient
		.prompt()
        	.user(message)
       	.stream()// Switch from .call() to .stream() for reactive output
       	.content(); // Returns Flux<String> - each chunk is a token from the model
}
7.3 Add Streaming Endpoint to AiController
Add these imports + method to AiController.java:
@GetMapping(value = "/ai/stream", produces = MediaType.TEXT_EVENT_STREAM_VALUE)
public Flux<String> stream(@RequestParam String message){	// TEXT_EVENT_STREAM_VALUE sends chunks as Server-Sent Events (SSE)
	return aiService.streamAnswer(message);
}
7.4 How it works
.stream() // Instead of .call()
.content() // Returns Flux<String>
.call() -> Blocking: waits for full response, returns String.
stream() -> Recative: returns Flux<String>, each emission is a token/word chunk.
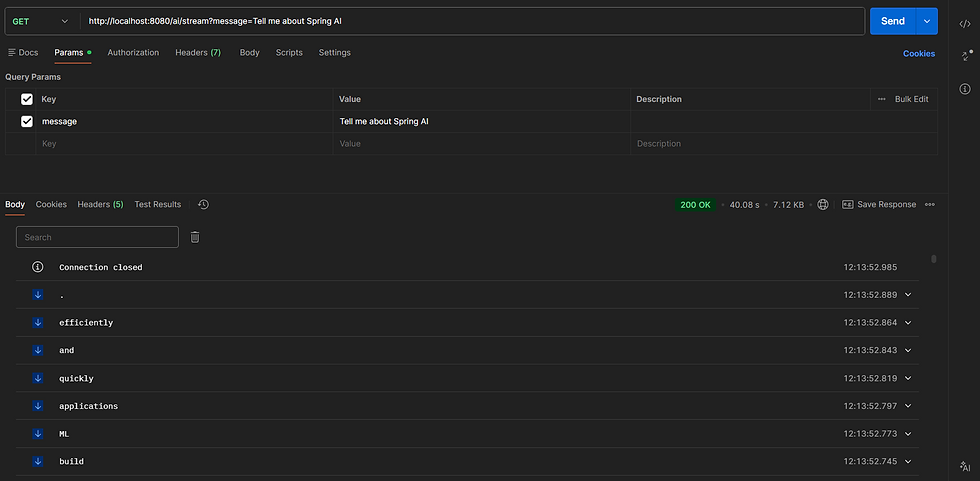
TEXT_EVENT_STREAM_VALUE sends each chunk over HTTP via Server-Sent Events (SSE).
Test in Browser:
http://localhost:8080/ai/stream?message=Tell me about Spring AI
Final Complete Files
AiService.java
package com.spring.ai.spring_ai_demo;

import org.springframework.ai.chat.client.ChatClient;
import org.springframework.stereotype.Service;
import reactor.core.publisher.Flux;

@Service
public class AiService {

    private final ChatClient chatClient;

    public AiService(ChatClient.Builder builder) {
        this.chatClient = builder.build();
    }

    // Part 1: Simple Answer
    public String simpleAnswer(String message) {
        return chatClient
                .prompt()
                .user(message)
                .call()
                .content();
    }

    // Part 2a: Prompt templates
    public String explainInStyle(String topic, String audience) {
        return chatClient
                .prompt()
                .user(u -> u
                        .text("Explain \"{topic}\" to a {audience}. Keep it short and clear.")
                        .param("topic", topic)
                        .param("audience", audience))
                .call()
                .content();
    }

    // Part 2b: System message
    public String tutorAnswer(String question){
        return chatClient
                .prompt()
                .system("""
                        You are a friendly Java tutor.
                        - Use simple and clear language.
                        - Use short paragraphs.
                        - If you mention code, keep it minimal.
                        - Always encourage the learner.
                        """)
                .user(question)
                .call()
                .content();
    }

    // Part 2c: Streaming
    public Flux<String> streamAnswer(String message){
        return chatClient
                .prompt()
                .user(message)
                .stream()
                .content();
    }
}
AiController.java
package com.spring.ai.spring_ai_demo;

import org.springframework.http.MediaType;
import org.springframework.web.bind.annotation.GetMapping;
import org.springframework.web.bind.annotation.RequestParam;
import org.springframework.web.bind.annotation.RestController;
import reactor.core.publisher.Flux;

import java.awt.*;

@RestController
public class AiController {

    private final AiService aiService;

    public AiController(AiService aiService) {
        this.aiService = aiService;
    }

    @GetMapping("/ai/hello")
    public String hello(@RequestParam(defaultValue = "Hello World!") String message) {
        return aiService.simpleAnswer(message);
    }

    @GetMapping("/ai/explain")
    public String explain(
            @RequestParam String topic,
            @RequestParam(defaultValue = "beginner") String audience) {
        return aiService.explainInStyle(topic, audience);
    }

    @GetMapping("ai/tutor")
    public String tutor(@RequestParam String question){
        return aiService.tutorAnswer(question);
    }

    @GetMapping(value = "ai/stream", produces = MediaType.TEXT_EVENT_STREAM_VALUE)
    public Flux<String> stream(@RequestParam String message){
        return aiService.streamAnswer(message);
    }
}
What You Have Achieved
At this point, you have:
A service layer keeping AI logic clean and reusable.
Prompt templates with {placeholders} for dynamic, reusable prompts.
System messages for consistent AI behaviour across all requests.
Streaming real-time responses using Flux<String> and SSE.
In Part 3, we will add:
Structured output - map AI responses directly into Java records/POJOs
Validation and error handling - gracefully handle bad inputs and API errors.
Multiple system personas - switch between tutor, code reviewer, and summarizer roles.
You've done it! From raw prompts to a full AI service layer.
Questions? Comment your test results below.
Source: Spring AI Reference Docs - ChatClient API, Prompt Templates


