Performance Testing with JMeter


Introduction
Consider this scenario: The scenario is about someone desperate to buy airline tickets who waited until midnight 12:00 AM for an airline discount event. At midnight when the airline announces its ticket sale you can finalize your purchase of reserved flights since the promotion runs while you complete the payment. The website crashes unexpectedly during your operation which causes the session to end abruptly.
You experience frustration by hitting the refresh button which results in the "Server Overloaded" error displayed to users. The website becomes accessible to users following the complete elimination of discounted tickets from the promotional sale. Reported usage of digital technology in present-day business demands performance testing to become essential for digital projects.
What is Performance Testing?
Performance testing stands as a non-functional testing technique which verifies software stability together with speed while examining its scalability alongside workload response behavior.
Note: Performance testing must always be done after functional testing.
JMeter: A Powerful Open-Source Performance Testing Tool
Java platform generates the open-source solution Apache JMeter for testing that enables load testing capabilities along with functional testing and API testing and database testing features that manage multiple user requests for performance measurement under diverse conditions
Getting Started with Apache JMeter
Using JMeter for the first time requires several steps to complete.
Check Java Installation
o Run command java -version to check if Java is installed on your system.
Download JMeter
o You must visit the Apache JMeter website to download its most recent version.
Extract JMeter Files
o After downloading the file users should unzip it while placing the JMeter folder in their preferred directory.
Launch JMeter
o On Windows: Navigate to /bin and run jmeter.bat file.
o On Mac: Open Terminal, go to /bin, and execute sh jmeter.sh script.
Creating Your First JMeter Test
To create and execute a performance test in JMeter:
Start JMeter
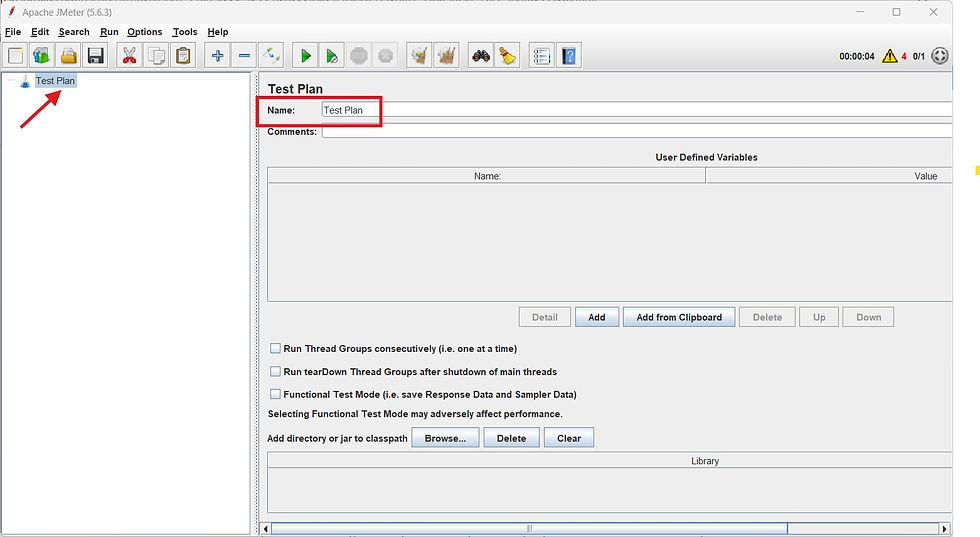
Create a Test Plan
A Test Plan is a project container that holds all test elements. Complete Project is saved as Test Plan.
3. Add a Thread Group
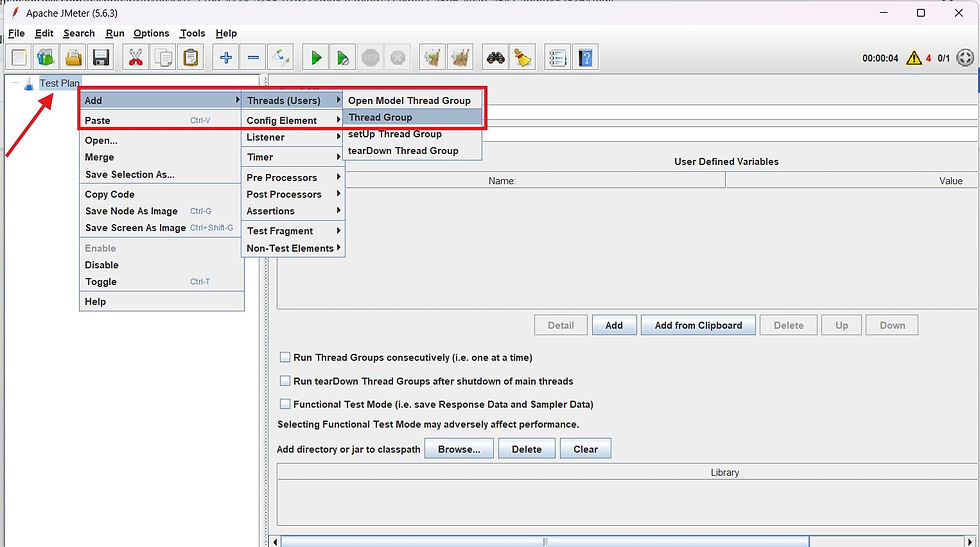
Set the number of test users (threads). To achieve this Right Click on Test Plan---->Add---->Thread(users)---->Thread Group
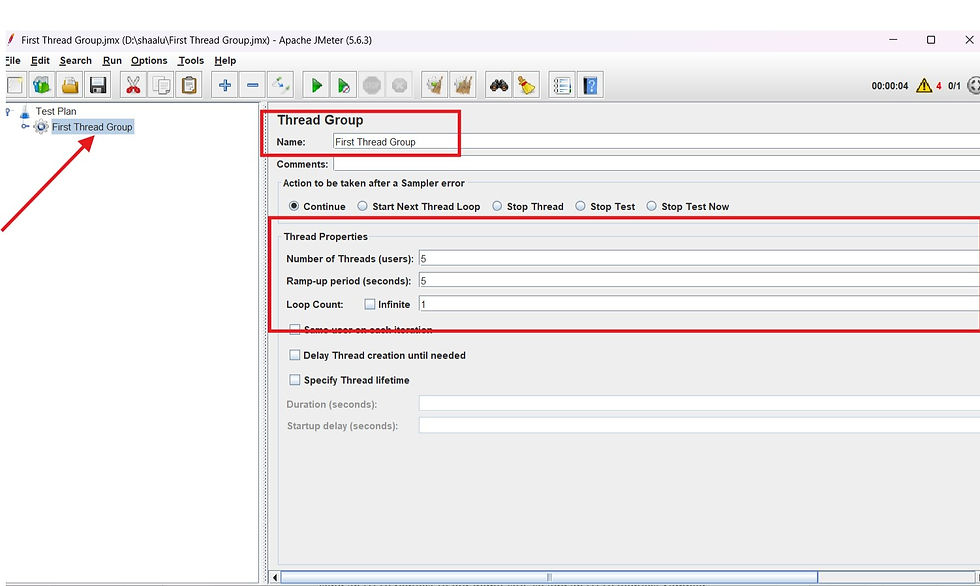
Set up the Thread Group through parameters which include :
o Name: Choose either a custom name or maintain the default value of "Thread Group" under name .
o Number of Threads: requires a specification to define the test user simulation count (e.g. 5 users).
o Ramp-up Period: The time period for user addition should be defined. (e.g. 5 seconds).
o Loop Count: The test execution cycle needs users to define the number of recruitment times through loop count parameter input (e.g., 1 time).
4. Add a Sampler
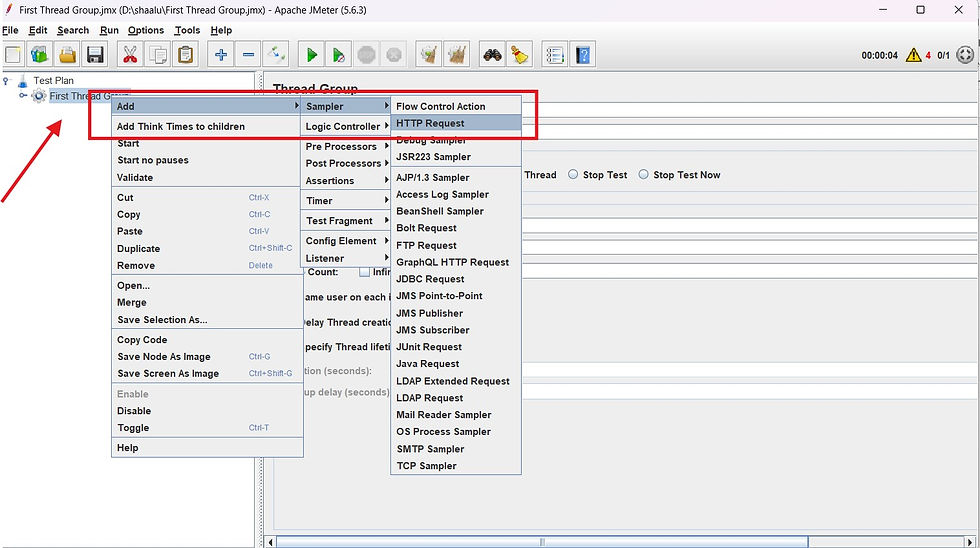
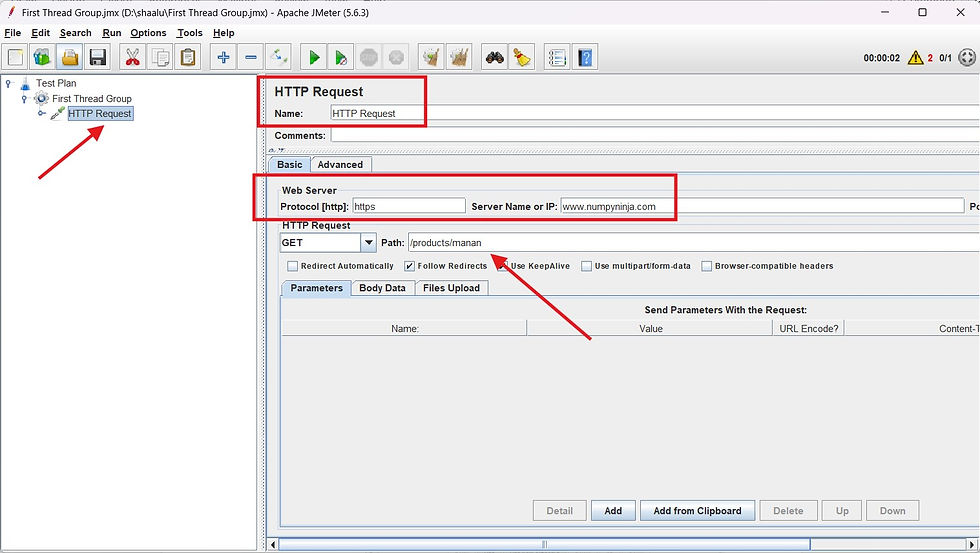
Samplers specify the kind of requests which will be sent by the threads. In this instance we will be sending an HTTP request to a demo site. To do this; > right click on the Thread Group > Add > Sampler > HTTP Request.
Configure the Sampler as follows::-
o Name: I decided to keep my method name as the default “HTTP Request”, but you are welcome to use a custom name.
o Server Name or IP: Put in there the server address of your target (e.g., www.numpyninja.com).
o Protocol: Place it to " https " This is to make it secure.
o Ensure Security: Websites that only use HTTP are treated as insecure and shouldn't be accessed.
5. Add Listeners
In order to see the outcome of your test run, you must add Listeners. Listeners are used to capture and show results, as well as logs and debugging details.
One of the most popular Listeners is the View Results Tree.
To include it, right-click on your thread group, then choose "Add" > "Listener" > "View Results Tree."

We have successfully created a basic JMeter script to perform the testing of the NumPy Ninja website. The script Simulates a number of user interactions with the site to check how it performs under different loads.
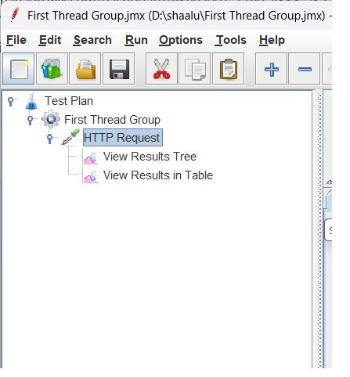
Now click on 'Save'. The saved test file will have a .jmx extension.
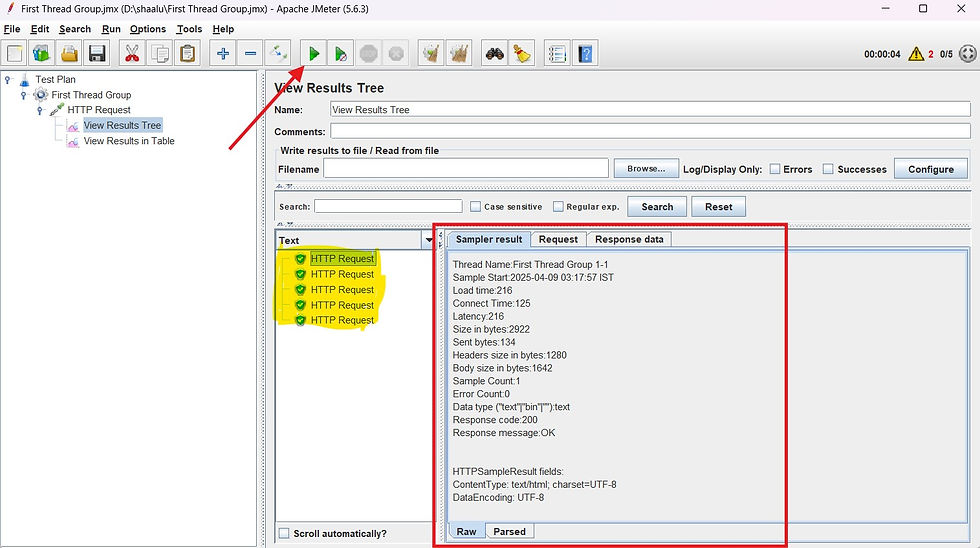
You can run the test by selecting the top green arrow button. The Listener displays the test output after successful completion.
This test was successful because the output displays green icons. Detailed results including load time, connection time, errors, request data, response data and additional information are displayed on the right side. The results can be stored for future reference.
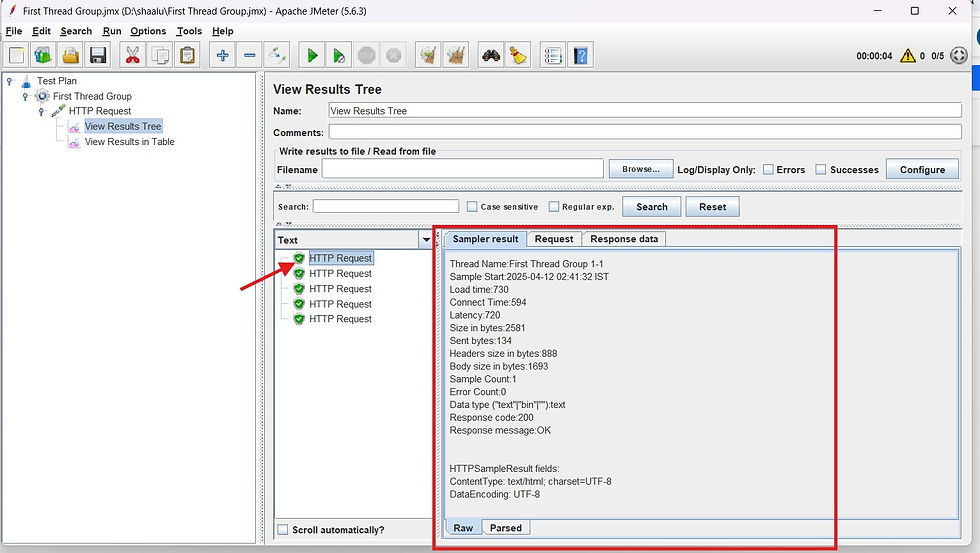
We’ll also add a “View Results in Table” Listener, Save and run the test.

The View Results Table shows an additional data: start time, bytes sent , connect time, latency and more.
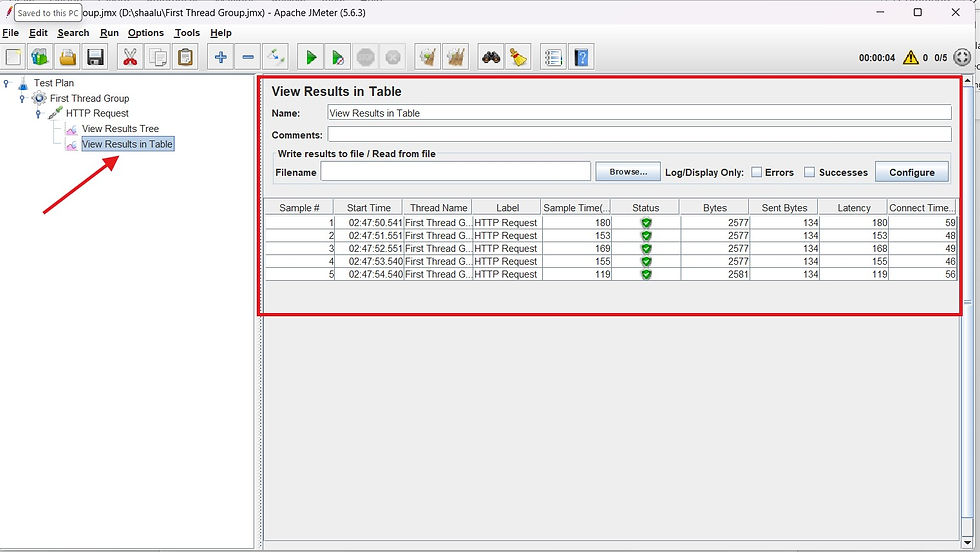
The test was successful.
Record Test in JMeter using Test Script Recorder
Start JMeter
Select Test Plan on the tree
Add Thread Group
Right click on the Test Plan and add a new thread group : Add----> Threads(users)--->Thread Groups

Add Recording Controller
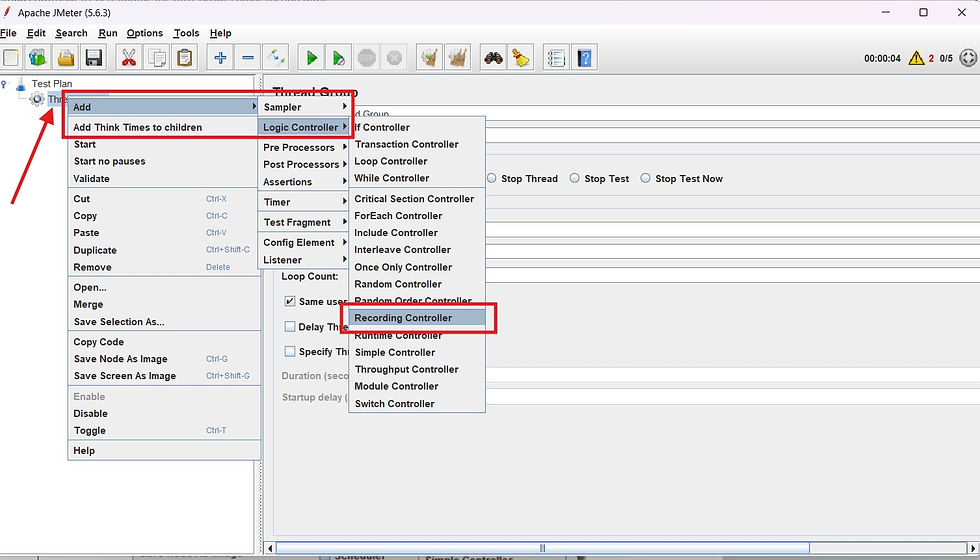
Right click on the “Thread Group” and Select Add → Logic Controller → Recording Controller.
This will create a Recording Controller under the Thread Group to capture recorded requests.
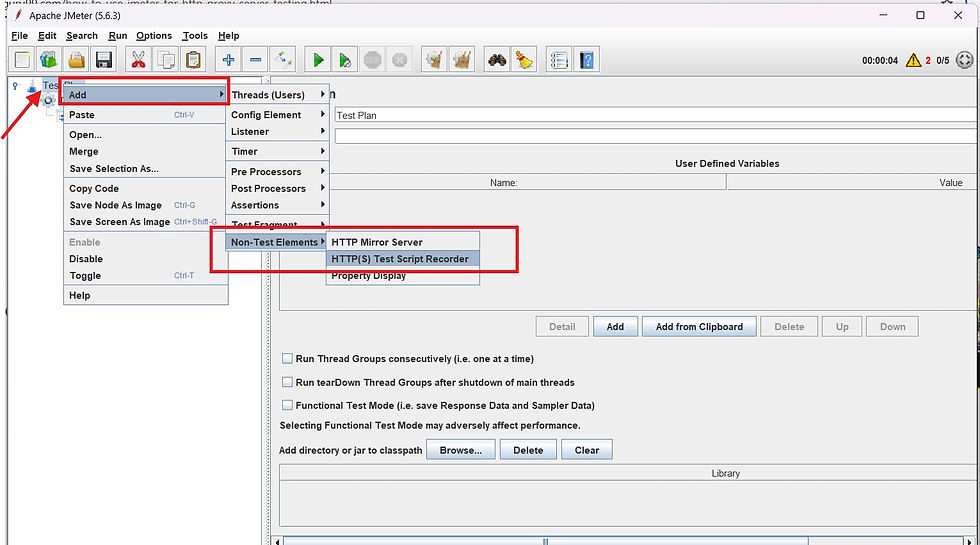
To Add HTTP(S) Test Script Recorder
Right click on the “Test Plan” and add a HTTP(S) Test Script Recorder : Add => Non-Test Elements =>
HTTP(S) Test Script Recorder
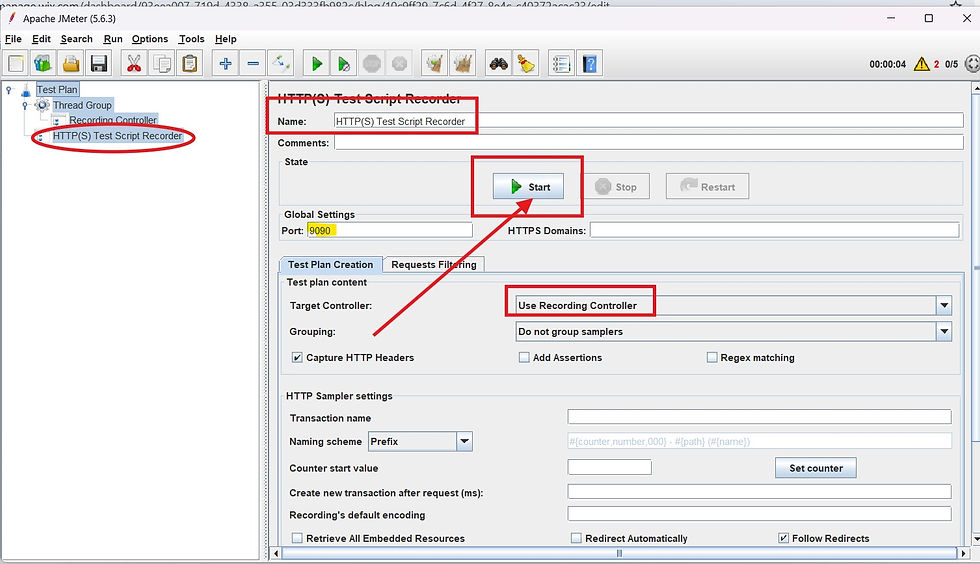
Set Target Controller as recording controller where your recorded scripts will be added
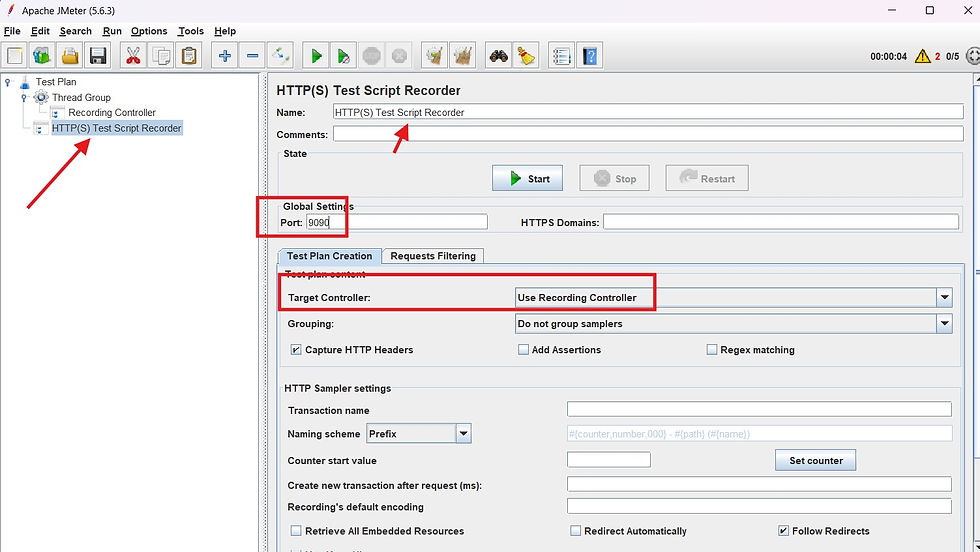
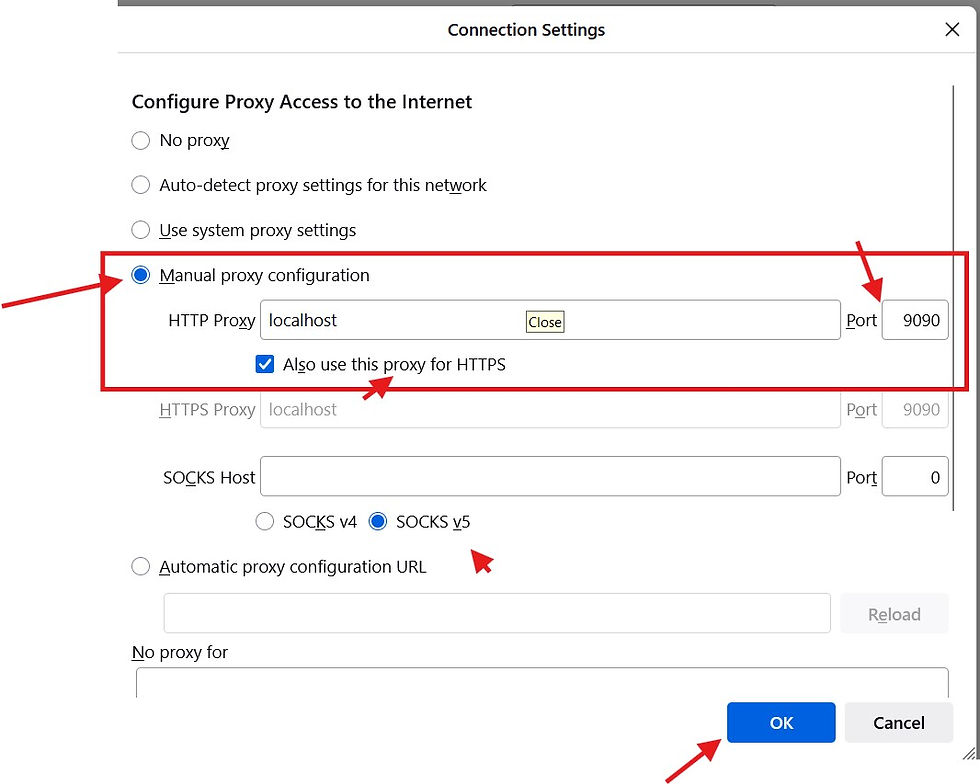
Before you begin recording the test in JMeter, you need to configure the proxy settings in your browser (I used Firefox). Follow these steps:
Go to General in Firefox settings.
Scroll down to Network Settings and click on Settings.
In the Connection Settings window, enter the HTTP proxy details as below:-
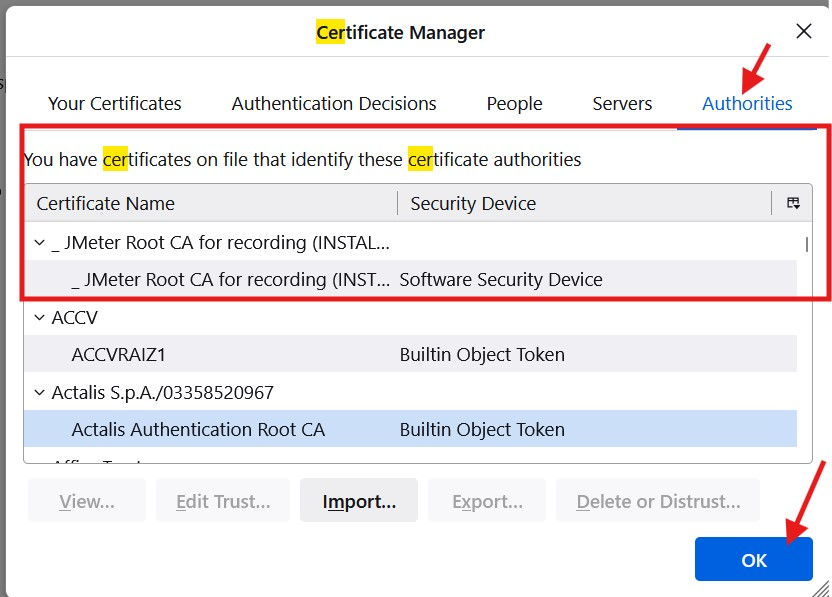
Next, search for Certificates in your browser settings, then click on View Certificates. After that, import the necessary certificate. Make sure the certificate is added appropriately by checking the Authorities tab after it has been imported.
Start Proxy Server
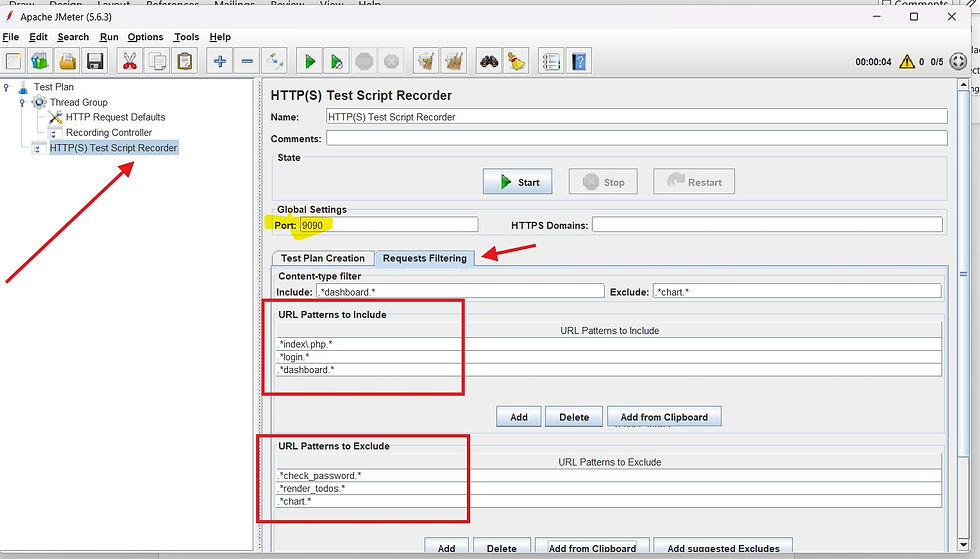
Go back to the HTTP(S) Test Script Recorder in JMeter and click on the Start button. This will start the JMeter proxy server to record the activities on web application.
Record your activity
Now Launch http://www.testrail.com in your web browser (JMeter still open)
Do activities such as entering the <username> and <password> click on Login button
Back to JMeter, in HTTP Proxy Server, click Stop when finished
After finishing recording, you will see JMeter automatically created in the recording controller as shown below:-
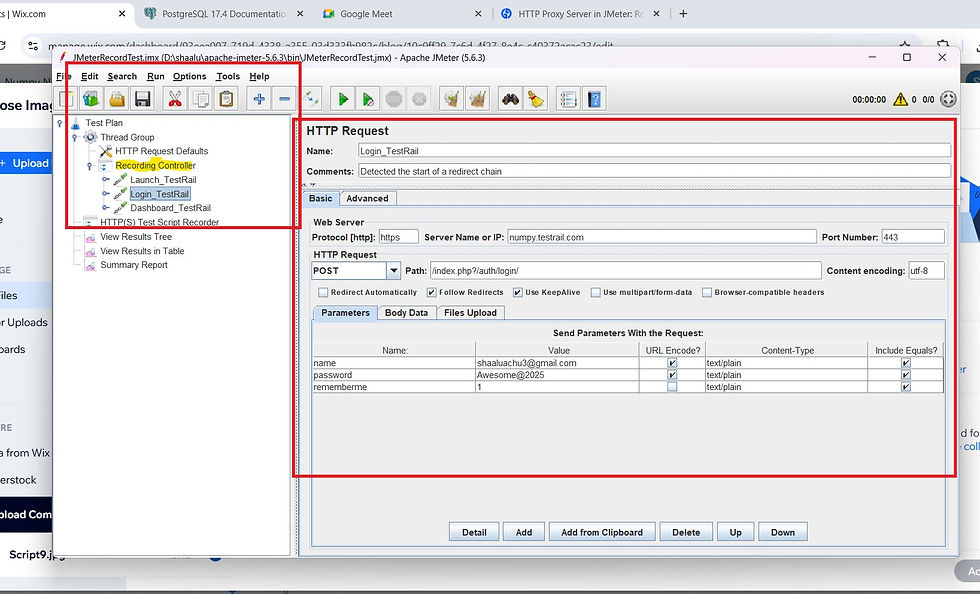
Finally ,JMeter has already recorded a user request of Test Rail website. https://numpy.testrail.com
Click File => Save your Test Plan as JMeterRecordTest.jmx.
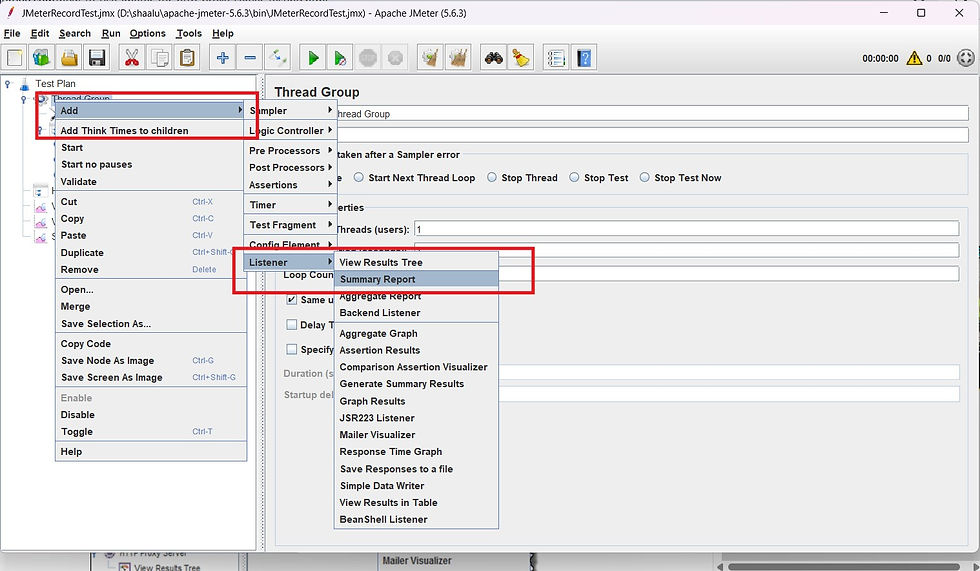
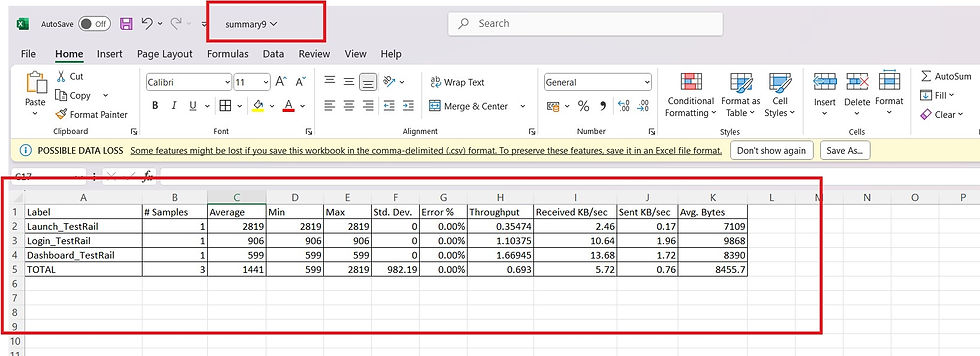
Select Thread Group => Add => Listener=> Summary Report
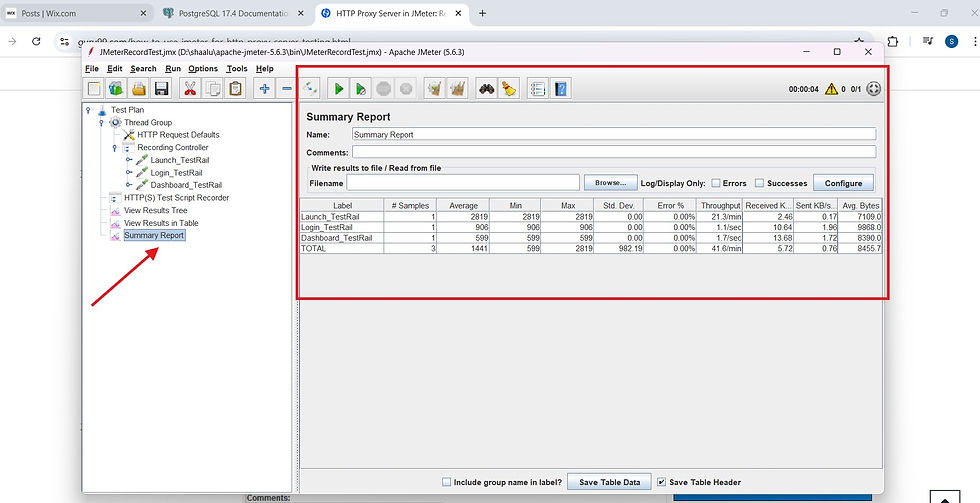
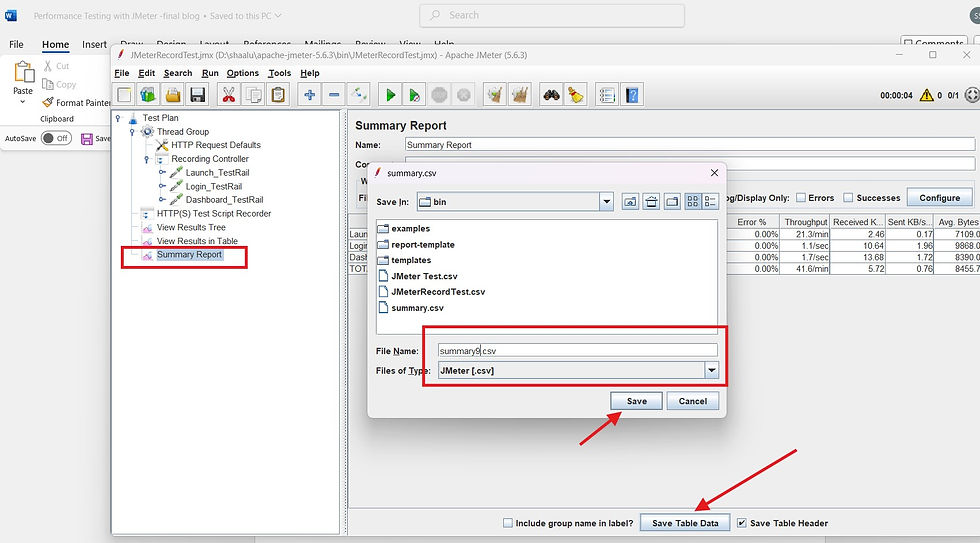
Click Save Table Data to save test result to file . Test Result in JMeter is saved in *.csv format as default
Key Benefits of JMeter
Thorough modification and customization is possible with JMeter because this tool presents itself for open-source modification.
Record & Playback functionality allows users to build their test scenarios from finished activities so the system can generate automated activities.
The distributed load testing function enables users to replicate heavy traffic across multiple machines.
Through its wide-ranging plugin support the program enables users to obtain access to more capabilities apart from its reporting options.
Conclusion
JMeter serves as a potent flexible platform to help testing teams verify application stability while multiple users interact with the system.
JMeter provides users with a test-plan generation capability to develop solutions that match precise performance requirements.
Performance testing happens with JMeter because organizations find its setup process easy while benefiting from its portable and expandable characteristics.
The system performance of JMeter achieves total assessment capability because it works with different testing models that include load testing and volume testing.
The JMeter tool implements numerous plugins to maintain its position as the leading performance testing tool through an expansive developer community.
I hope this blog post was very helpful in helping us understand how JMeter's logging methods to record tests, rectify issues and tracks performance. Understanding these JMeter techniques lets you develop efficient test designs as well as analyze outputs to validate system reliability during load tests.
‘Test smarter, not harder — Let JMeter handle the load.'
Embrace the journey of exploration, continue testing and never stop learning!!!


