Mastering Screenshot Capture in Selenium WebDriver — From Basics to TestNG & Cucumber Integration
Automation testing has become a crucial part of every product’s software testing strategy. The ability to execute scripts and obtain results without manual intervention has led to significantly higher efficiency within shorter timelines. Among the many tools available in test automation, screenshots are one of the simplest yet most powerful. They provide instant visual feedback when a test fails, making debugging faster and easier. In this blog, we’ll explore different ways to capture screenshots in Selenium to make test reports more insightful and effective.
Screenshot:
A Screenshot is a digital image that captures the visible contents of a screen or a portion of it. In selenium (tool for automating web browser interactions), a screenshot refers to capturing the element or viewport state of a web page during test execution.
Importance of Screenshots in Selenium,
Debugging Test Failures
Documentation and Bug Reporting
Validating Visual Layouts
Proof of Testing
Helping Non-Technical Stakeholders
Types of Screenshots Capturing Techniques:
Capturing Basic Screenshots Using Selenium
Taking Screenshots in TestNG Framework
Integrating Screenshot Capture with Cucumber Scenarios
CAPTURING BASIC SCREENSHOTS USING SELENIUM:
Selenium WebDriver provides a built-in interface called TakesScreenshot. You can capture:
Element specific screenshots
Viewport (visible area) screenshots
Full page screenshots
ELEMENT SPECIFIC SCREENSHOTS
An element-level screenshot captures only a specific web element on the page, such as a button, form field, or image. This is useful for validating the visual state or appearance of a particular component during testing. Selenium WebDriver provides the TakesScreenshot interface to capture the current screen of the browser and getScreenshotAs() method (defined in the TakesScreenshot interface) to capture the particular element.
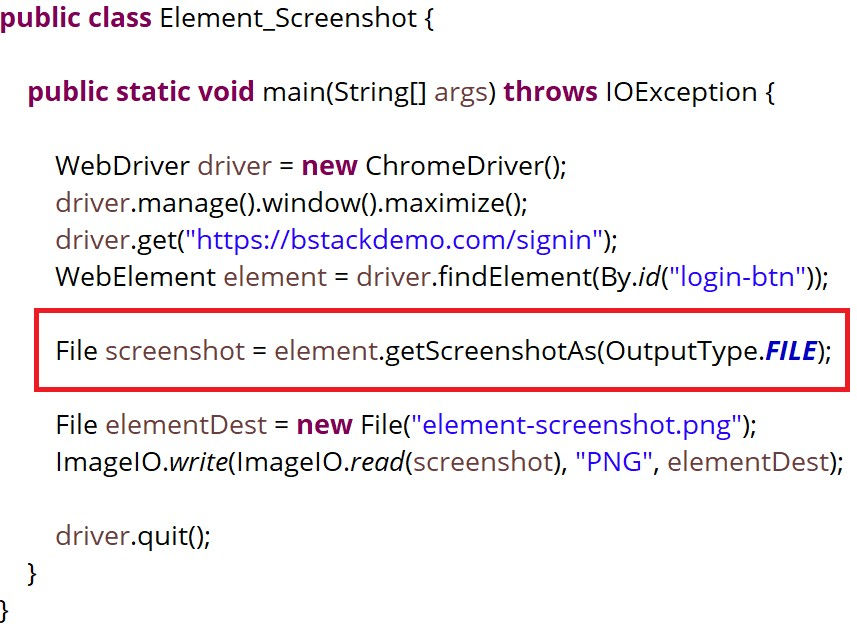

Here, element Screenshot is captured using getScreenshotAs method and the output is saved as a File in OutputType.File method. Screenshot is attached to the directory itself as element-screenshot.png, it can also be saved in a separate folder structure.
VIEWPORT (VISIBLE AREA) SCREENSHOTS
Viewport screenshot captures only the visible area of the browser window. It mostly doesn't include content that needs scrolling. Mainly useful for popups, error messages, or above-the-fold content. Selenium WebDriver provides the TakesScreenshot interface to capture the current screen of the browser.


Common ways to capture screenshots via OutputType<T>,
OutputType.FILE - Returns a File object, save as .png or .jpg
OutputType.BYTES - Returns screenshot as a byte array
OutputType.BASE64 - Returns screenshot as a Base64-encoded String
Here, viewport Screenshot is captured using TakesScreenshot interface and getScreenshotAs method, the output is saved as a File in OutputType.File method. Screenshot is attached to the directory itself as
fullpage-screenshot.png, it can also be saved in a separate folder structure.
FULLPAGE SCREENSHOTS
A full-page screenshot captures the entire visible content of the web page, including areas that require scrolling. It is helpful for getting the entire view of the UI and identifying layout or rendering issues across the entire page. Taking full-page screenshot in Selenium is bit-lengthy because Selenium's pre-defined getScreenshotAs method only captures the visible area of the webpage. Then, JavaScript is used to scroll the page and stitch screenshots together. To simplify this process, third-party tools like AShot is used. ShootingStrategy is an interface and viewportPasting() is a static method in the ShootingStrategies utility class from the AShot library.

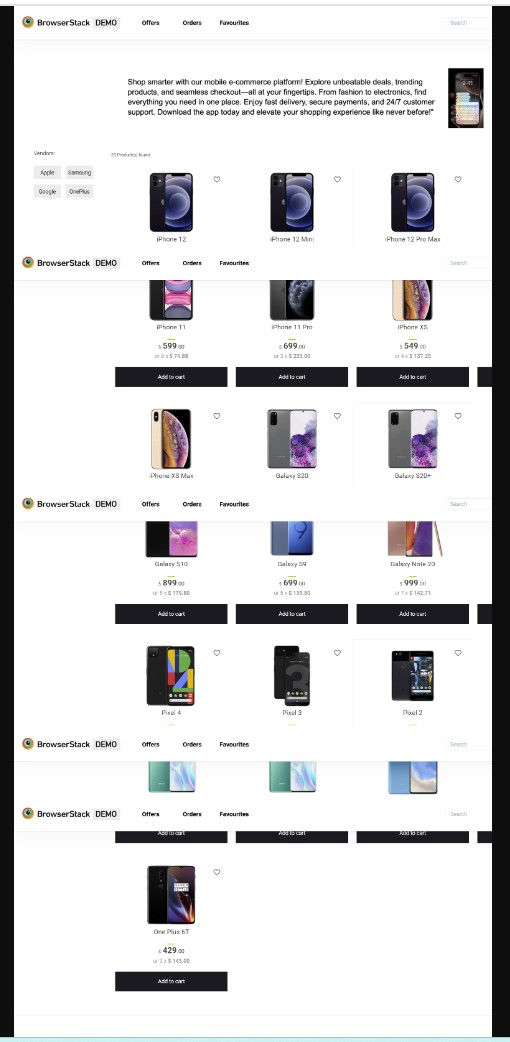
Here, full-page Screenshot is captured using,
ShootingStrategy is a method in the AShot class
ShootingStrategies is a utility class provided by AShot that offers predefined strategies
viewportPasting(100) static method to enable full-page screenshot by scrolling the viewport. The number 100 refers to the scrolling timeout in milliseconds between each scroll action while capturing the full-page screenshot
TakesScreenshot interface
Screenshot is attached to the directory itself as fullpage-ashot.png, it can also be saved in a separate folder structure
TAKING SCREENSHOTS IN TESTNG FRAMEWORK
Capturing screenshots is a common practice in automated testing. In a TestNG-based framework, screenshots are best captured within ITestResult listener or in the @AfterMethod hook. This allows automatic capture of screenshots upon failure, aiding in faster debugging and generating rich HTML reports with visuals. TestNG provides the @AfterMethod hook and the ITestResult interface like Selenium's TakesScreenshot interface to take screenshots. @AfterMethod integrates seamlessly with TestNG's lifecycle and is useful for generating visual logs in automated reports.
Basic Workflow to Capture and Save Screenshots in TestNG
Include selenium-java and testng dependencies in pom.xml
Launch browser in @BeforeMethod (highlighted in RED)
Execute test in @Test (highlighted in GREEN)
On failure, capture screenshot in @AfterMethod (highlighted in BLACK)
Save it locally or attach to reports. Here, Screenshots are attached to the directory itself, it can also be saved in a separate folder structure.


Here, to simplify the process in TestNG - @BeforeMethod, @Test and @AfterMethod is given in the same class file.
Usually, it is defined in,
@BeforeMethod - Driver_Factory class file to setup the browser
@Test - TestClasses class file to execute test cases
@AfterMethod - Driver_Factory or BaseClass file to take screenshot and terminate the browser
However, the packages and class structure can vary according to the requirements.
INTEGRATING SCREENSHOT CAPTURE WITH CUCUMBER SCENARIOS
In Cucumber-based test automation, capturing screenshots is especially helpful for visual debugging of failed scenarios. Screenshots are usually captured by @After hook in Hooks.java after each failed scenario. This provides a seamless visual trace of failures aligned with the feature files. With the use of Cucumber report plugins, screenshot can be embedded into the generated report for the failed scenario. If reporting plugins are not used, the screenshots won't be saved or visible anywhere — it's just attached in memory and discarded after the test ends.
Why Capture Screenshots in Cucumber?
To capture the state of the application when a scenario fails
Enhance visibility in Cucumber reports (HTML, Extent, or Allure)
Attach the screenshot directly to the report via scenario.attach()
Essential for debugging and regression analysis
Screenshots can also be used for each step (via @BeforeStep/@AfterStep) for more detailed reporting
Basic Workflow to Capture and Save Screenshots in TestNG
Include selenium-java, cucumber-java and cucumber-testng dependencies in pom.xml
Launch browser using @Before hook from Hooks file

Execute TestRunner file or Feature file (which is mapped with Step Definition file)
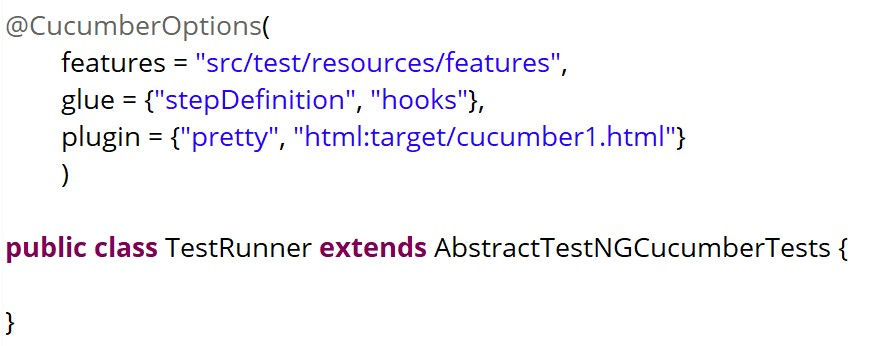

On failure, capture screenshot in @After hook. Save screenshot locally or attach to reports

Here, Screenshots are attached to the directory itself, it can also be saved in a separate folder structure.
These are the various ways to capture Screenshots in Selenium along with TestNG and Cucumber. Reports like Allure, Extent, Chain Test and so on can be generated by adding corresponding pom dependencies and plugins in POM.xml. However, they are few best practices to handle Screenshots,
Store screenshots with meaningful file names or attach directly to reports
Usage of timestamps to avoid overwriting
Capture only on failure to save resources and reduce execution time
Combine with logging for full traceability
Bonus Tip,
Elements can be highlighted in the Screenshots using Graphics2D (a Java class in the java.awt package). Elements can be highlighted in element, visible area or full-page level.
Graphics2D can be used like,
Graphics2D graphics = image.createGraphics();
graphics.setStroke(new BasicStroke(5));
graphics.drawRect(0, 0, width - 1, height - 1);
Highlighted Screenshot:

Capturing screenshots helps to debug faster, report better, and communicate test results visually. Whether using TestNG, Cucumber, or raw Selenium, having a reliable screenshot strategy boosts the clarity of your test automation suite.


