How to Work with Delimited Files in Excel

Delimited files are data files which have values separated by certain special characters (e.g.: Tab, Comma, Semi-Colon). They are in widespread use because they can be easily accessed by various platforms and spreadsheet software apart from Excel. Some of the most commonly used delimited file formats are:
Comma Separated Values Files (CSV): CSV files are commonly used because they are supported by nearly all data processing tools and programming languages.
Semi-Colon Separated File : In this format, values are separated by semicolons (;). These files are often used in regions where the comma is a decimal separator.
Tab Separated File(TSV) : In TSV files, values are separated by tabs, making them useful for data with long or complex text entries.
The provided screenshot demonstrates how data is stored in a semicolon-separated values (CSV) file format and how it appears when imported into Microsoft Excel.
1. Original Format: Each record contains fields like "Date of Birth," "Pupil," and "Grade," separated by semicolons (;). Each record is placed on a new line.
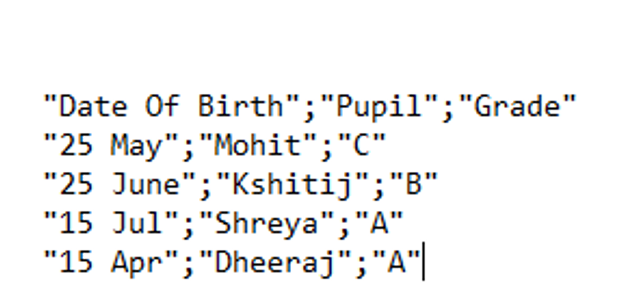
Semi Colon Separated File Storage
After Importing to Excel: When opened in Excel, the semicolon-separated data is neatly organized into rows and columns, with each field occupying its respective cell. This makes the data easier to read and analyze.
The following image shows how the same file would look after exporting to MS Excel.

Lets extract bank-marketing data (to MS Excel) from one type of Delimited Files - Semi Colon Separated Files.
Step 1: Understand the File Format
Delimited files use specific characters (such as commas, tabs, or semi-colons) to separate values. Before importing, check what delimiter your file uses. In this example, we’ll work with a semi-colon-separated CSV file.
Step 2: Open the CSV File in Excel
Locate the CSV file on your computer. In this case, the file is named bank-marketing(1).csv.
Double-click the file to open it in Excel. You might notice that all data is cluttered into one column, as shown below:

Reason for Clustering: This occurs because Excel might not automatically recognize the delimiter (e.g., commas or semicolons) used in the CSV file.
To fix this, use Excel’s “Text to Columns” feature or import the file with proper delimiter settings to ensure the data is split into separate columns based on the specified delimiter. This step ensures data readability and proper formatting for further analysis.
Step 3: Use the Text Import Wizard to Separate Data.
Go to the Data tab and select Text to Columns

It will give the preview of selected data.

In the screenshot, the Text to Columns Wizard in Excel provides two main data formatting options:
1. Delimited: This option separates the data into columns based on specific characters such as commas, semicolons, tabs, or other delimiters. For instance, if your data uses commas to separate fields (e.g., "John,Doe,25"), Excel splits it into columns like "John" | "Doe" | "25". You must select the appropriate delimiter that matches the structure of your data.
2. Fixed Width: This option divides the data into columns based on specified positions in the text. It is suitable for data where fields have consistent spacing or align in fixed character widths (e.g., Name occupies 10 characters, Age occupies 5, etc.). Users can manually set the column breaks in the preview.
Choose the Correct Delimiter:
To import delimited data into Excel, you must select the correct delimiter in the Text Import Wizard (Step 2 of 3). This step ensures Excel accurately separates the data into columns based on the specified delimiter.
1. Choose the Delimiter: Select the delimiter used in your file. Options include Tab, Semicolon, Comma, Space, or custom delimiters under "Other." For instance, choose Semicolon if the data is separated by ;.
2. Preview the Data: The wizard provides a preview of how the data will look after being split, helping verify the correct delimiter.
3. Proceed to Next Step: Once confirmed, click Next to continue.

Step 4: Preview and Confirm the Data
A preview of the separated data will be displayed. Verify that all columns are correctly separated.
Below the preview, there are options to set the data format for each column. Options include:
General: Suitable for mixed data types.
Text: Forces data to be treated as plain text.
Date: For date values, select a specific format such as MDY (Month-Day-Year).
Do Not Import Column (Skip): Exclude specific columns from being imported by selecting this option.
Set the Destination Cell
Specify the destination cell where the processed data should start in your worksheet. The default is $A$1, meaning the data will begin in the first cell of the worksheet.
If you want to place the data elsewhere, click the destination field and select a different starting cell.
Click Load to import the data into the Excel worksheet.

Step 5: Finalize the Import
Once satisfied with the settings, click the Finish button. This action will import the data into your Excel worksheet based on the specified formats and location

Once you’ve clicked Finish in the Text-to-Columns Wizard, Excel imports the data into your specified worksheet location. The imported data should now be organized into clean, separate columns.
Step 6: Verify Data Organization
Examine the worksheet to ensure the data aligns with your expectations. Each value should be in its corresponding column, and no data should be misplaced or truncated.
Apply Additional Formatting
Check for any formatting issues such as inconsistent cell widths or alignment problems. You can adjust column widths by double-clicking on the column borders or using the Format Cells option for more customization.
Use Data Validation (under the Data tab) to enforce rules on specific columns if required, such as ensuring numeric values in a particular range.
Step 7: Save the File
After verifying and finalizing the data, save the file in an Excel-compatible format to preserve all formatting and features. To do so:
Go to File > Save As and select the appropriate file type, such as .xlsx for for modern Excel features.
Note: A note at the top of your worksheet may warn about potential data loss if saving in the original delimited format (e.g.,.csv). To avoid this, always save a copy in the Excel format.
Importing delimited data into Excel is a simple yet efficient method for organizing raw data into a structured, analyzable format. Delimited data, such as .csv files or files separated by semicolons, tabs, or other characters, often comes from various sources, including databases or systems exporting large datasets. Excel's built-in tools, such as the Text to Columns Wizard, allow users to seamlessly transform such data into clearly defined columns.
This process begins with opening the delimited file in Excel. Often, the data initially appears cluttered within a single column. By selecting the "Delimited" option in the Text to Columns Wizard, users can identify the specific character that separates fields (e.g., commas or tabs) and instruct Excel to split the data accordingly. The wizard also provides a preview of how the data will be split, ensuring accuracy before applying the transformation. The final step involves reviewing and confirming the structured data, ensuring its integrity and readiness for analysis. This workflow saves time, minimizes errors, and boosts productivity, making it an essential skill for professionals handling large datasets. With these steps, importing and preparing data for meaningful insights becomes straightforward and reliable.
I hope you enjoyed reading this blog and found it helpful. Thank you for taking the time to read it!"


