How to Set Up Appium with Java for Android Automation Testing (Beginner-Friendly)
Appium, an open-source tool, is widely used for mobile app testing.
because of its flexibility, support for multiple programming languages, and cross-platform capabilities.
It is used to test native and hybrid mobile applications. Appium is similar to the Selenium Webdriver testing tool, making it easy to learn for those familiar with Selenium. Appium supports multiple programming languages such as Java, PHP, C, C#, Python, JavaScript with node.js, Ruby, etc. Appium can be used to run your tests in parallel, which can save you time.

How does Appium work?
Installation of Appium Server: When Appium is installed, a server is set up on the user’s machine that exposes the REST API.
Command Execution: The server receives command and connection requests from the client and executes these commands on mobile devices such as iOS or Android.
Response Mechanism: After executing the commands, Appium responds with HTTP responses to the client.
Mobile Test Automation Framework: To carry out these requests, Appium utilizes a mobile test automation framework to interact with the user interface of the application
For Example –
Apple instruments are used for iOS.
Selendroid is utilized for Android API level 15 or lower.
UIAutomator is employed for Android API level 16 or higher.
Pre-requisites
Java Installation and Setup
Node.js installed
Android Studio
Appium Server
Appium driver
Create a virtual device using Android Studio
Device or Emulator Configuration
Appium Inspector
Step1:
Java Installation and Setup: install Java Development Kit (JDK) and IntelliJ IDE/Eclipse IDE.
Set the JAVA_HOME environment variable to the JDK installation directory after installation.
For example, if you installed JDK in C:\Program Files\Java\jdk-21, set JAVA_HOME to C:\Program Files\Java\jdk-21. We have to installed in our machine EclipseIDE/IntelliJ IDE.
Step-2:
Node Installation:
The first step is to verify whether Node.js is already installed in the system. To do so, open the terminal and run the command: node -v
If Node.js is already installed in the system, it’ll return the Node version, else it throws an error stating – ‘node is not recognized’, which means Node.js is not installed in the system.
To install Node.js, visit https://nodejs.org/en/download/.
Once the installation is complete, restart the terminal and run the command -> node -v again. It will return the Node version.

Step-3:
Setup Emulator with Android Studio:
1. Install Android SDK: Once Android Studio is installed, open it and follow the setup wizard to install the Android SDK (Software Development Kit) through More Actions > SDK Manager. This is a set of tools that enable you to run the emulator.

2.Install the Android version that you’d like to install on your emulator under SDK Platform.
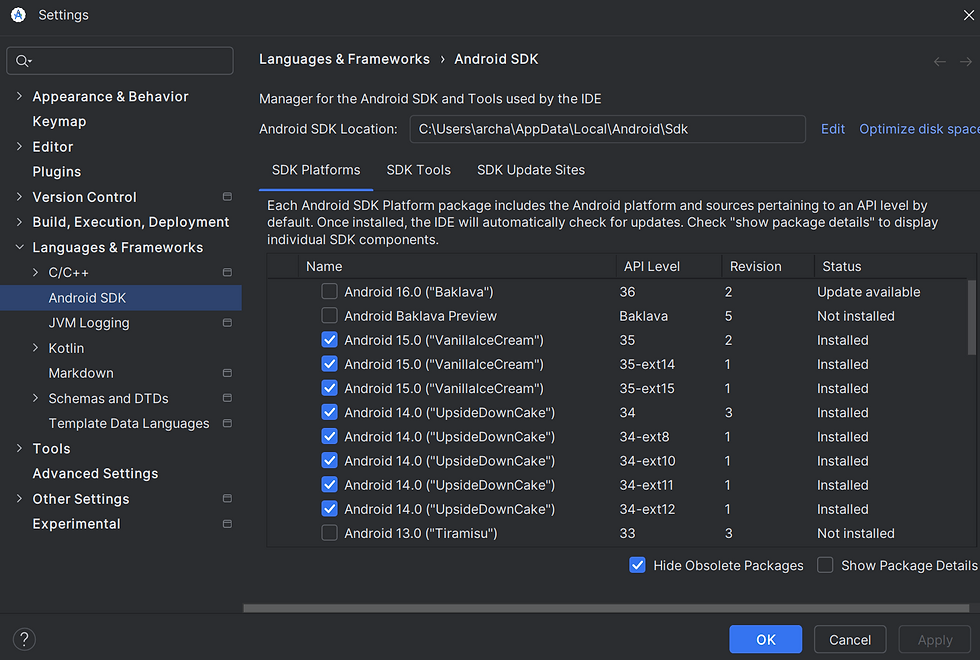
3.Install SDK Tools such as Intel processor with Intel HAXM (for faster emulation performance)

4. Add the Android SDK directory to your system’s ANDROID_HOME environment variable. For example, if the Android SDK Location in Android Studio is C:\Users\Administrator\AppData\Local\Android\Sdk, add C:\Users\Administrator\AppData\Local\Android\Sdk to the ANDROID_HOME environment variable.
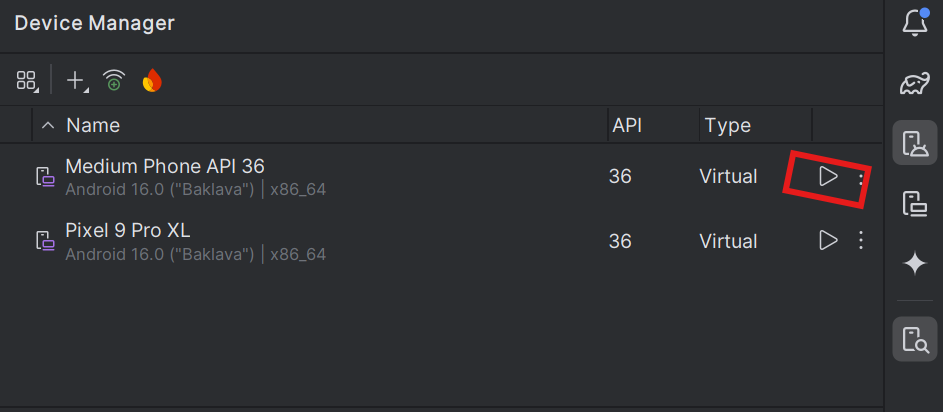
5. An Android Virtual Device (AVD) is an emulator that allows you to test your apps without using a physical device. To set up an AVD, open Android Studio, click on the More Actions > Virtual Device Manager button, and proceed with the virtual device creation by selecting the hardware and system image.
6. Run the emulator: Click on the “Run” button to start the AVD on the Virtual Device Manager page.
Step-4:
Appium Server: To interact with mobile devices and execute automation scripts, installing the Appium server on your system is essential. It’s crucial to have Node.js and npm (Node Package Manager) installed because Appium is built on Node.js.
There are 2 methods to install Appium:
From the terminal using Node.js
Directly from the Appium desktop client.
Run the command npm install -g appium which will install Appium from NPM.
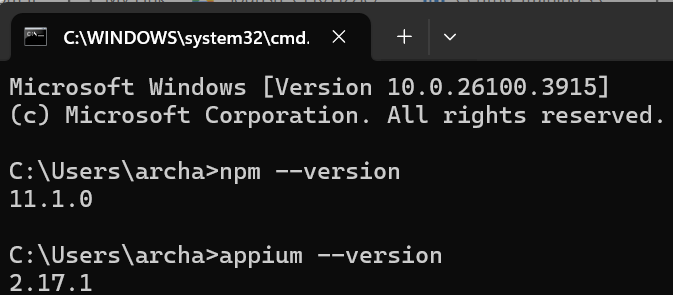
The command above will download and install Appium. Once done, verify the Appium installation on macOS or Windows by running the command below: appium –version
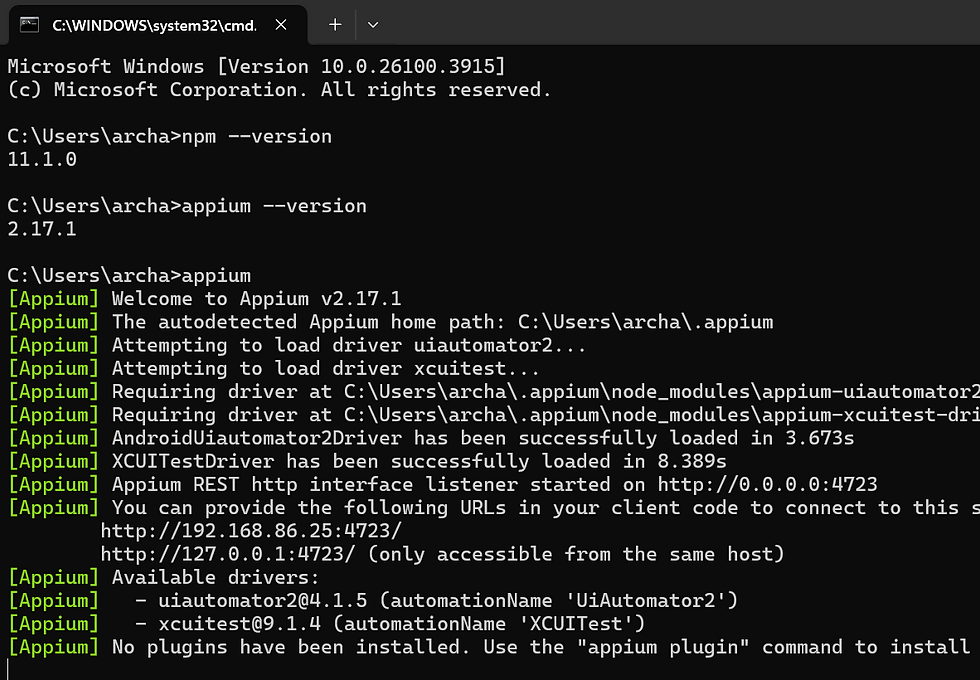
To start Appium, you can now simply run appium from the prompt.
You can also install Appium globally on your system by running the NPM command npm i –location=global appium. You can start Appium from the command line by running the appium command. For example, if you get an output that starts with a line like this: (Appium) Welcome to Appium v2.17.1, then the Appium server is up and running. You can quit the server by pressing CTRL-C.
Step-5:
Install Appium Driver:
Along with appium server , we would need to install appium driver
Run the command appium driver install uiautomator2 which will install Appium driver for android.
Run the command appium driver install xcuitest which will install Appium driver for iOS.
Once done, verify the Appium driver installation by running the command:
Appium driver list – -installed.

Step-6:
create a virtual device using Android Studio:
An AVD stands for Android Virtual Device. It’s basically a software program that mimics an actual Android phone, tablet, or other device. AVDs are created and managed through the Android Virtual Device Manager, a tool included with Android Studio.
How to set up an AVD?
Open Android Studio.
Open the Device Manager.
Click on + icon, ‘Select Hardware’ window appears.

Select a hardware profile, then click Next, ‘System Image’ window appears.
Select the system image for a particular API level, and then click Next, ‘ Verify Configuration’ window appears.
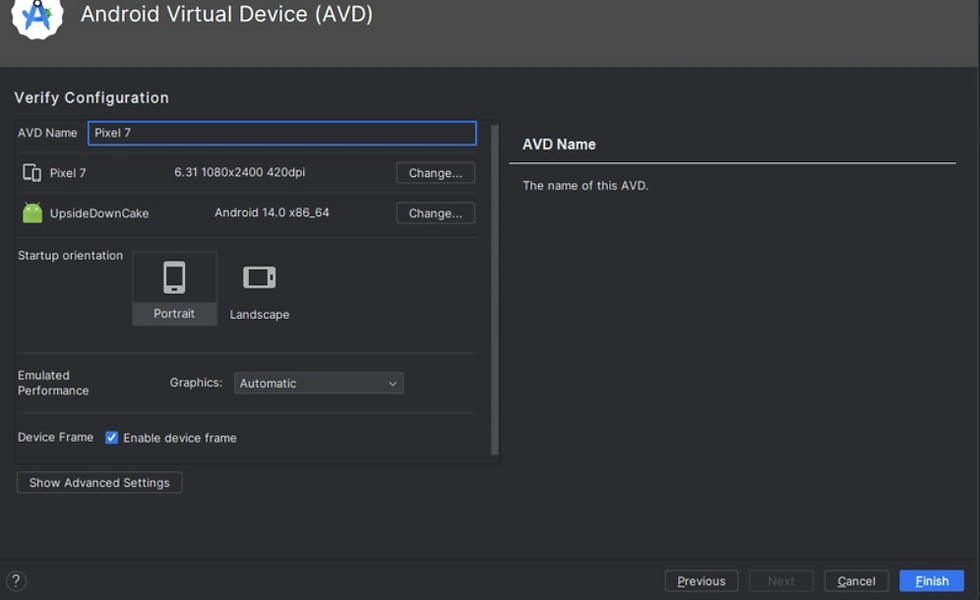
Change the AVD properties as needed, and then click Finish.
Step-7:
There are few steps to to start an emulator from the command line:
Open the Command Prompt.
to the path – C:\Users<username>\AppData\Local\Android\sdk\emulator
Run the following command: emulator -avd.
You can use the emulator-list-avds command to list all the AVDs installed on your computer.
You can use the emulator-help command to get more information about the emulator command.
Appium-doctor is a test environment that identifies and fixes common configuration issues before starting Appium. It’s a node module that can be used to check if all the prerequisites for installing Appium are met.
To install it, you can use the npm install @appium/doctor -g command.
appium-doctor –version [To check version]
appium driver doctor [To check if machine is setup properly to run on Android devices], see below pic:
Step-8:
Setup Appium Inspector:
Download and install Appium Desktop from the official website
(https://github.com/appium/appium-desktop/releases). Choose the appropriate version for your operating system.
Once the installation is complete, open Appium Inspector.
Click on the “Start Inspector Session” button located in the top left corner of the window.
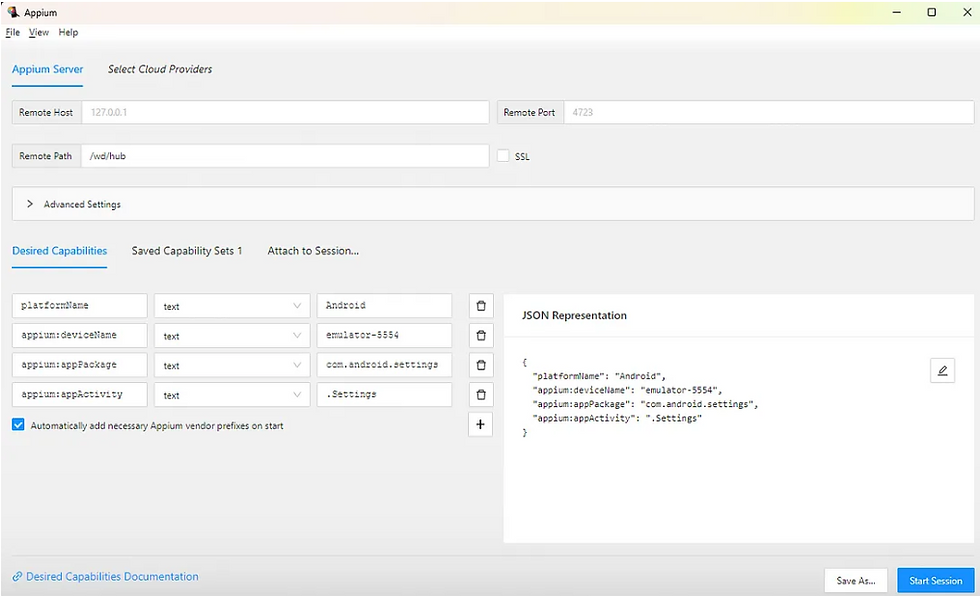
In the “Desired Capabilities” section, enter the capabilities required to connect to the device. Note: The values for “deviceName”, “appPackage”, and “appActivity” may vary depending on the device and the application you are testing. For example, if you want to connect to an Android emulator, enter the following:
{
 "platformName": "Android",
 "deviceName": "emulator-5554",
 "appPackage": "com.android.settings",
 "appActivity": ".Settings"
}
Open a new terminal window and run the following command to start the Appium server. This will start the Appium server on the default port (4723).
appium2. Start your device emulator in Android Studio.
3. Click on the “Start Session” button on Appium Inspector
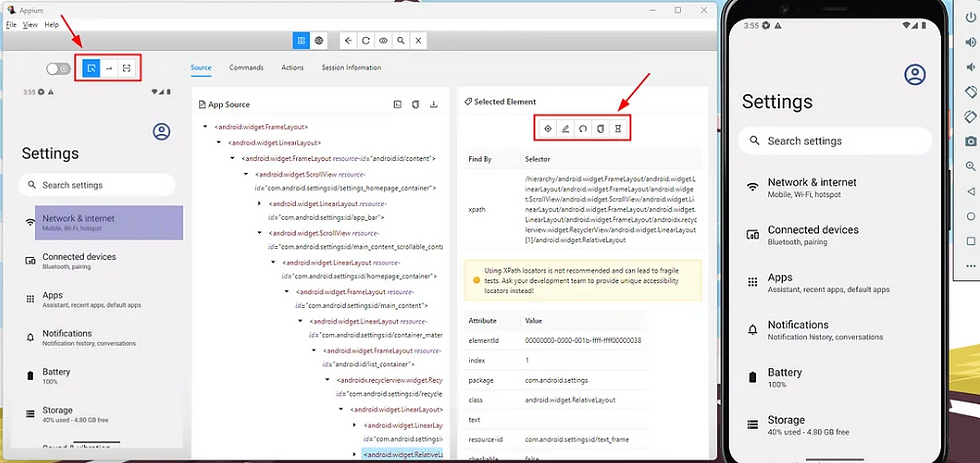
Now that all setup steps are done, we can write test scripts and execute them.
Run the test script through your preferred testing framework once it’s completed.
Connect to the Appium server and run the specified test on the connected device or emulator.
Next, try writing first Appium test case using BDD or explore how to locate mobile elements using Appium Inspector.


