How to Push a Project from Eclipse to a Remote GitHub Repository Via Eclipse

Why Do We Need to Connect Projects to GitHub for Collaboration?
In today’s fast-paced development world, coding is no longer a solo journey. Whether you’re part of a student team, a startup, or a large enterprise, collaboration is at the heart of software development. This is where GitHub becomes a game-changer.
Connecting your project to GitHub brings structure, transparency, and efficiency to your team. Here’s why it’s essential:
1. One Central Place for Your Code
When you push your project to GitHub, you’re placing it in a centralized location where everyone on your team can access, update, and contribute. No more sending code over email or worrying about version mismatches everyone works from the same source.
2. Track Every Change, Automatically
GitHub records every single change made to the project. You can:
See who made what changes and when.
Revert back to previous versions if something breaks.
Understand the history and decision-making behind your code.
This version control ensures your project is always in a recoverable and trackable state.
3. Work in Parallel Without Overwriting Each Other
GitHub uses branches to let team members work independently on features or fixes. This avoids conflicts and allows for safer integration. Once the changes are ready, they can be merged through a Pull Request, with an option for review before final approval.
4. Encourage Code Reviews and Better Quality
Pull Requests are not just for merging code they’re for discussing and reviewing it. Other team members can review your work, suggest improvements, or catch bugs before they reach production. This leads to better code quality and team learning.
5. Manage Work and Stay Organized
GitHub offers Issue tracking, labels, and project boards that make collaboration more than just code. You can plan features, assign tasks, track bugs, and visualize the progress of your entire project.
6. Collaborate Across Time Zones
Since GitHub is cloud-based, your teammates can contribute from any location, any time. This is especially helpful in remote work or open-source projects where contributors may be in different parts of the world.
7. Safe, Secure, and Always Backed Up
Your project is backed up in the cloud. Even if your local machine crashes, your code is safe on GitHub. You can also control access, manage permissions, and enable security scans for vulnerabilities.
8. Automate Testing and Deployment
GitHub integrates with powerful tools like GitHub Actions, Jenkins, and others to automate:
Code testing
Deployment
Notifications
This helps your team move faster without compromising on quality.
Connecting your project to GitHub isn’t just about storing code it’s about creating a collaborative, transparent, and efficient development workflow. It empowers your team to work together smoothly, avoid mistakes, and build better software faster.
If you haven’t yet connected your Eclipse or local project to GitHub, now is the perfect time to start. The benefits for collaboration are simply too good to ignore!
Let’s dive in and explore why this matters…
Start by creating a new project in Eclipse. I recommend using the same name for your GitHub repository to maintain consistency and make tracking easier.

Then, launch your preferred browser and go to github.com to open your GitHub account and access the remote repository.
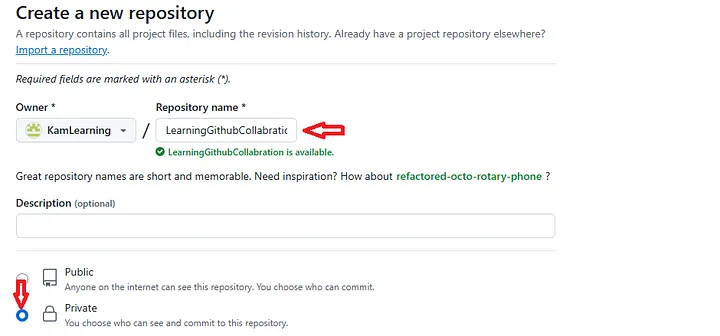
Now, let’s create a new GitHub repository. Make sure to select the ‘Private’ option so only you or authorized collaborators can access it.
Enter a Repository name of your choice, set the visibility to ‘Private’, and click ‘Create repository’ as shown in the image below.
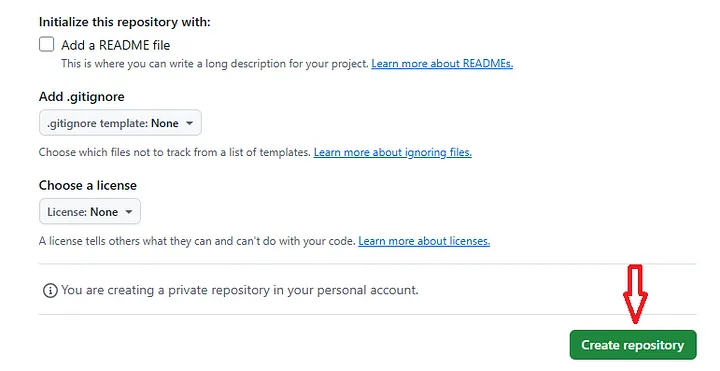
On the next page, copy the repository URL as shown in the image below.

Now, go back to Eclipse, right-click on your project, navigate to Team, and select Share Project.

In the ‘Share Project’ window, check the box labeled ‘Use or create repository in the parent folder of project’. Eclipse will automatically display your project’s local path. Select that path. The ‘Create Repository’ button will become active. Click ‘Create Repository’, ensure the checkbox next to the path is selected, and then click ‘Finish’ to complete the setup.

You’ll now notice an arrow (>) before your project name, along with your GitHub repository name followed by the word ‘master’ enclosed in square brackets. This indicates that your project is now under Git version control and ready to be connected to the remote repository.

Next, right-click on your project, go to Team, and select Commit to prepare your initial commit.

This will open the Git Staging view.

Move your files from Unstaged Changes to Staged Changes by clicking the double plus icon as shown in the image below.

Enter a message in the Commit Message field. Ensure that the Author and Committer details match your GitHub username and email. Once everything is set, click Commit to complete the initial commit.

Next, minimize the Git Staging tab.
Before proceeding, go back to your GitHub repository page and copy the remote repository URL. Then, return to Eclipse, right-click on your project, navigate to Team, and select Push Branch ‘master’… to start pushing your code to the remote repository.
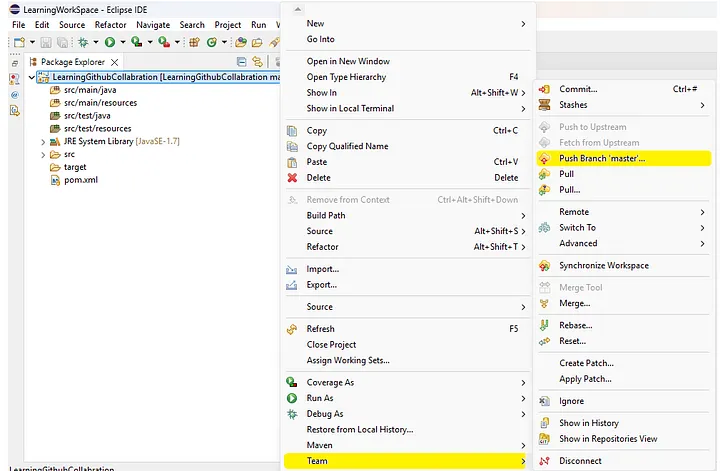
The Destination Git Repository window will open, automatically displaying the copied remote Github repository URL. Enter your GitHub username in the User field and your GitHub password in the Password field. If Eclipse continues to prompt for credentials or if password authentication fails, you’ll need to generate a personal access token (PAT) from your GitHub account and use that token in place of your password.
To generate a Personal Access Token (PAT), log in to your GitHub account and click on your profile icon in the top-right corner. From the dropdown menu, select Settings.

This will take you to your profile settings page. From there, scroll down and click on Developer settings located at the bottom of the left-hand menu.

You’ll be directed to the Developer settings section, which opens on the Apps page by default. From there, expand the Personal access tokens dropdown in the left menu and select Tokens (classic). Then, click the Generate new token dropdown in the top-right corner and choose Generate new token (classic). GitHub will prompt you to enter your password go ahead and enter it to proceed.

In the Note field, enter a label such as ‘For my learning purpose’ to identify the token. Under the Expiration dropdown, select No expiration (or choose a time limit based on your preference). Then, check all the available scopes by selecting all checkboxes, and finally, click Generate token.

Once the token is generated, it will be displayed on the screen as shown below. Make sure to copy and securely save this token on your system, as it will not be shown again. You will use this token in Eclipse in place of your GitHub password not as your GitHub login password.

Now, return to Eclipse and, in the Password field of the Destination Git Repository window, paste the personal access token you generated. This token will act as your GitHub password for authentication.
After entering your GitHub username and personal access token, click Preview> to continue. Also, make sure that the Branch selected is master before proceeding.

This will open the Push Confirmation window. Verify that it shows master → master [new branch], indicating that your local branch will be pushed to the remote repository. Once confirmed, click Push to complete the process.

If prompted to enter your GitHub username and email, go ahead and provide the required credentials to proceed.
You will now see a confirmation indicating that your project has been successfully pushed to the remote GitHub repository and close it.

Now, go to your remote GitHub repository and refresh the page. You should see your project files successfully uploaded there.

To create a new branch from Eclipse, right-click on your project, navigate to Team > Switch To, and then click on New Branch.

The Create Branch window will open. Enter a name for your new branch and click Finish to create it.

You can now see that your project is connected to the new branch. To verify, right-click on your project, go to Team > Switch To, and you’ll find that the branch you created (Branch_Kam) is selected.

You can confirm that the new branch(Branch_Kam), is connected by looking at your project in Eclipse. Your remote repository name will now display the new branch name at the end, as shown below.

Push the project again following the steps outlined earlier. After the push completes, check your remote GitHub repository to confirm that the new branch and changes have been updated.
You can also verify the new branch on your remote GitHub repository. Navigate to your repository page, click on the master branch dropdown You should see the new branch which is Breanch_Kam listed there, confirming it is connected. Additionally, you can confirm by noting that there are now two branches in the repository.

By following these steps, you’ve successfully connected your Eclipse project to GitHub, created and switched branches, and pushed your code remotely. Using Git and GitHub effectively empowers you to collaborate seamlessly and manage your code with confidence. Happy coding!
Thanks for reading! If this guide helped you, please share it with others who might find it useful. Don’t hesitate to leave a comment or reach out if you have any questions or suggestions for future tutorials.


