How to Perform Data Driven Testing from CSV file in Postman

If you're reading this, chances are you're a developer, tester, or simply someone interested in learning more about API testing in Postman. Have you ever had to test the same API end point over and over again, just with different data?
Maybe it's a login API with multiple sets of credential. Manually sending each request can take time and it's easy to make mistakes along the way.
In this blog I will go over Data-driven testing in Postman using CSV files. With just one request and a simple CSV or JSON file, you can test multiple test cases -automatically.
What is Data driven testing?
Data-Driven Testing(DDT) When you use external data (like from a CSV file or JSON file) to run the same test case multiple time with different inputs.
How to use Data Driven Testing from CSV file in Postman
We will be using Sample API URL: https://simple-books-api.glitch.me
Step 1: Create new Collection:
Open Postman and create new collection by clicking on collection icon tab

Name this collection as Book API
In this collection click on Add a request .Enter the request URL, for this we are going to use Books API URL:
This URL requires a barer token. You need to register your API client to obtain a Bearer token.

First we will create single Post request to submit an order. Then I will show you how to test it with multiple sets of data using a CSV file.
To submit an order, select Post as the request type from dropdown. In the Body tab, choose raw and select JSON, then enter the following JSON data in the body section.
{
    "bookId":"5",
    "customerName":"Ram"
}
After clicking on the Send button, you should get "201 Created" status code.

Step 2: Create CSV file in the API request
There are multiple ways to create CSV file. eg. (In Excel, Google Sheet, or a text editor like Notepad.)
In excel you enter your data, and save the file in the "CSV(Comma delimited)" format.
Second method is with a text editor, you manually enter your data, separating fields with commas.
At the end save the file with a .csv extension.
a. Open your Excel create new sheet .
b. Enter your data into rows and columns.
c. In excel file create 15 BookId which are in stock with 15 customer name and save it in .csv format.
NOTE: Excel file(.xlsx) are not same as CSV files. You must save the Excel file in CSV format using the Save As option.

Instead of hardcoded values, you can use variables like {{bookid}}, {{customerName}} in the request body.
In JSON data update in body to below code to replace actual data with variables:
{
"bookId":"{{bookId}}",
"customerName":"{{customerName}}"
}

NOTE: Make sure that column headers in your CSV file match the variable names you used in your request body.
Step 3: Run Collection with Data files using collection Runner
Run the collection by clicking on three dots of collection.
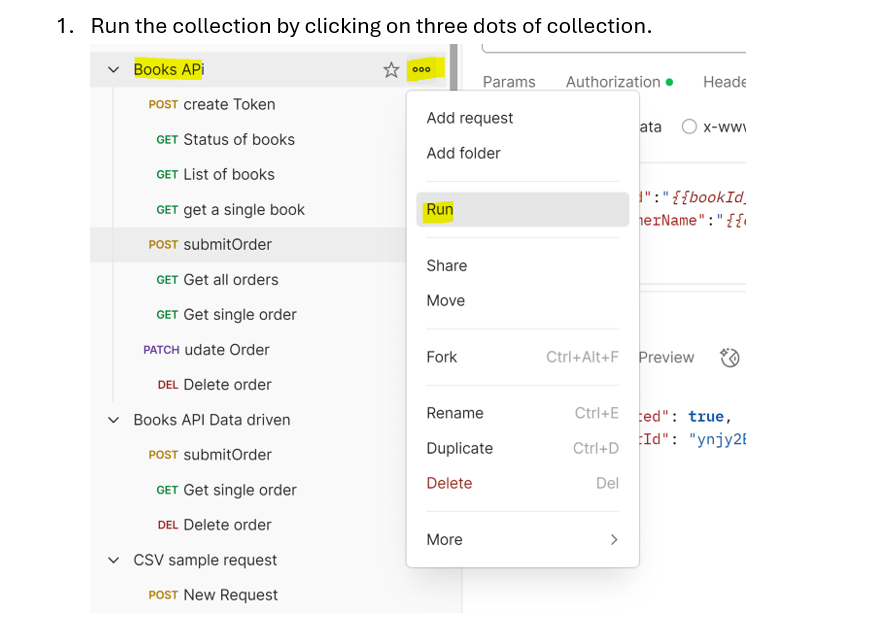
Select collection which you want to run.
Click on the Select File and select the CSV file that you created. By this method you will be able to import the CSV file in postman. In Iteration box you will notice that 15 is displayed. Since we have 15 rows, Postman will automatically detect 15 iterations. Each row is one iteration and it will take variables into that iteration.
Next you will see Delay box. In Delay box you will see '0' by default.
It will run iteration as fast as possible. If you want to avoid overloading the API you can change Delay time by 1000 this will add 1-second gap between each iteration.

Click on Preview button if you want to make sure the data is correct. Which helps you double-check your test data before running the collection.
At the end click on Run<collection name> ( “Run Books Api” in my case).

You will notice that all Post request is created with 201 status code. Since we did not validate request it shows Passes(0) Failed(0).
Now go back to request and write in script tab. On right-hand side, you will see a "Snippets" section. You can use it to validate Status Code. Snippets can be used to pre-built code templates provided by Postman to add common test scripts.

You can click on "Status code: Code is 200" under Snippets. It will auto generate code
pm.test("Status codeis 200", function () {
pm.response.to.have.status(200);
});
Now change 200 to 201 in above code.
//Header type
pm.test("Content-Type should be application/json", function () {
    pm.expect(pm.response.headers.get("Content-Type")).to.include("application/json");
});
pm.test("Body matches string", function () {
    pm.expect(pm.response.text()).to.include("true");
})
Now follow same steps to export CSV file and run collection as we did first time.

After running collection since we have added pm.test() in request's script total Passed (45) and failed (0)
Conclusion:
I learned that Data-Driven-Testing(DDT) in Postman is like a superpower for testers who is deal with repetitive input scenarios. With help of CSV data file you will need only single request.
This helps in saving a lot of time and while increasing test coverage.
We have covered following points in this blog:
Creating a CSV file with test data
Using variables in the request
Running collection
Writing basic test scripts using Postman Snippets
Thank you. Happy Testing!!!🎈


