How to create a local API server for testing.

INTRODUCTION:
Let’s learn how to create and host a local API server. In other words how to create our own fake REST API for testing. Generally, we depend on the public REST API, but here we create our own APIs and hence we can have complete control over the data.
So, let’s get started.
INSTALLATION:
Step 1: Install the Node.js
Node.js is an open source server environment.
Node.js allows you to run JavaScript on the server.
Node.js is designed to build scalable network applications.
It uses asynchronous programming.
Node.js is required to be installed in our machine to host a local server. For this, go to https://nodejs.org/en/download and download and install the Node.js for the operating system which you are using.
Note: Whenever you want to host a local server, the Node.js should be up in the system.
Step 2: Install the JSON server
JSON server will help you to create a REST API of your own.
JSON server should be installed each time you try to access the local server.
From the command prompt run the following command: npm install json-server
This is a node package to install JSON server
Please refer the json-server github page (https://github.com/typicode/json-server) to learn more about creating a REST API of your own.
Step 3: Once the json server is installed, create a db.json file in your system locally. The content of the file should be in a valid JSON format.
JSON example:
{
"users": [
{
"id": "1",
"firstName": "George",
"lastName": "Allister",
"subjectId": "1"
},
{
"id": "2",
"firstName": "Sarah",
"lastName": "Elizabeth",
"subjectId": "2"
},
{
"id": "3",
"firstName": "Peter",
"lastName": "Thomson",
"subjectId": "1"
}
],
"subjects": [
{
"id": "1",
"name": "Science"
},
{
"id": "2",
"name": "Maths"
}
]
}
Step 4: Host a local server
Go to the folder where you have placed db.json file and open the terminal from there.
Run the following command: npx json-server db.json (Command to start a local server)
Now your server is up at localhost:3000

Step 5: Access the localhost from a browser.
Go to any browser and try to access the localhost:3000. You can see the data from db.json file.
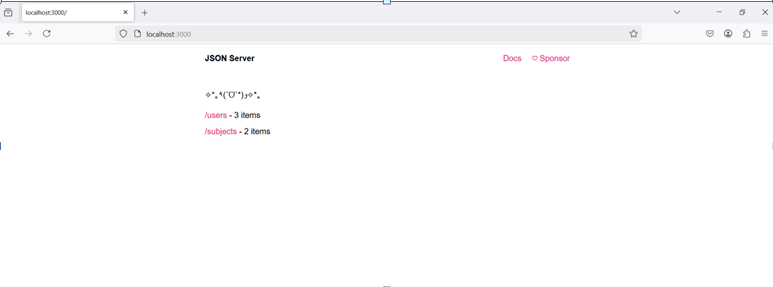
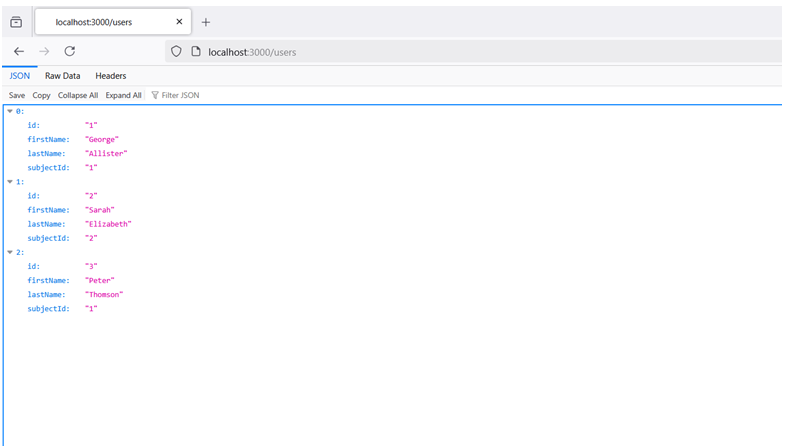
Clicking on the /users takes you to http://localhost:3000/users page with the contents from users array
Similarly clicking on the /subjects take you to http://localhost:3000/subjects

Step 5: How to play around with the Local Host url.
http://localhost:3000/users/1 gives details of the user with id:1 from the users array i.e.
id: “1”
firstName: “George”
lastName: “Allister”
subjectId: “1”
http://localhost:3000/users/?subjectId=1 gives all the users who has subjectId = 1
Step 6: Accessing the localhost server using Rest Assured
Now lets's see how to access this from Rest Assured and perform actions on it.
Go to Eclipse and create a maven project.
Have the following dependencies added to the pom.xml file:
rest-assured
testng
json-simple
Accessing Rest API using the GET() method:
Create a class e.g. LocalHostExamples
baseURI is going to be http://localhost:3000/ and the rest of the path will be provided within the appropriate rest methods (get, post, put or delete)
Example 1: Simple get()
import org.testng.annotations.Test;
import static io.restassured.RestAssured.*;
public class LocalHostExamples
{
@Test
public void test_get()
{
baseURI = "http://localhost:3000/";
given().
get("/subjects").
then().
statusCode(200).
log().all();
}
}
Example 2: get() with parameters to retrieve a particular resource
import org.testng.annotations.Test;
import static io.restassured.RestAssured.*;
public class LocalHostExamples
{
@Test
public void test_get()
{
baseURI = "http://localhost:3000/";
given().
param("name","Maths").
get("/subjects").
then().
statusCode(200).
log().all();
}
}
Accessing Rest API using the POST() method:
Post() method is used to create a new resource.
Post() method requires a body and we need a JSON library for the same. Here we are using org.json.simple.JSONObject
We can use any number of headers and params here along with post() command. They are provided along with the given() command
We send the actual post() in when() command
We check for the statusCode in then(). For Post() the statusCode() is 201.
Example:
import org.json.simple.JSONObject;
import org.testng.annotations.Test;
import io.restassured.http.ContentType;
import static io.restassured.RestAssured.*;
public class LocalHostExamples
{
@Test
public void test_post()
{
JSONObject request = new JSONObject();
request.put("id", "4");
request.put("firstName", "Sheldon");
request.put("lastName", "Cooper");
request.put("subjectId", "2");
baseURI = "http://localhost:3000/";
given().
header("Content-Type","application/json").
contentType(ContentType.JSON).
accept(ContentType.JSON).
body(request.toJSONString()).
when().
post("/users").
then().
statusCode(201).
log().all();
}
}
So we could do a successful post and create a new user resource and view it in the server

Accessing Rest API using the PATCH() method:
A simple patch() is used to edit the existing resource in the local server.
We can modify any of the field of the existing resource by providing only that field in the body of the request.
And we have to provide the url pointing to that particular resource in the patch(“/users/4”) command.
Example: Trying to modify the last name to “Geller” from “Cooper” of the user id=4
import org.json.simple.JSONObject;
import org.testng.annotations.Test;
import io.restassured.http.ContentType;
import static io.restassured.RestAssured.*;
public class LocalHostExamples
{
@Test
public void test_patch()
{
JSONObject request = new JSONObject();
request.put("lastName", "Geller");
baseURI = "http://localhost:3000/";
given().
header("Content-Type","application/json").
contentType(ContentType.JSON).
accept(ContentType.JSON).
body(request.toJSONString()).
when().
patch("/users/4").
then().
statusCode(200).
log().all();
}
}
The patch is successful and we could see the modified data in the local server:

Accessing Rest API using the PUT() method:
Put() is again used to modify an existing resource.
The difference between patch() and put() is: patch() can be used if we have to modify one or more field of a resource whereas we may have to provide every field in the body to update using put().
Example: Let’s change the firstName from Sheldon to Mary and lastName from Geller to Cooper again and the subjectId from 2 to 1 for the same user id=4
import org.json.simple.JSONObject;
import org.testng.annotations.Test;
import io.restassured.http.ContentType;
import static io.restassured.RestAssured.*;
public class LocalHostExamples
{
@Test
public void test_put()
{
JSONObject request = new JSONObject();
request.put("firstName", "Mary");
request.put("lastName", "Cooper");
request.put("subjectId", "1");
baseURI = "http://localhost:3000/";
given().
header("Content-Type","application/json").
contentType(ContentType.JSON).
accept(ContentType.JSON).
body(request.toJSONString()).
when().
put("/users/4").
then().
statusCode(200).
log().all();
}
}

After each post, patch and put, you can also check in the actual db.json file along with checking the server.

Accessing Rest API using the DELETE() method:
We can perform delete() request as well in the local server. We can provide the url in given() or when() and the statusCode should be 200.
Example:
import org.testng.annotations.Test;
import io.restassured.http.ContentType;
import static io.restassured.RestAssured.*;
public class LocalHostExamples
{
@Test
public void test_delete() {
baseURI = "http://localhost:3000/";
when().
delete("/users/4").
then().
statusCode(200).
log().all();
}
}

So using the above methods one can host the local server in the machine and create fake Rest api’s and perform testing.
Thanks for reading and keep learning !!!


