Getting Started with Python Using Jupyter Notebook

Introduction
Managing Python projects becomes easier when version control and development tools are connected correctly. GitHub, GitHub Desktop, Anaconda Navigator and Jupyter Notebook work together to create a structured and reliable workflow. This blog explains how these tools work together and how project files move from GitHub to local development and back again.

Image Source: dannykruwhanna (image modified by the author)
GitHub and Repository Access
GitHub acts as central platform where project files are stored, organized and tracked. A project begins with the creation of repository. This repository acts a main workspace for all related files and folders.
Creating Repository on GitHub
A repository can be created directly from a GitHub website as follows:
Sign in to GitHub (Create a GitHub account if one does not already exist)
Click on the + icon in the top right corner
Select New repository
Enter a repository name
Choose whether repository should be public or private
Initialize repository with a README file (Optional)
Click Create repository

Image Source: GitHub (screenshot captured by the author)
A repository can be created with initial files such as a README, or it can be created as an empty space where files are added later. Both approaches are valid and depend on how the project is structured. Once the repository is created, it becomes the place where the project is stored and keep track of all the changes as files are added, updated or removed over time.
Working with GitHub Desktop (Simple Method)
GitHub Desktop provides a simple, visual interface instead of using terminal commands. This method is especially useful for beginners and users who prefer a graphical interface.
Cloning a Repository
Cloning creates local copy of the repository on the computer.
Using GitHub Desktop:
Open GitHub Desktop
Go to File – Clone Repository
Select the repository from the list or paste the repository URL
Choose a local folder (for example: Documents/GitHub)
Click Clone

Image Source: GitHub Desktop (screenshot captured by the author)
After Cloning, the repository exists as a normal folder on the computer and becomes the main working directory.
Creating Files in the Repository
Once the repository is cloned, files can be created directly inside the folder. This can be done using:
File Explorer (Windows)
Notepad
Jupyter Notebook
Examples of common files include:
analysis.py
README.md
Data_cleaning.ipynb
Any file saved inside the repository folder is automatically tracked by GitHub Desktop.
Viewing Changes in GitHub Desktop
GitHub Desktop automatically detects the changes after creating and editing files. The Under Changes tab, the modified or newly added files will appear. This confirms that the work is being tracked correctly.
Committing Changes
The commit saves the current changes along with a short description.
In GitHub Desktop:
Enter a brief summary such as “Added README.md file”
Add a longer description (Optional)
Click Commit to main (or the working branch)
The commit saves the changes locally and creates a clear checkpoint in the project’s history.

Image Source: GitHub Desktop (screenshot captured by the author)
Pushing Changes to GitHub
Pushing sends committed changes to GitHub.
Click Push origin at the top of the GitHub Desktop
If the branch is new, the button may appear as Publish branch.
After pushing, the files are safely stored in repository and become visible on the GitHub website.
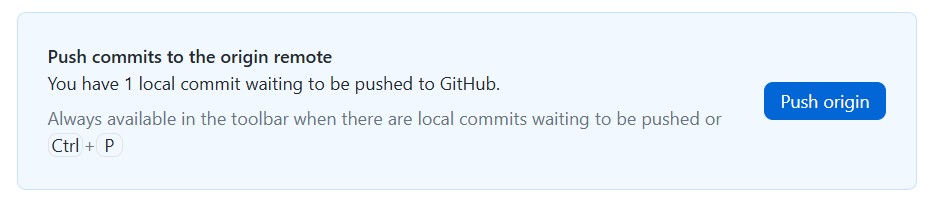
Image Source: GitHub Desktop (screenshot captured by the author)
Alternative Method: Using Git Bash / Command Line
As an alternative to GitHub Desktop, repositories can also be managed using Git Bash or the command line. This method involves command such as git clone, git add, git commit and git push.
This approach provides more flexibility and its commonly used by experienced technical users. Both methods achieve the same result, and users can choose the one that best fits on their comfort level.
Anaconda Navigator
Anaconda Navigator provides an easy way to manage Python environments and access commonly used tools. It makes the setup easier. Also it ensures that Python and required libraries are properly installed and ready to use.
Jupyter Notebook can be launched directly from Anaconda Navigator. This helps avoid common environment and dependency issues. This approach is especially useful for users who prefer a graphical interface.
Jupyter Notebook
Jupyter Notebook opens in a browser-based interface. This interface allows users to browse folders on their local system. Opening the cloned repository folder keeps notebooks, scripts and data files inside the project. This ensures all files remain under version control.
Working within the repository folder helps to keep the project organized and ensures that all the changes are tracked properly.
Method 1: Launching Jupyter Notebook from Anaconda Navigator
This is the most straightforward method and uses a graphical interface.
Open Anaconda Navigator
Find Jupyter Notebook
Click Launch
Jupyter opens in a browser window. From the Jupyter home page, folders can be browsed to reach the cloned repository.
Jupyter also provides a in-built terminal that can be accessed directly from the interface:
Click New
Select Terminal
The terminal opens inside Jupyter. It can be used to navigate folders and run basic commands such as:
cd C:\Users\scien\OneDrive\Documents\GitHub\Test
Jupyter Notebook
This allows command-line operations without leaving the Jupyter interface.

Image Source: Jupiter Notebook (screenshot captured by the author)
Method 2: Opening Jupyter Notebook from the Command Line
As an alternative to launching Jupyter Notebook through Anaconda Navigator, it can also be started from the command line. This opens Jupyter directly inside the project folder.
To access the correct folder:
Open File Explorer
Go to the cloned repository folder
Click the address bar and copy the full folder path
After copying the path, open a terminal or command prompt and run:
cd C:\Users\scien\OneDrive\Documents\GitHub\Test
Jupyter Notebook
This option is helpful for the users who are comfortable using the command line. It also useful when opening Jupyter directly in a specific project folder is preferred.

Image Source: Windows Command Prompt (screenshot captured by the author)
Writing Python Code in Jupyter
Jupyter Notebook brings Python code, outputs and explanations together in a single, interactive document. From the Jupyter home page, a new notebook can be created by selecting New - Python. It opens a fresh Notebook ready for coding. By default, a Notebook is named untitled. Renaming it to a clear name, such as data_anaysis.ipynb, helps keep the project organized and easy to understand.
Jupyter is commonly used to loading datasets. It also used to clean and transform data. Jupyter Notebook supports data analysis and saving processed results. Notebook files are saved automatically. This allows work can be reopened later with both code and results saved.
As a simple starting point, a basic Python command can be run. This helps confirm that the Notebook environment is working correctly:
print("Jupyter Notebook is ready for Python development")
This confirms that the Python is running successfully within the Jupyter Notebook environment. And the setup is ready for further development.
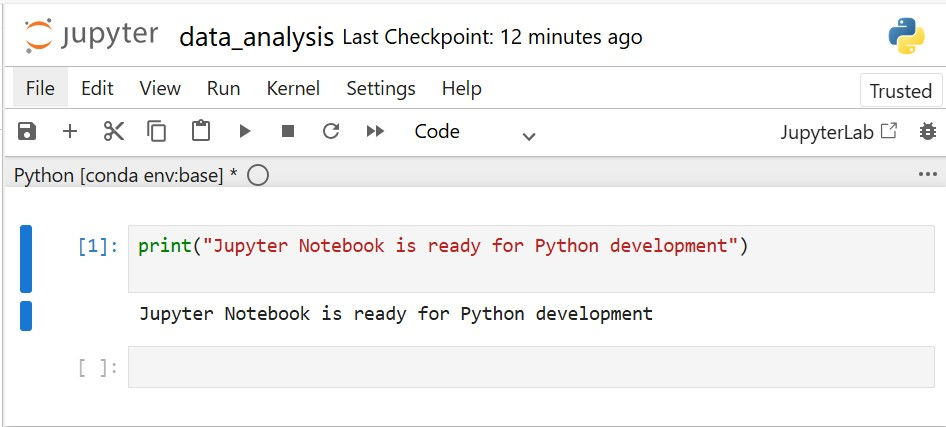
Image Source: Jupiter Notebook (screenshot captured by the author)
Conclusion
Combining GitHub, GitHub Desktop, Anaconda Navigator and Jupyter Notebook creates a structured and reliable Python workflow. GitHub maintains project files and tracks version history. GitHub Desktop manages local changes and updates. Anaconda ensures a stable and consistent Python environment. Jupyter Notebook enables interactive coding and analysis. Together these tools support well organized, repeatable and maintainable Python projects.
References
Python Notebook Execution Guide (AI4BI) - https://ai4bi-cdt.github.io/python-course/module1/module_1e_notebook-execution.html
GitHub Actions - Build and Test Python Code Tutorialhttps://docs.github.com/en/actions/tutorials/build-and-test-code/python?versionId=free-pro-team%40latest&productId=repositories&restPage=creating-and-managing-repositories%2Cquickstart-for-repositories
Anaconda Documentation - https://www.anaconda.com/docs/main


