Executing Selenium Automation Scripts on Docker with Different Modes of Selenium Grid

Automation testing is vital part in the software development process/QA process, ensuring faster releases with higher quality. The management of different browser environments across various operating systems often proves to be challenging.
In order, to run automation testing in parallel across different browsers without manual setup we need to combine Docker with Selenium Grid.
Let's Understand the Basics:
What is Docker?
Docker is a highly useful tool that helps developers to build and run applications inside a container.
Containers are small lightweight box that holds your application along with all its necessary things like code, libraries, Settings and system tools. So it make sure that Your application functions correctly anywhere without depending on the operating system where it runs.
What is Selenium Grid?
Selenium Grid is a tool that distributes automation scripts across various devices, browsers, and platforms and Run simultaneously. It improves testing speed and also efficiency by distributing test execution across multiple machines known as nodes.
Selenium Grid works based on a hub and node architecture:
Hub: It is known as central controller that manages test distribution and assigns test cases to available nodes.
Nodes: All the Other Machines where the tests are distributed and execute the test cases on different browsers. Selenium Grid is highly useful for cross-browser testing and parallel testing, which helps in speed up the testing process and ensuring that applications work correctly across different platforms.
Now, We will have a quick check on cross browsing and parallel Testing:
Cross browsing:
Cross browsing testing is testing your website or application whether it works properly on different web browsers like Chrome, Firefox, Safari, and Edge.
Different browsers can will display things differently, so cross browsing checks that everything like buttons, layouts, and features of application looks and works the same everywhere.
Parallel Testing:
Parallel testing is a testing where you can execute multiple tests at the same time instead of running them sequentially.
It helps saving lot of time because you can test different features, browsers, or devices all together, rather than waiting for one test to finish before starting the next.
Why we have to use Docker for Selenium Grid?
In traditional Selenium Grid we have to install browsers manually which causes compatibility issues most of the time. We can use specific images while using Docker.
Using Docker for Selenium Grid provides several benefits:
Docker makes sure tests are running in the same way on all machines.
You can add more browser nodes quickly when needed.
Helps running many tests in parallel mode , and that saves lot of time.
You no need to manually install browsers or drivers everything will be in containers.
Now we will Set up Selenium Grid On Cucumber BDD Project with Docker:
Step 1: Create a maven project
We are using a Hybrid Framework for this test automation project, which includes:
Behavior-Driven Development (BDD) with Cucumber
Selenium + Java + TestNG for test execution
Maven for dependency management
Git + GitHub for version control
For a detailed, including configuration files and scripts, refer to
Step 2: Set up your Driver.java class
Point RemoteWebDriver in your test to http://localhost:4444 Note : For Edge- browser name should be 'MicrosoftEdge'
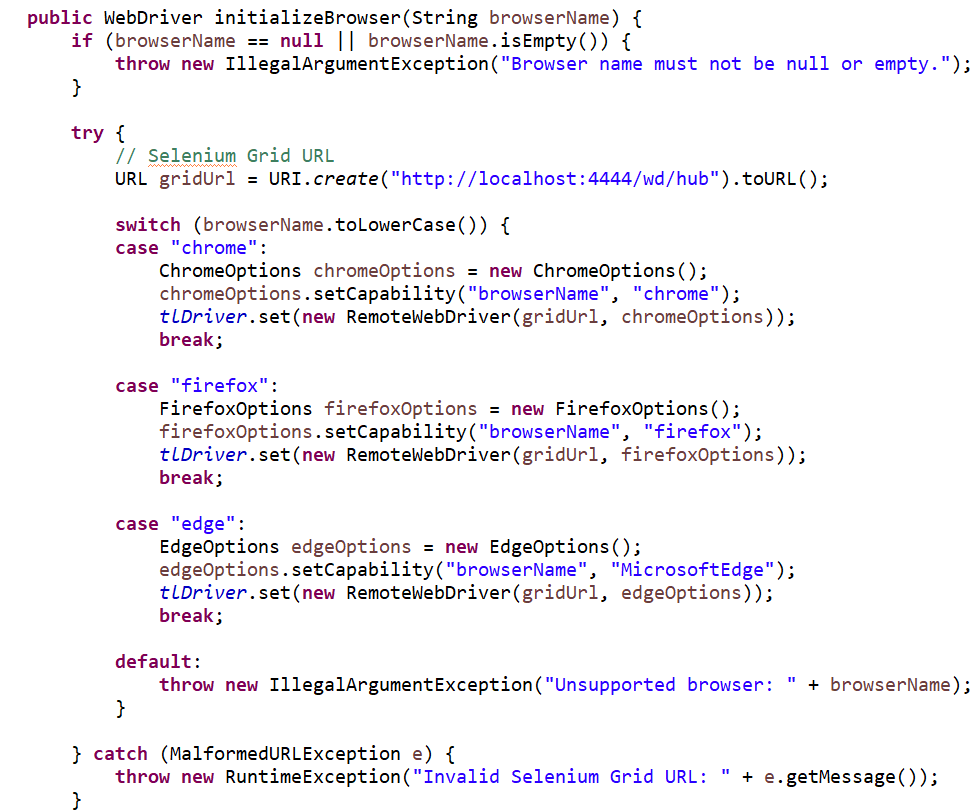
Step 2.1: Get the browser value : Hooks.java

Step 2.2: ConfigReader class:

Step 2.3: Runner Class:
Integrating cucumber framework with TestNG

Step 2.3 : Testng.xml:
Step 3: Install Docker:
Install Docker on local machine
Below are Step-by-step details on how to run Selenium scripts in different modes of Selenium Grid
Selenium Grid supports three different modes, to achieve flexibility when running tests between different platforms.
1. Standalone Mode:
Lets understand standalone mode
Runs everything (hub and node) in a single container/machine.
It provides ideal conditions for small-scale development testing or debugging operations within a local environment.
Example use case: Running quick tests without setting up multiple machines.
Execution steps:
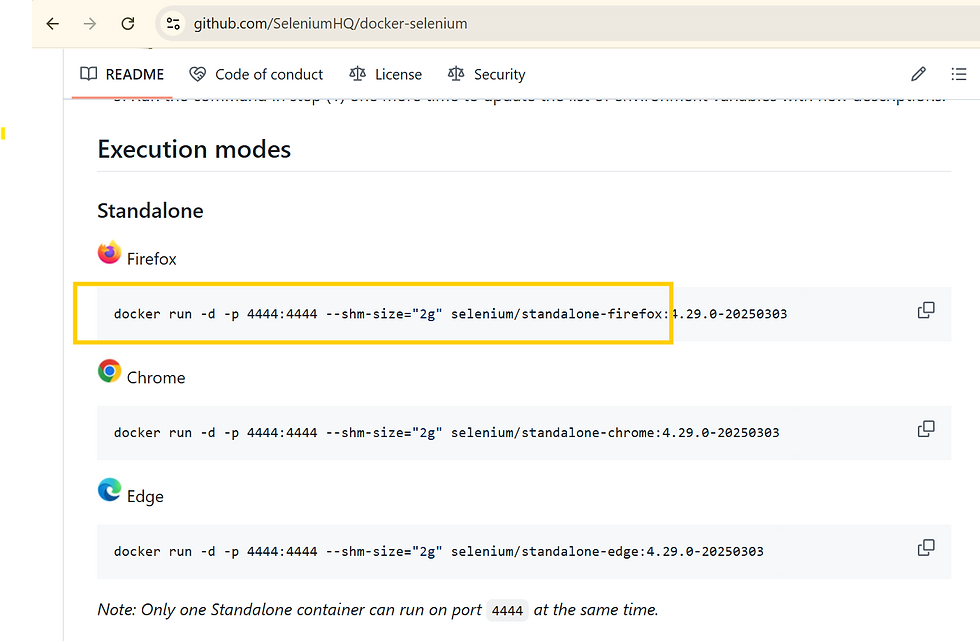
Now execute the container in terminal NOTE: Make sure to add :latest after the command
(Use this if the image is not downloaded automatically.
Open Docker Hub:https://hub.docker.com/
(Docker Hub- We can pull docker images from Docker Hub and we can also store docker images) Now pull selenium selenium/standalone-firefox image from any terminal)

NOTE: Make sure to add :latest after the command
And Docker Container should be started while executing tests
Video Guide For Standalone MODE:
NOTE: Only one Standalone container can run on port 4444 at the same time.
So We Can't do Parallel and Cross Browsing Testing with Standalone mode
2.Hub and Node Mode:
Lets understand Hub and Node mode:
The Hub test coordinator distributes tests to multiple nodes which operate on separate machines with different browsers.
The network consists of separate nodes which operate from different computers while using various browser systems.
For Hub and Node Mode we have two different ways:
1) Manual setup: We have to download containers and images one by one
2)Using YAML file :
So using YAML file we can enable parallel testing and cross-browser testing on various test environments.
Quick learn about docker compose file:
Docker Compose file is a file where you add multiple containers together and you Run them.
We can start everything using just one command, Instead of starting containers each at a time.
Instead of Starting each container one by one, you can start everything with one command.
You can also tell Docker that what images we want to use, what ports to open, and how the containers should communicate with each other.
Example use case: Running tests across Chrome, Firefox, and Edge simultaneously.
So here we will see the execution through yaml file
Execution steps:
Download docker-compose-v3.yml under Hub and Node Mode

Add it to project under src/test/resources

After adding go to docker-compose-v3.yml file project location and pull it using below command command: docker compose -f docker-compose-v3.yml up
NOTE: Here we are integrating our Cucumber BDD project with TestNG to enable parallel execution and cross-browser testing.
Video Guide For Hub and Node MODE:
3.Fully Distributed Mode:
Lets understand Fully Distributed Mode:
Each Selenium component such as Session Queue and Distributor along with Router operate independently.
The system enables maximum scalability benefits during testing of large suites.
Best for enterprise-level testing with many concurrent test runs.
It allows parallel testing and cross-browsing testing
Example use case: Large companies running thousands of tests across multiple regions
For Execution:
For the Fully Distributed mode, we use the docker-compose-v3.yml file
Follow the same steps as we used for setting up the Hub and Node
Conclusion
The combination of Docker with different Grid modes simplifies the execution of Selenium tests. With Docker you save time while gaining scalability features and experiencing less stress regarding your tests.
As they say, "Work smarter, not harder" — and this setup truly lets you do just that.
Happy learning!!!!


