Creating a Basic Folder Structure for a BDD(Cucumber) Playwright Framework in VSCode

Before jumping into the folder structure, let me give a brief introduction to Playwright and BDD(Cucumber).
Playwright: This is a powerful open-source web automation tool developed by Microsoft, which is used for end-to-end testing of web applications. It enables us to run the tests across various web browsers, including Chromium, Firefox, and WebKit. Additionally, it allows for testing across multiple browsers simultaneously. Key features of the Playwright include cross-browser testing, headless mode execution, executing testcases in parallel, auto-wait mechanism, and retry capabilities, as well as robust debugging tools.
Cucumber: It is a widely used framework for implementing BDD (Behavior-Driven Development). It allows us to write clear, structured test scenarios in plain English, using a language called Gherkin. These scenarios describe how a system should behave under certain conditions and are linked to automated test scripts.
Combining the Cucumber framework with Playwright gives us a powerful testing framework. Let's create the Basic folder structure for the BDD(Cucumber) framework that helps to automate the test cases from scratch.
1. Create a New Workspace in VSCode.
Create a new empty folder for your project. I named it playwrightBDD-Demo.
Open the folder in VSCode (File ➔ Open Folder ➔ Select your created folder).

Playwright has a VSCode extension that is available when testing with Node.js
We have to install the extension in the workspace. To do this, go to the extensions panel on the left side and search for Playwright. You will see “Playwright Test for VSCode” and click on the “Install” button.

Once installed, open the view-> command palette(ctrl+shift+P) and type
“Install playwright”
Select Test: Install Playwright and choose the browser options for running your test cases. These options can later be configured in the `playwright.config` file. Additionally, select JavaScript if you are writing your scripts in that language, as VSCode defaults to TypeScript. Additionally, you can choose GitHub Actions if you want to run on CI.

Click OK to install all the required drivers and browsers in your workspace. You can observe the installation progress in the terminal. This process may take some time.

After the installation is completed, you will see a few files added to your folder explorer.

To create a cucumber framework project. We must add some packages to the project. We have to install playwright-bdd. Give the following command in the terminal
npm i -D @playwright/test playwright-bddIt will install a few packages. Now we have to install Cucumber. Run the following command in your terminal to install the packages.
npm i cucumberNow we need to add the Cucumber extension from the extensions tab on the left. Search for "Cucumber" and install the Cucumber (Gherkin) full support extension.

Now we have everything ready to start creating the folder structure.
To build the basic cucumber folder(framework) structure, we have to add the following folders to the workspace.
Right-click on the project level and add the new folders to your project.

Feature folder: Create a folder named "feature" and place all your feature files in this folder. Feature files should be named using the following format: Example: Login.feature.
StepDefinitions folder: Create a folder named "stepDefinitions" and place your step definitions in this folder. The file should be named using the following format: Example: LoginSteps.js.
PageObjects folder: Create a folder named “pageObjects” and place all your page object files for each page. The file must be named using the following format: Example: LoginPage.js.
Utility folder: Create a folder named “utils” and place all your utility-related files in this folder. You can keep files such as commonUtils, ExcelReader, and CSVReader in this folder.
Fixtures folder: In Playwright, a fixture is a reusable setup or shared object that is automatically created for your tests before they run. Fixtures provide common objects, such as the browser, page, context, your page classes, and test data, without requiring you to manually create them in every test or step. They can be automatically injected into your tests, eliminating the need for repetitive setup code each time.
We can also create our custom fixtures. Create a folder named “fixtures” and create a custom fixture file named “fixture.js”. Here, we don't need to create the objects for your classes in your step definition file to call the functions from the page object classes
import {test as basetest} from 'playwright-bdd'
import { Loginpage } from '../pageObjects/LoginPageObjects';
import { Homepage } from '../PageObjects/HomePageObjects';
export const test=basetest.extend({
loginpagefixture:async({page},use)=>{
        const loginpagefixture=new Loginpage(page);
        await use(loginpagefixture)
    },
homepagefixture:async({page},use)=>{
        const homepagefixture=new Homepage(page);
        await use(homepagefixture)
    }
})
We have to write our tests(step definitions) in the following manner to auto-inject the objects
import { createBdd } from 'playwright-bdd';
const { Given, When, Then } = createBdd(test);
import {test} from '../Fixtures/fixtures';
const { expect } = require('@playwright/test');
Given('Admin logs in to application and lands on home page', async ({ loginpagefixture}) => {
  await loginpagefixture.validLogin();
});
When('Admin clicks the {string} Navigation bar in the Header', async ({loginpagefixture}, moduleOption) => {
  await loginpagefixture.goToModule(moduleOption);
});
Then('Admin should land on the {string} page', async ({commonpagefixture,page}, expectedPageName) => {
  const actualPageName = await commonpagefixture.getPageName();
  await page.waitForLoadState('load');
 await expect(actualPageName).toEqual(expectedPageName);
});
We can add multiple fixtures in a single test. In the "Then" step, both commonpagefixture and page are injected. We used these fixtures to call the methods on those pages.
Fixture takes out all the headaches of creating objects for classes whenever we try to use them.
Don't forget to add the import statement for the fixtures wherever you are using them. For example, if you created a custom fixture named `fixture.js`, you would typically add the following import statement at the top of your step definition or test file:
import {test} from '../Fixtures/fixtures';This ensures that you have access to the objects and methods defined in your fixtures, allowing for cleaner and more efficient test code. Always ensure that the path is correct based on your folder structure.
Test Data Folder: Create a folder named "testData" and place all your test data files which is used for data-driven testing
Example: Excel file. JSON file, CSV file
7. Hooks Folder: Create a folder named “hooks” and add the hooks.js file if you want to add the @after or @before, or teardown steps.
This is how the final folder structure looks after adding all the folders to the framework.
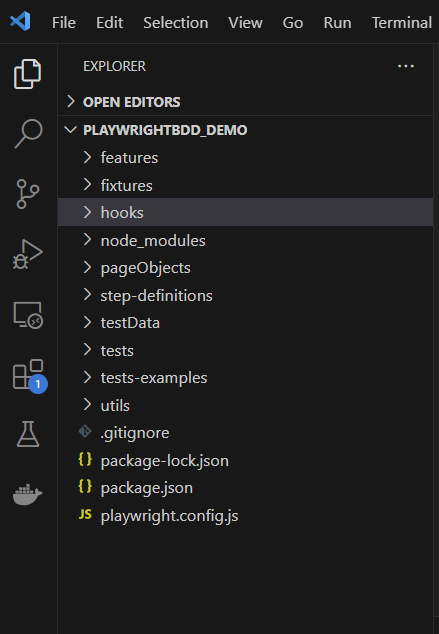
Hope this blog helps you in creating a basic folder structure for your Playwright BDD Project.
Happy testing!!


