CI/CD with Jenkins Pipelines
Automating CI/CD with Jenkins Pipelines, Webhooks, and Email Notifications
Introduction :
In the fast-paced world of software development, the need for automated CI/CD pipelines has never been more critical. Tools like Jenkins allow development teams to streamline their workflow by automating the build, test, and deployment processes. By integrating webhooks and email notifications into your Jenkins pipelines, you can make this process even more efficient and ensure that your team is always in the loop.
In this blog post, we’ll walk through setting up a Jenkins pipeline that triggers automatically through webhooks, while also keeping your team informed of build results via email notifications.
Why Use Jenkins Pipelines with Webhooks?
Webhooks are a lightweight way for your Jenkins server to respond automatically to changes in your codebase, such as a new commit or a pull request. This eliminates the need for manual build triggers, enabling a seamless CI/CD workflow. With email notifications, you can also keep your team updated about the status of builds, including logs and error messages if something goes wrong.
Step 1: Prerequisites
Before we start, ensure you have:
Jenkins installed and running (locally or on a server).
Version control system like GitHub, GitLab, or Bitbucket set up, where your code repository is hosted.
Email server configuration for Jenkins (we’ll cover this in Step 6).
Required Jenkins plugins:
Pipeline plugin (installed by default)
Email Extension plugin
Git plugin (if using Git)
Step 2: Set Up a Jenkinsfile
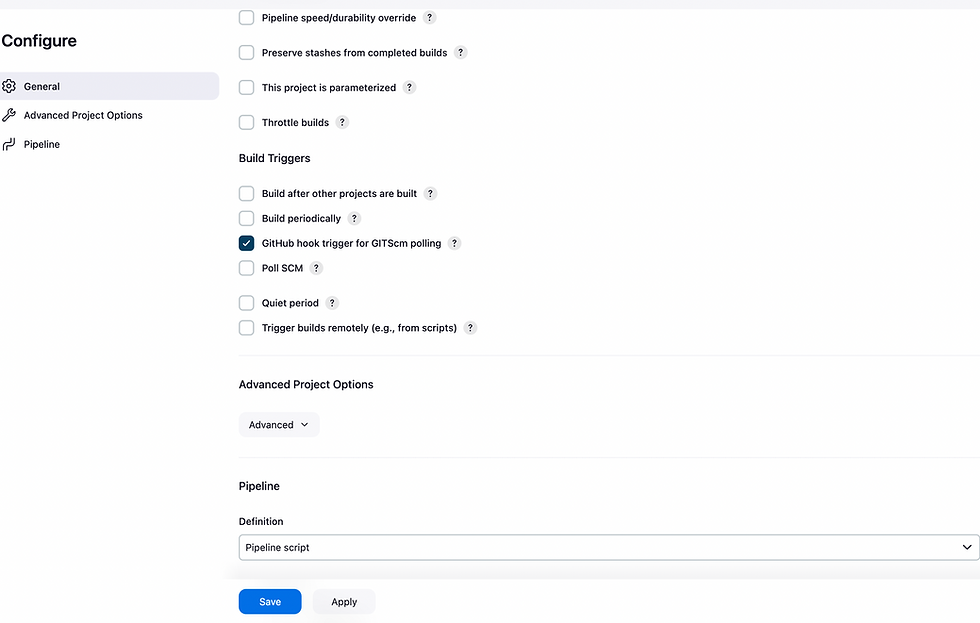
The Jenkins pipeline is defined using a Jenkinsfile, which describes the stages of your CI/CD process. You can add a Jenkinsfile to your repository, which Jenkins will automatically use to trigger a build when the webhook is activated.
Here is a sample Jenkinsfile that defines a pipeline with stages to checkout code, build, test, and deploy the application. It also includes steps for sending email notifications based on the result of the build.
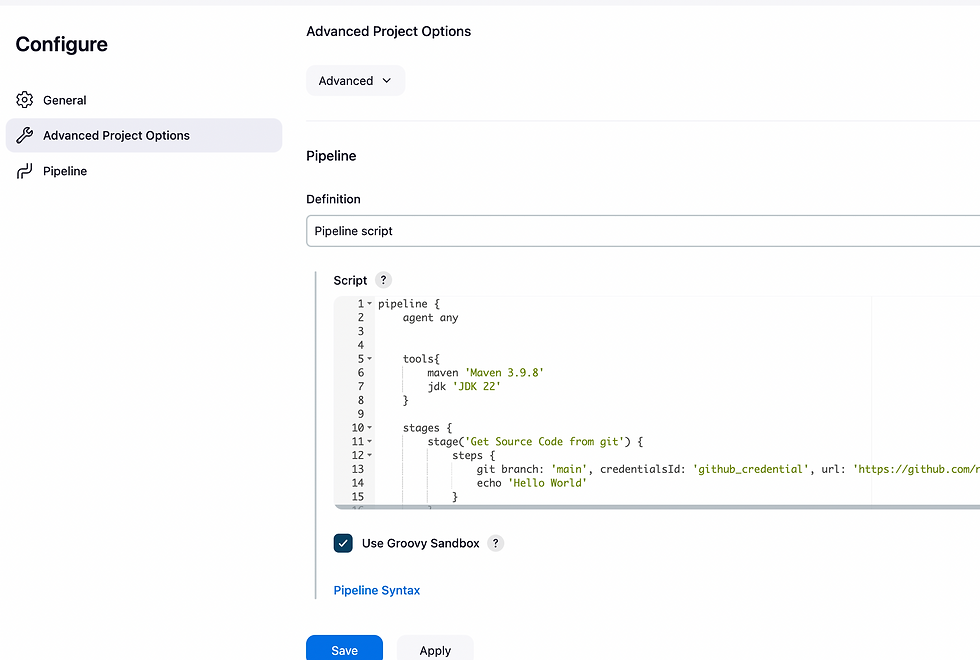
pipeline {
agent any
tools{
maven 'Maven 3.9.8'
jdk 'JDK 22'
}
stages {
stage('Get Source Code from git') {
steps {
git branch: 'main', credentialsId: 'github_credential', url: 'https://github.com/pathtofolder.git'
}
}
stage('Build Source Code') {
steps {
sh 'mvn compile'
}
}
stage('Run test') {
steps {
sh 'mvn test'
}
}
}
post {
always {
echo 'Generating Allure Report...'
script {
allure includeProperties: false, results: [[path: '/allure-report']]
}
}
success {
echo 'Build Succeeded!'
script {
def jobName = env.JOB_NAME
def buildNumber = env.BUILD_NUMBER
def buildUrl = env.BUILD_URL
emailext(
subject: "Build Failure: ${jobName} - ${buildNumber}",
body: "The build failed. Check details here: ${buildUrl}",
to: 'email1@gmail.com, email2@gmail.com,
attachLog: true // Attach the Jenkins build log
)
}
}
failure {
script {
def jobName = env.JOB_NAME
def buildNumber = env.BUILD_NUMBER
def buildUrl = env.BUILD_URL
emailext(
emailext(
subject: "Build Failure: ${jobName} - ${buildNumber}",
body: "The build failed. Check details here: ${buildUrl}",
to: 'email1@gmail.com, email2@gmail.com,
attachLog: true // Attach the Jenkins build log
)
)
}
}
}
}
Step 3: Set Up Webhooks in Your Version Control System
Webhooks allow Jenkins to respond automatically when there are changes in your repository. When you push a commit or create a pull request, the webhook triggers Jenkins to run the pipeline.
For GitHub:
Go to your GitHub repository.
Navigate to Settings > Webhooks.
Click Add webhook.
In the Payload URL, enter your Jenkins webhook URL in the format:
http://<your-jenkins-server>/github-webhook/
Replace <your-jenkins-server> with your actual Jenkins server URL.
Set the Content type to application/x-www-form-urlencoded.
Choose the events you want to trigger the webhook. For a typical CI/CD pipeline, you’ll want to select Just the push event and Pull requests.
Click Add Webhook.
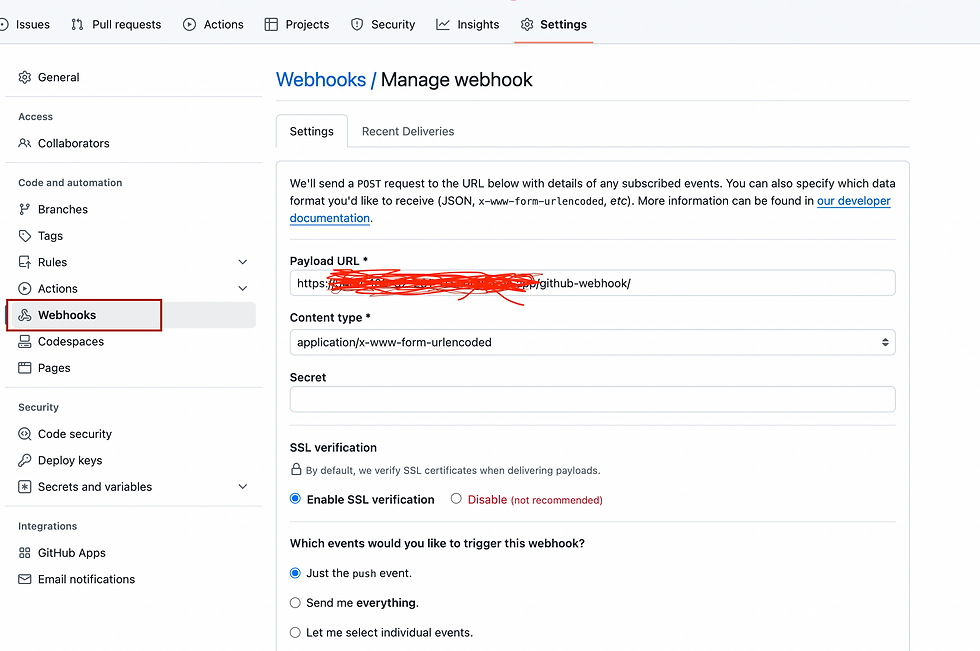
Once the webhook is configured, every time you push a change to the repository, Jenkins will automatically trigger a build.
Step 4: Configure Jenkins to Use Webhooks
In Jenkins, you need to set up your pipeline to listen for webhook events.
Create a New Pipeline Job:
From the Jenkins dashboard, click New Item.
Select Pipeline, give your job a name, and click OK.
Set Pipeline from SCM:
Under the Pipeline section, choose Pipeline script from SCM.
Select Git as the source control system and provide the repository URL.
In the Script Path field, ensure it points to Jenkinsfile (default).
Enable Webhooks:
Jenkins will automatically handle webhooks if the repository URL is configured properly, and the webhook is set up in your version control system.
Step 5: Adding Email Notifications
Jenkins can send email notifications when a build succeeds, fails, or is unstable. This is especially useful to ensure that your team is promptly informed about the status of the build process.
Configuring Jenkins Email Notifications:
Global Configuration:
In Jenkins, go to Manage Jenkins > Configure System.
Scroll down to the Extended E-mail Notification section.
Configure your SMTP server, which could be something like Gmail's SMTP server or your company’s email server.
Example for Gmail:
SMTP Server: smtp.gmail.com
SMTP Port: 465 or 587
SMTP Authentication: Yes
Set the username and password for the email account you want to send notifications from.
Default Recipients: Add your team’s email addresses.
Email Extension Plugin:
You should already have the Email Extension Plugin installed, as mentioned earlier.
With this plugin, you can customize the email content and attach build logs as shown in the Jenkinsfilefrom Step 2.
Step 6: Test the Pipeline and Notifications
Once everything is set up, push a new commit to your repository, or manually trigger a build from Jenkins by clicking Build Now on the pipeline job. If the pipeline succeeds or fails, you should receive an email notification with details of the build, including logs if it failed.
To see webhook events in action:
Push a change to your repository.
Jenkins should automatically trigger the pipeline based on the webhook configuration.
Check the Jenkins console or the pipeline dashboard to ensure the webhook is triggering builds correctly.
Step 7: Troubleshooting Tips
Webhooks Not Triggering: Ensure your webhook URL is correct and reachable from the external network. Double-check firewall settings.
Email Notifications Not Working: Check your SMTP configuration, and make sure Jenkins can authenticate with your email server.
Build Failures: If a build fails, check the pipeline logs by navigating to Build History in Jenkins.
Conclusion
By combining Jenkins pipelines with webhooks and email notifications, you can automate your CI/CD workflow and improve team communication. Webhooks ensure that Jenkins automatically responds to changes in your codebase, while email notifications keep your team informed of the build's outcome, including logs when things go wrong.
This setup not only saves time but also enables a more robust and automated development process, ensuring that code is consistently built, tested, and deployed in an efficient manner.


