Automated Defect Logging with JIRA & TestNG


Introduction
Automated defect logging in JIRA is a crucial step for streamlining bug tracking and improving workflow efficiency in software development projects. It can significantly streamline the testing process, saving time and effort. This blog explains how to integrate TestNG with JIRA to automatically log defects whenever an assertion fails in a Selenium-based test framework.
Key Benefits:
✅ Automated Defect Tracking – No manual intervention is needed; defects are logged in JIRA instantly when a test fails.
✅ Faster Debugging – Failed test assertions automatically create detailed JIRA tickets with error messages and stack traces, helping developers diagnose issues quickly.
✅ Consistency & Accuracy – Ensures standardized defect logging, reducing errors and missing defects due to manual logging.
✅ Improved Collaboration – Developers, testers, and project managers can track bugs in real time, improving communication and workflow efficiency.
✅ Efficient Regression Testing – Enables continuous feedback for test automation suites, ensuring recurring issues are identified and resolved.
How It Improves Efficiency & Productivity:
✅ Reduces Manual Effort – Testers don’t need to manually create JIRA tickets for failed tests, saving time.
✅ Enhances Visibility – Each defect is automatically recorded, keeping stakeholders informed.
✅Faster Bug Resolution – Developers receive detailed error reports immediately, speeding up fix cycles.
✅ Better Test Coverage – Ensures all critical failures are captured and reported, maintaining software quality.
By eliminating manual defect tracking, this integration helps teams focus on fixing bugs rather than reporting them, significantly boosting productivity!
Step 1: Add JIRA Maven Dependency to the TestNG Project
To get started, include the JIRA client Maven dependency in your TestNG project.
Here’s how:
Navigate to your pom.xml file.
Add the Maven dependency for JIRA Client.
Build the project to ensure the dependency is correctly added.

Step 2: Set Up JIRA Integration
To enable automated defect logging, create a JIRA Service Provider class that connects to your JIRA instance. Use the JIRA REST API or a client library such as rcarz.jiraclient to handle authentication and ticket creation.

More fields can be added while logging defects like given in sample code below:
fluentCreate.field("summary", summary)
.field("description", description)
.field("priority", "High")
.field("assignee", "username")
.execute();
Step 3: Define a Custom Annotation
Use a Java annotation to flag test cases that should log defects when they fail
Any test case annotated with @JiraPolicy(logTicketReady = true) will trigger defect logging upon failure.
This is important to make sure that only valid failures and exceptions are logged as defects

Step 4: Implement a TestNG Listener
The TestNG Listener monitors test execution and automatically creates a JIRA ticket for flagged failures.
Full Implementation of ITestListener – Handles test lifecycle methods (start, success, failure, skip, execution start/finish).
Automated JIRA Logging on Failures – If @JiraPolicy (logTicketReady = true) is set, failed tests automatically create a JIRA ticket.
Stack Trace in Ticket Description – Captures full exception details to provide context for debugging.

How It Works...
Annotation Check: Uses @JiraPolicy to flag tests that should trigger defect logging.
Test Listener (TestJiraListener): Detects failed assertions and triggers JIRA defect creation.
JIRA Service Provider: Manages API calls for logging defects in JIRA.
Replace placeholders (your-username, your-api-token, project-key) with actual values to integrate with JIRA seamlessly.
NOTE: If you are using JIRA cloud then use API Token. Else, for JIRA client version give username and password.
How to obtain a JIRA API token?
Sign in to Atlassian: Visit Atlassian API Token Management and log into your JIRA account.
Generate a Token: Click Create API Token, then assign a name to the token.
Set Expiration: Choose a validity period (from 1 day to 1 year).
Copy & Secure: Once generated, copy and securely store the token, as it won't be visible again.
Use the Token for Authentication: Include the token in API requests instead of a password.
Step 5: Execute Tests
Apply the annotation in your test cases to enable defect logging(@JiraPolicy(logTicketReady = true) before every testcase.
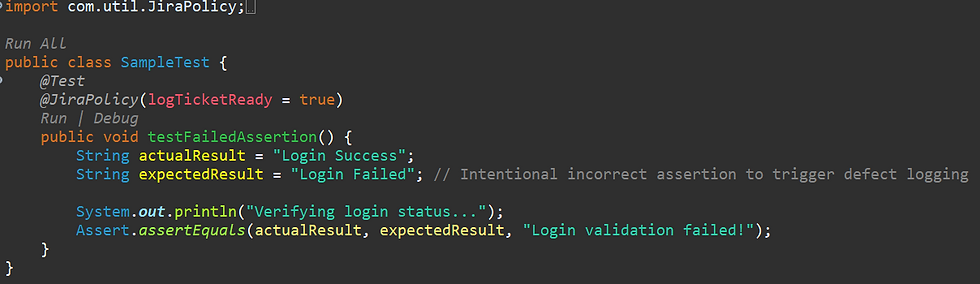
Configure TestNG to use the TestJiraListener via testng.xml.

Best Practices for Efficient Integration
Ensure JIRA API credentials are securely stored using environment variables.
Use JIRA issue types like Bug, Task, or Improvement for better defect categorization.
Implement failure threshold handling—log defects only for critical failures to avoid unnecessary tickets.
Potential Challenges & Troubleshooting
Authentication Issues – Fix by verifying API token validity and permissions.
Missing JIRA Fields – Ensure mandatory fields like summary, priority, and assignee are correctly populated.
Possible Drawbacks
❌ Overhead of Unnecessary Defect Logging – If not configured properly, minor or non-critical failures may flood JIRA with defects, leading to unnecessary workload.
❌ False Positives – Some failed assertions may not indicate actual bugs but test script issues, causing misleading defect reports.
❌ Authentication & API Limitations – JIRA API tokens need secure storage; improper management can lead to authentication failures or security risks.
❌ Configuration Complexity – Setting up annotations, listeners, and JIRA service providers requires precise implementation. Misconfiguration may cause defects not to log properly.
❌ Maintenance Challenges – As projects scale, managing the automation setup and adapting it to new JIRA workflows can be challenging.
❌ Potential Performance Impact – Logging each failure in JIRA adds execution time to test runs, especially in high-volume test suites.
Mitigation Strategies
✅ Filter Critical Failures – Log only high-impact defects by fine-tuning annotation-based defect logging.
✅ Regular Cleanup – Periodically review JIRA issues to remove false defects and streamline tracking.
✅ Optimized API Calls – Use batch processing for defect logging to reduce performance overhead.
✅ Secure Credential Storage – Store JIRA API tokens in encrypted environments to avoid leaks.
Conclusion:
By integrating TestNG with JIRA, teams can automate defect logging, reducing manual intervention and improving workflow efficiency. This implementation ensures that every failed assertion results in a well-documented defect report in JIRA, providing developers with critical debugging insights.


