A Comprehensive Guide to Administering Test Cases in Jira Using Zephyr Scale
Create new test cases manually using Zephyr in Jira.
When it comes to maintaining quality in projects, test cases are where we begin. In this section, we’ll dive into the essentials of working with test cases - how to create them manually and integrate them in to testing process in Jira using Zephyr tool.
A Test case is a component that has set of conditions, steps, and expected results used to determine specific functionality of an application that is working as expected.
After configuration of zephyr in Jira, we can see the app on left side panel in the selected project, for example DS_ALGO_Zephyr.
Step-by-Step creating Test Cases in the Zephyr.
Step 1: Launch the Zephyr.
Click on Zephyr app in project side bar. Zephyr application opens on right hand side with all the tabs like Test Cases, Test Cycles, Test Plans and Reports.
Step 2: Create Test Case Folders to organize.
Click on “New Folder” field under Test Cases tab to create folders to organize the different test cases based on modules.
For example, Registration and Login page of a web site these are two different modules, we can create two separate folders for each module, or we can create the test cases under "All test cases".
Another one more example is Data Structures , it has different modules like graph, stack, tree, Array and linked list. We can create separate folders for each module and these folders can be re-used accordingly.

Create a folder name and press enter

Here for example, created two folders for Graph and Stack modules.

Step 3: Create a Test Case.
Click on New Test Case. "Create Test Case" pop up window appears, fill the mandatory field "Name".
Name: We can write the title of the test case in this field. It provides the description of what the test case is about. For examples, "verify the user is able to land on login page", "Navigate to Graph TryEditor Window"
Objective: This gives the information about the purpose of the test case. It explains what feature is being verified.
Precondition: Tells us about what conditions must be satisfied before executing the test case.
For examples, The users must be registered first to login to any websites.
To execute Graph test cases first the user should be logged in to DS-ALGO portal.
Details: Details has Status, Priority, Owner, etc., needed fields can be filled as they were not mandatory

Status:The dropdown menu allows one to select from predefined options relevant to the test case requirement. Selecting "Draft" means that the test case is being developed but is not yet ready for execution. "Approved" the case is reviewed and ready for execution."Deprecated" The test case is invalid due to changes in the application or requirements.

Priority: The dropdown list allows one to select from predefined options relevant to the test case requirements.
Test cases marked with priority "High" must be given immediate attention and execute them to make sure timely validation of critical functionality. Normal and Low can be executed as part of the testing life cycle and Low can also be executed at the end of testing life cycle.

Owner: Here We can see to whom the test case is "Assigned" and if the test case is not assigned then Unassigned is selected.

Select Folder to save the test cases

Select the folder in which the test case need to be saved. Here "Graph TestCases" is selected to save the test case. Once selected we can see the folder name in Folder tab.

Selected folder name appears in Folder field.

Step 4: Save the Test Case.
Click on Create dropdown. We can see two options Create and Create and edit.
Create: Saves and Close the Create Test Case pop-up
Create and edit: Opens the Test Case window for editing on more tabs.

Select Create and click on it, the test case is saved.

"Create and edit". If we use this option, while creating the new test case it takes us to the "Test Case" page where we can add more details in Details , Test Script, Traceability, Execution, and History tabs.
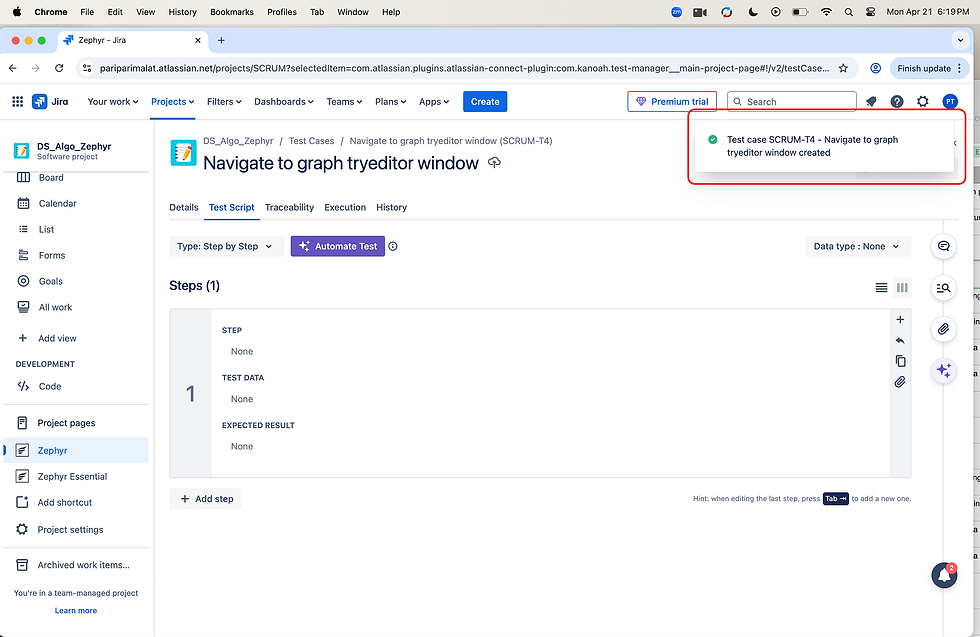
From the above example we see a prompt "Test Case SCRUM -T4 - Navigate to graph try editor window created". "Test Case SCRUM -T4 " is test case number or key automatically generated by the Zephyr.
"Navigate to graph try editor window " is test case Name.
Once the Create and edit is done, we can see the new test cases in Folder panel.
After creating the test case, we can see the new test case created under "Graph TestCases" Folder with status "Draft". We can also see "All test cases" contains the total number of test cases i.e., 1.

Create another "New test Case" under 'Graph TestCases" Folder with status "Approved". When new test case is created, we can see test case prompt on the screen. All test cases are now "2"

Step 5: Creating multiple test cases.
While creating new test case if we select "Create another test case" checkbox then after creating the test case it automatically opens the "Create Test Case" pop up window. If we are creating manually more than one test case we can select this checkbox so that we don't have to go back and click on "New Test Case".

Step 6: Display and Organize Test Cases
Click on Test Cases. We can find all the test cases created under folders, while creating a test case, if there is no specific folder selected then test cases created are saved under "All test cases".

If we want the test cases moved to specific folder then select those test cases and move to that folder.

Now "Graph TestCases(4)" folder contains 4 test cases, and "All test cases (4)".
Step 7: Review Status and assign to sprint.
This how it looks after creating test cases.

Some test cases are in Status DRAFT and APPROVED. The draft test cases are yet to be verified by team lead and moved to status APPROVED. The approved test cases can be moved to sprint life cycle in Jira and executed.
By following these steps we can efficiently create and manage test cases in Zephyr, ensuring organized, and quality oriented process for test management. This supports team collaboration and continuous improvement in the software testing life cycle.
This blog is intended to give you a better understanding of Zephyr Test Case and how it enhances test management.


